Yealink W90B User Manual
Dect ip multi-cell system
Hide thumbs
Also See for W90B:
- Quick start manual (28 pages) ,
- Recovery manual (18 pages) ,
- Getting started (17 pages)
Table of Contents
Advertisement
Advertisement
Table of Contents

Related Manuals for Yealink W90B


Summary of Contents for Yealink W90B
- Page 1 Yealink DECT IP Multi- Cell System User Guide...
-
Page 2: Table Of Contents
| Contents | ii Contents Getting Started.....................6 Hardware Overview..........................6 W90DM/W90B Hardware......................6 W59R Hardware........................7 W53H Hardware........................9 W56H Hardware........................11 CP930W Hardware......................... 12 DD Phone Hardware......................14 W59R/W56H/W53H Power LED Indicator................15 CP930W Mute Touch Key LED Indicators................15 Menu on the W59R/W56H/W53H..................... 16 Main Menu.......................... - Page 3 | Contents | iii Silencing a Call........................31 Rejecting a Call Manually.......................31 Rejecting Anonymous Calls....................31 Rejecting Calls with Do Not Disturb (DND)................32 Ending Calls............................32 Muting/Unmuting Audio........................32 Holding and Resuming Calls......................33 Holding a Call......................... 33 Resuming a Held Call......................33 Call Forward............................
- Page 4 | Contents | iv Deleting a Shared Contact..................... 48 Deleting All Shared Contacts....................49 Searching for Shared Directory Contacts................49 Saving a Shared Contact to the Local Directory..............49 Blocklist.............................. 49 Adding a Blocklist Contact..................... 50 Viewing Blocklist Contacts......................50 Editing a Blocklist Contact......................50 Deleting Blocklist Contacts.....................
- Page 5 | Contents | v Setting the Ring Tone........................62 Setting the Ring Tone for the External Calls................63 Setting the Advisory Tone......................... 63 Setting the Vibrator........................... 63 Setting the Key Tone......................... 64 Disabling the Noise Cancellation...................... 64 W59R Bluetooth..................64 Enabling / Disabling the Bluetooth....................64 Pairing Devices..........................65 Managing Paired Headsets.......................
-
Page 6: Getting Started
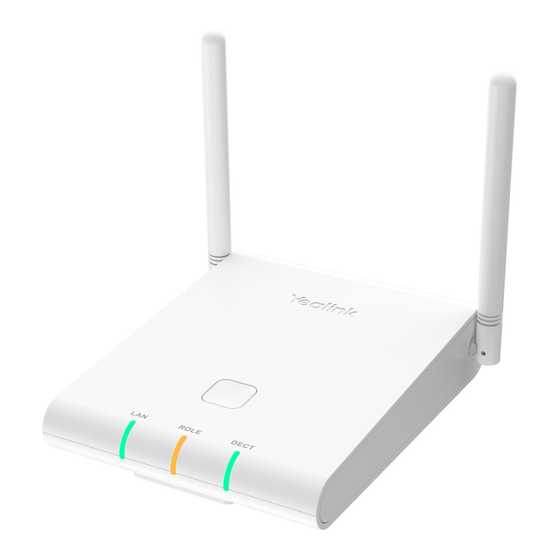
Menu on the W59R/W56H/W53H • Screen and Icons • Rechargeable Battery • Entering Characters Hardware Overview Understanding the phone hardware helps you easily use the phone's features. • W90DM/W90B Hardware • W59R Hardware • W53H Hardware • W56H Hardware • CP930W Hardware •... -
Page 7: W59R Hardware
• Indicates the power status. • Indicates the LAN connection status. ROLE LED Indicates the device role. DECT LED For W90B, indicates the connection status to the DECT manager (DM). W59R Hardware Item Description Receiver Receives audio in receiver mode. - Page 8 | Getting Started | 8 Item Description Speakerphone Key • Switches among the receiver, headset, and handsfree modes. • Answers an incoming call. • Places a call in handsfree mode. Navigation Keys Scroll through information or options on the screen. OK Key Confirms actions or enters the main menu.
-
Page 9: W53H Hardware
| Getting Started | 9 W53H Hardware Item Description Receiver Receives audio in receiver mode. Power LED Indicator Indicates call status, message status, and charging status. Phone Screen Shows information. Soft Keys Access the function directly. It depends on the operating situation. Message Key Accesses the voice mail or missed call. - Page 10 | Getting Started | 10 Item Description On-hook Key/Power Key • Press briefly to return to the previous screen. • Long press to return to the idle screen. • Press to turn the handset on. • Long press on the idle screen to turn the handset off. •...
-
Page 11: W56H Hardware
| Getting Started | 11 W56H Hardware Item Description Receiver Receives audio in receiver mode. Power LED Indicator Indicates call status, message status, and charging status. Phone Screen Shows information. Soft Keys Access the function directly. It depends on the operating situation. Message Key Accesses the voice mail or missed call. -
Page 12: Cp930W Hardware
| Getting Started | 12 Item Description On-hook Key/Power Key • Press briefly to return to the previous screen. • Long press to return to the idle screen. • Press to turn the handset on. • Long press on the idle screen to turn the handset off. •... - Page 13 | Getting Started | 13 Item Description Three Internal Provide 20-feet (6 meters) and 360-degree sound pickup. Microphones Mute Touch Key • Toggles mute feature. • Indicates phone and call status. Speaker Provides speakerphone audio output. LCD Screen Shows information about calls, messages, soft keys, time, date and other relevant data.
-
Page 14: Dd Phone Hardware
| Getting Started | 14 Item Description Scrolls through the displayed information upwards. • Scrolls through the displayed information downwards. • Views the Directory list when the phone is idle. Security Slot Allows you to connect a universal security cable to your phone so you can lock down your phone. -
Page 15: W59R/W56H/W53H Power Led Indicator
Reversible Tab Secures the handset in the handset cradle when the phone is mounted vertically. For more information on how to adjust the reversible tab, refer Yealink Wall Mount Quick Installation Guide for Yealink IP Phones. Hookswitch Connects or disconnects the phone from the phone line. The hookswitch is automatically activated when a user lifts the handset from the cradle to get a dial tone. -
Page 16: Menu On The W59R/W56H/W53H
| Getting Started | 16 LED Status Description Solid red The phone is initializing. The phone is muted. Flashing red The phone is ringing. Solid green The phone is placing a call. There is an active call on the phone. Flashing green The call is placed on hold or is held. -
Page 17: Submenu
| Getting Started | 17 Description Menu icon: : Status—To view the status information of DM, handset, and line. : Intercom—Not available in the multi-cell system. : Voice Mail—To set and view voice mail(s). : Call Features—To access the features of Call Forward, Do Not Disturb, Call Waiting, Anon.Call Rejection, and Anonymous Call. -
Page 18: Returning To Idle Screen
| Getting Started | 18 • Accessing a Submenu Feature Accessing a Submenu Feature After entering a certain menu, you can use the navigation keys to access the desired submenu. Procedure 1. Press the up and down navigation keys to highlight the desired submenu. 2. - Page 19 | Getting Started | 19 W59R/W56H/W53H: CP930W: DD Phone: Default Account: Indicates the local name or number. • Signal Strength: • Weak to strong: (W59R/W56H/W53H), (CP930W), (DD phone) No reception: Eco mode+ is on: • Battery Status: Low to full: (W59R/W56H/W53H), (CP930W) Need Charging:...
-
Page 20: Icons On The Idle Screen
| Getting Started | 20 Handset Name: Displays the registered handset name. • Soft Keys: The soft key labels on the screen directly above the soft keys show the functions available at • that particular moment. Icons on the Idle Screen By viewing the icons on the idle screen, you can easily get the current phone status, such as message status. -
Page 21: W59R/W56H/W53H Line Status Screen
| Getting Started | 21 Icons Description Icons Description The phone is in the handset mode. The phone has missed calls. The phone is in the headset mode. The phone is locked. The phone is in the Speakerphone The private line registers successfully. (hands-free) mode. -
Page 22: Rechargeable Battery
| Getting Started | 22 Icons Description Icons Description Call Forward Do Not Disturb (DND) Anonymous call rejection is enabled Anonymous call is enabled Rechargeable Battery The CP930W phone comes with a charged battery, but it may need recharging to full capacity depending on how long it has been in storage. -
Page 23: Entering Data On The Cp930W/Dd Phone
| Getting Started | 23 Task Action Switch among input Press to switch among input modes. modes. The current input mode is displayed at the right bottom of the phone screen. Enter letters. Press a key one or more times (depending on what input mode you’re in) to enter the possible characters that are displayed on the keypad key. -
Page 24: Registering The Handset
| Registering the Handset | 24 Task Action Delete one or more On the DD phone, position the cursor to the right of the character, and characters select the Delete soft key. On the CP930W, press the Delete soft key. Note: 2aB is only applicable to the DD phone. -
Page 25: Selecting A System To Connect
| Call Features | 25 Selecting a System to Connect You can connect the handset to a desired system manually, or allow the handset to connect the registered system with the greatest signal strength automatically. About this task It is only applicable to W59R/W56H/W53H. Procedure 1. -
Page 26: Placing A Call From The Call History
| Call Features | 26 • Placing an External Call • Placing Multiple External Calls Placing an External Call Procedure 1. Enter the desired number using the keypad. 2. Press the OK key to dial out. Placing Multiple External Calls When you are in a call, you can hold your current call and place a new call. -
Page 27: Speed Dial On The Dd Phone
| Call Features | 27 Assigning a Speed Dial Number You can assign a contact number as a speed dial number to the digit key. A maximum of 8 speed dial numbers are allowed. Before you begin The assigned number should exist in the directory. Procedure 1. -
Page 28: Redial
| Call Features | 28 • Configuring a Speed Dial Key Configuring a Speed Dial Key You can set a line key as a Speed Dial key for a contact number. Procedure 1. Go to Menu > Features > Dsskey. 2. -
Page 29: Placing An Anonymous Call
| Call Features | 29 About this task It is only applicable to W59R/W56H/W53H. Procedure 1. Press when the handset is idle to access the redial list. 2. Highlight the desired record. 3. Press Options, and then select Add To Local > New Entry. 4. -
Page 30: Answering Calls
| Call Features | 30 2. Select the desired line. The phone screen displays the outgoing lines currently assigned to the handset. The default outgoing line is highlighted and followed by a left arrow. 3. Enable local anonymous. 4. Confirm the action. 5. -
Page 31: Disabling Call Waiting
| Call Features | 31 About this task It is only applicable to W59R/W56H/W53H. Procedure 1. Go to OK > Settings > Telephony > Auto Answer. 2. Press Change to select the Auto Answer check box (the default status is checked). Disabling Call Waiting If the call waiting feature is disabled, when there is already a call, the new incoming call will be rejected automatically. -
Page 32: Rejecting Calls With Do Not Disturb (Dnd)
| Call Features | 32 Procedure 1. Go to OK > Call Features > Anon.Call Rejection. On the CP930W, go to Menu > Features > Anon.Call Rejection. On the DD phone, go to Menu > Features > Anonymous Call. 2. Enable local anonymous rejection. 3. -
Page 33: Holding And Resuming Calls
| Call Features | 33 Holding and Resuming Calls You can place an active call on hold and resume the call when you are ready. When you place a call on hold, the held party may hear the music played by its sever. •... -
Page 34: Transferring Calls
| Call Features | 34 4. If you select the No Answer (No Answer Forward), select the desired ring time to wait before forwarding from the After Ring Time field. 5. Confirm the action. Transferring Calls During a call, you can transfer the call to another contact. You can use one of three ways: Blind Transfer: Transfer a call directly to the third party without consulting. -
Page 35: Local Conference
| Call Features | 35 • Network Conference Local Conference You can initiate a three-way (including yourself) conference calls with your contacts on the phone. • Setting Up a Local Conference Call • Merging Two Calls into a Conference • Muting/Unmuting a Conference Call •... - Page 36 | Call Features | 36 • Creating a Hybrid UC Meeting with Mobile Phone and PC Creating a Hybrid UC Meeting with Mobile Phone When you are talking on your mobile phone and want to invite colleagues, you can create a hybrid UC meeting on the phone.
-
Page 37: Network Conference
| Call Features | 37 Network Conference If your system administrator has set a network conference feature on your phone, you can initiate a conference with two or more contacts. • Setting Up a Network Conference • Inviting another Party into an Active Conference Call •... -
Page 38: Recording Using An Sd Card
By default, you can record your calls into an SD card so that you can listen to them later. For more information on how to attach an SD card, please refer to the Quick Start Guide for your phone on Yealink Support. -
Page 39: Stopping A Recording
| Call Features | 39 2. Select Re REC to resume a recording. Note: If you hold the call during the recording, none of the parties will be recorded until you resume the call. Stopping a Recording You can stop recording a call before the call ends. The recording also stops when the active call ends. The recording will be saved as a "*.aac"... -
Page 40: Viewing The Available Recording Time
| Advanced Call Features | 40 Fast Forwarding/Rewinding a Playback While a recording plays, you can fast forward or rewind the playback at any time. Procedure Do the following: • Select to skip forward the playback. Tap once to skip forward 1 minute. •... -
Page 41: Parking Or Retrieving A Call In The Fac Mode
| Advanced Call Features | 41 Parking or Retrieving a Call in the FAC Mode You can park the call to the local extension or the desired extension through dialing the park code. • Parking a Call in the FAC Mode •... -
Page 42: Retrieving A Call With A Retrieve Key
Shared Call Appearance (SCA) Yealink phone supports using Shared Call Appearance (SCA) to share a line. So that this line can be registered on more than one phone at the same time. Your system administrator can set your phone to use the shared line. -
Page 43: W59R/W56H/W53H State Indicator Of Shared Line
| Advanced Call Features | 43 • Placing a Call on Public Hold • Placing a Call on Private Hold • Retrieving a Held Call on a Shared Line • Barging in an Active Call on a Shared Line • Pulling a Shared Call on a Shared Line W59R/W56H/W53H State Indicator of Shared Line If your system administrator assigns the shared line to your handset, the SCA with an icon is displayed on... -
Page 44: Placing A Call On Private Hold
| Advanced Call Features | 44 Procedure During a call, select Options > Hold. On the CP930W/DD phone, select Hold. Placing a Call on Private Hold You can place a call on private hold that only you on shared line can retrieve the held call. Procedure During a call, select Options >... -
Page 45: Voice Mail
| Advanced Call Features | 45 It is not applicable to CP930W. Procedure 1. Enter the call pull feature access code (for example, *11). 2. Press the OK key to dial out. Voice Mail Voice Mail feature allows you to leave voice mails for someone or listen to your voice mail messages on your IP phones. -
Page 46: Directory
| Directory | 46 Directory The phone provides several types of phone directories, which can be customized by your system administrator. • Local Directory • Shared Directory • Blocklist • Remote Phone Book Local Directory You can store up to 100 contacts in the handset's Local Directory, as well as add, edit and delete a contact. •... -
Page 47: Deleting Contacts
| Directory | 47 Procedure 1. Go to OK > Directory or OK > Directory > Local Directory. On the CP930W/DD phone, select Directory or go to Directory > Local Directory. 2. Highlight the desired contact and select Options > Edit. On the CP930W/DD phone, select Options (Option) >... -
Page 48: Shared Directory
| Directory | 48 Shared Directory All handsets that are registered on the same DM can share the contacts with each other. You can store up to contacts in your phone’s Shared Directory. It is not applicable to DD phones. Note: Check with your system administrator to find out if this feature is available on your phone. -
Page 49: Deleting All Shared Contacts
| Directory | 49 3. Confirm the action. Deleting All Shared Contacts You can delete all contacts from the Directory. Procedure 1. Go to OK > Directory > Shared Directory. On the CP930W, go to Directory > Shared Directory. 2. Highlight a contact and select Options > Delete All. The phone prompts you whether to delete all contacts. -
Page 50: Adding A Blocklist Contact
| Directory | 50 Adding a Blocklist Contact You can add a blocklist contact on the phone to prevent someone from calling you. Procedure 1. Go to OK > Settings > Telephony > Blocklist. On the DD phone, go to Menu > Directory > Blacklist. On the CP930W, go to Menu >... -
Page 51: Remote Phone Book
| Directory | 51 Procedure 1. Go to OK > Settings > Telephony > Blocklist. On the DD phone, go to Menu > Directory > Blacklist. On the CP930W, go to Menu > Settings > Basic Settings > Blacklist. 2. Highlight the desired blocklist contact and select Options > Delete. Deleting All Blocklist Contacts You can delete all contacts from the Blocklist when you are ready to answer calls from them again. -
Page 52: Saving A Remote Phone Book Contact To The Local Directory
| Call History | 52 Saving a Remote Phone Book Contact to the Local Directory You can save any remote phone book contact to the Local Directory, to conveniently call this contact when you cannot access the Remote Phone Book. Procedure 1. -
Page 53: Viewing History Records
| Call History | 53 Viewing History Records The history record saves the call information such as the caller's name and number, local line and call duration. Procedure 1. Press History. 2. Select the desired list. 3. Highlight the desired entry and select Options(Option) > Detail. Saving a History Record to Local Directory To identify someone's call the next time, you can save a history record to the Local Directory. -
Page 54: Deleting A Call Record
| Customizing Your Phone | 54 Deleting a Call Record You can delete any call record from the call history list. Procedure 1. Press History. 2. Select the desired list. 3. Highlight the desired entry and select Options > Delete. On the DD phone, highlight the desired entry and select Delete. -
Page 55: Turning Handset Off
| Customizing Your Phone | 55 About this task It is only applicable to W59R/W56H/W53H/CP930W. Procedure Do one of the following: • Press the On-hook key. The handset screen lights up. On the CP930W, long press the On-hook key. The mute touch key glows red and then the handset screen lights up. -
Page 56: Changing The W59R/W56H/W53H/Cp930W Brightness
| Customizing Your Phone | 56 Procedure 1. Go to OK > Settings > Display > Screen Saver. 2. Press Change to select the Screen Saver check box (the default status is checked). Changing the W59R/W56H/W53H/CP930W Brightness For W59R/W56H/W53H, the handset backlight in charger or out of charger can be configured independently. -
Page 57: Changing The Language
| Customizing Your Phone | 57 Procedure 1. Go to OK > Settings > Display > Keypad LED. 2. Press Change to select the Keypad LED check box (the default status is checked). Changing the Language Your phone supports several languages that you can choose to use on the phone. Before you begin Contact your system administrator to find out exactly which languages are supported on your phone. -
Page 58: Customizing The Soft Keys
| Customizing Your Phone | 58 Procedure 1. Go to OK > Settings > Display > Time Format or Date Format. On the DD phone, go to Menu > Settings > Basic Settings > Time & Date > Time & Date Format. On the CP930W, go to Menu >... -
Page 59: Customizing The Shortcuts
| Customizing Your Phone | 59 Shortcut Default Access Feature Available Access Features Left Softkey History History Right Softkey Line Status Missed Intercom (not available in the Received multi-cell system) Redial Directory Speed Dial Volume- Menu Volume+ Line Status Default Line Call Forward Do Not Disturb Directory... -
Page 60: Locking Handset Keypad
| Customizing Your Phone | 60 • Unlocking Your Handset Locking Handset Keypad When you temporarily do not use your handset, you can lock it manually. Procedure Long press the # key when the handset is idle until the phone prompts you the handset is locked. The lock icon appears in the status bar. -
Page 61: Locking Your Phone Manually
| Customizing Your Phone | 61 5. Enter the desired interval (0 - 3600 seconds) in the Lock Time Out field. If the value is set to 0, the phone will not be automatically locked. 6. Confirm the action. Locking Your Phone Manually You can lock the phone manually before the phone is automatically locked. -
Page 62: Switching On Silent Mode
| Audio Settings | 62 Switching on Silent Mode You can silence an incoming call by switching on silence mode to stop your phone from ringing. Procedure Long press the * key until the phone prompts “All Ring Tones Off”. The silent icon appears in the status bar. -
Page 63: Setting The Ring Tone For The External Calls
| Audio Settings | 63 Setting the Ring Tone for the External Calls You can select a unique ring tone for the external calls so that you can identify callers when the phone rings. Procedure 1. Go to OK > Settings > Audio > Ring Tones > Melodies. On the CP930W, go to Menu >... -
Page 64: Setting The Key Tone
| W59R Bluetooth | 64 Vibrate then Ring: The handset will vibrate four times and then start ringing. • • Note: If the silent mode is activated, the handset will not vibrate and ring. Procedure 1. Go to OK > Settings > Audio > Vibrator. 2. -
Page 65: Pairing Devices
| W59R Bluetooth | 65 Procedure 1. Go to OK > Settings > Bluetooth. 2. Select Enabled / Disabled from the Bluetooth field. 3. Confirm the action. Pairing Devices Before you begin Make sure that Bluetooth is enabled. Procedure 1. Go to OK > Settings > Bluetooth. 2. -
Page 66: Connecting A Mobile Phone To Your Cp930W Via Bluetooth
Bluetooth-enabled mobile phone. Before you begin Make sure you have activated the Bluetooth mode and made the phone discoverable. Procedure 1. Scan and pair the phone from the Bluetooth-enable mobile phone (the default device name of your phone is "Yealink-CP930W"). -
Page 67: Enabling The Phone Audio
| Connecting a Mobile Phone to your CP930W via Bluetooth | 67 2. Select OK when the phone prompts the connection passkey. Related tasks Activating the Bluetooth Mode Making the Phone Discoverable Enabling the Phone Audio When you enable the phone audio, the phone can act as a speaker and microphone for your connected mobile phone. -
Page 68: Editing Device Name Of Your Phone
| Connecting a Mobile Phone to your CP930W via Bluetooth | 68 • Place a call. Tap , and then tap Switch to switch to the Bluetooth channel. Place a call or multiple calls to the mobile contact. • Answer a call. An incoming call to your mobile phone is also shown on the phone, you can answer the call on the phone. -
Page 69: Disconnecting The Bluetooth Device
Merge phone calls, the PC and connected mobile phone into a hybrid UC conference. • Answer calls from the softphone. Note: You can install a softphone (for example, Yealink VC Desktop) on PC to make calls. It is only applicable to CP930W. •... -
Page 70: Connecting The Pc To The Phone
Setting the Phone as PC Audio Device via Softphone When your PC is connected to the phone, you can set the phone as a PC audio input and an output device via the softphone, for example, Yealink VC Desktop. Procedure 1. -
Page 71: Placing Calls Via Pc
3. Click Microphone (Yealink CP930W Speakerphone) and click Set as Default Device. 4. Confirm the action. Placing Calls via PC If you have installed a softphone (for example, Yealink VC Desktop) on PC, you can place calls and the phone acts as a microphone and a speaker. Before you begin Make sure you have set your phone as the PC audio device. -
Page 72: Investigating Warnings
| Maintaining Your Phone | 72 • Investigating Warnings • Resetting the Handset • Rebooting the Handset Investigating Warnings When the default password is used on the phone, you can view the warning details about the issue from Status screen. Procedure Go to OK >... -
Page 73: Appendix
| Appendix | 73 Appendix • Appendix A- Menu Structure • Appendix B - Input Modes and Characters • Appendix C - Bluetooth Headset Compatibility List Appendix A- Menu Structure • For W59R • For W56H/W53H • For CP930W • For DD Phone For W59R Note: The menus in the gray box are not available when the handset is not registered to a base... -
Page 74: For W56H/W53H
| Appendix | 74 For W56H/W53H Note: The menus in the gray box are not available when the handset is not registered to a base station. -
Page 75: For Cp930W
| Appendix | 75 For CP930W Note: The menus in the gray box are not available when the handset is not registered to a base station. -
Page 76: For Dd Phone
| Appendix | 76 For DD Phone Note: The menus in the gray box are not available when the handset is not registered to a base station. Appendix B - Input Modes and Characters (initials ΑΒΓ абв АБВ אבג SŚŠ sśš... -
Page 77: Appendix C - Bluetooth Headset Compatibility List
| Appendix | 77 (initials ΑΒΓ SŚŠ sśš абв АБВ אבג AÄÅ aäå capitals) TŤUÚÜ tťuúü ШЩ TUÙÚÛ tuùúû ΤΥΦ8 шщъы8 צץק TUVtuv8 8 TUV8 tuv8 ЪЫ8 ÜŨV8 üũv8 ŰŮV8 űův8 WŴX wŵx WXYỲÝ wxyỳý WXYZ WXYZ9Wxyz9 ΧΨΩƔ9 ЬЭЮЯ9 ьэюя9 סעפף... - Page 78 | Appendix | 78 Brands Type Model EZX 60 MB660 UC VOYAGER 4210 UC ML20 ML25 Plantronics Bluetooth M165 Edge B825(Focus) Iphone Bluetooth Apple AirPods...
Need help?
Do you have a question about the W90B and is the answer not in the manual?
Questions and answers