Table of Contents
Advertisement
Quick Links
r.LiNK Video-inserter
RL5-UCON65
Compatible with
Fiat 500, 500L, 500X
Jeep Renegade
Alpha Romeo Giulietta vehicles
with Uconnect 6,5 inch monitors (VP3 + VP4)
Video-inserter with 1 video inputs and 1 rear-view camera input
Product features
Video-inserter for factory infotainment systems
1 CVBS video-input for after-market devices (e.g. DVD-Player, DVB-T tuner)
1 CVBS rear-view camera video-input
Automatic switching to rear-view camera input on engagement of reverse gear
Video-in-motion in drive mode (ONLY for connected video-sources)
Video-inputs NTSC / PAL compatible
Version 18.09.2018
HW (V30)
RL5-UCON65
Advertisement
Table of Contents

Subscribe to Our Youtube Channel
Related Manuals for NavLinkz RL5-UCON65


Summary of Contents for NavLinkz RL5-UCON65
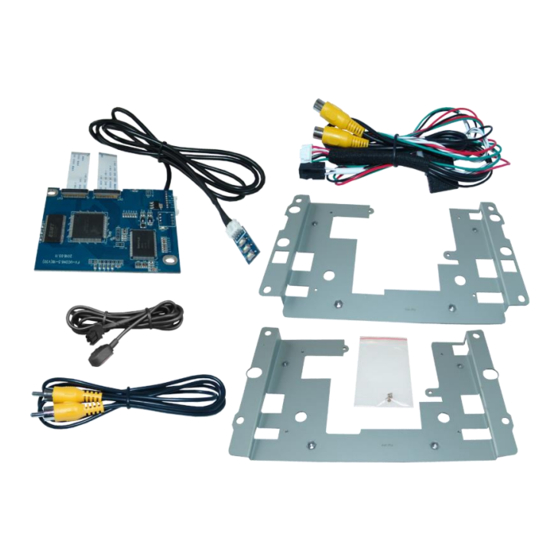
- Page 1 Video-inserter RL5-UCON65 Compatible with Fiat 500, 500L, 500X Jeep Renegade Alpha Romeo Giulietta vehicles with Uconnect 6,5 inch monitors (VP3 + VP4) Video-inserter with 1 video inputs and 1 rear-view camera input Product features Video-inserter for factory infotainment systems ...
-
Page 2: Table Of Contents
To receive a free update, the interface must be sent in at own cost. Labour cost for and other expenses involved with the software-updates will not be refunded. Version 18.09.2018 HW (V30) RL5-UCON65... -
Page 3: Prior To Installation
The interface inserts ONLY video signals into the infotainment. For audio insertion factory-audio-AUX-input or a FM-modulator is required. Factory rear-view camera Automatic switch to factory rear-view camera only while reverse gear is engaged. To delay the switch reset, additional electronics is required. Version 18.09.2018 HW (V30) RL5-UCON65... -
Page 4: Connectors - Video Interface (Daughter Pcb)
If power source is not taken directly from the battery, the connection has to be checked for being start-up proven and permanent. 2.1. Place of installation Both daughter PCB shell be installed and connected inside the head unit’s housing by using one of the delivered exchange metal plates. Version 18.09.2018 HW (V30) RL5-UCON65... -
Page 5: Connection Scheme
2.2. Connection Scheme Version 18.09.2018 HW (V30) RL5-UCON65... -
Page 6: Installation - Daughter Pcb
2.3. Installation – daughter PCB Remove the factory head unit and carry out the following mounting-steps. Version 18.09.2018 HW (V30) RL5-UCON65... - Page 7 VP4 Frame suitable for: Fiat 500X (334), 500L (330), Jeep Renegade, Alpha Romeo Giulietta VP3 Frame suitable for: Fiat 500 (312) Version 18.09.2018 HW (V30) RL5-UCON65...
-
Page 8: Warning Notes, Concerning The Installation Of Ribbon Cables
180° position to the connector. Each deviation from a perfect contact position will curse faulty contact and even danger of short circuit 2) The ribbon cable’s contacting side always has to correspond to the contacting side of the connector, concerning the mounting position. Version 18.09.2018 HW (V30) RL5-UCON65... -
Page 9: Connection - 6Pin Interface Cable
Connect the 6pin interface cable’s single red colored wire to S-Contact terminal 86s +12V (e.g. glove compartment illumination). Connect the 6pin interface cable’s single green colored wire to +12V reverse signal (see following chapter). Connect the 6pin interface cable’s black wire to vehicle Ground. Version 18.09.2018 HW (V30) RL5-UCON65... -
Page 10: After-Market Rear-View Camera
(87). Connect the reverse light’s power to the relay’s coil terminal (85). Connect permanent power to the relay’s input terminal (30). Connect vehicle’s ground to the relay’s coil terminal (86). Version 18.09.2018 HW (V30) RL5-UCON65... -
Page 11: Connection - Video Inputs
Connect the rear-view camera’s RCA to the female RCA „Camera IN“ of the 6pin interface cable. Connect the RCA of the video source to the female RCA „Video IN1“ of the 6pin interface cable. Version 18.09.2018 HW (V30) RL5-UCON65... -
Page 12: Connection - External Keypad
Connect the keypad’s female 4pin connector to the male 4pin connector of the 6pin interface cable. 3. Interface operation by external keypad Use the external keypad to switch to the connected video source. Each press will switch between the factory video and the connected video source. Version 18.09.2018 HW (V30) RL5-UCON65... -
Page 13: Picture Settings
Contrast Brightness Saturation Position H (horizontal) Position V (vertical) IR-AV1/2 (no function) Guide L/R (no function) UI-CNTRL (no function) Size H/V (picture size horizontal/vertical) Note: To adjust the reverse picture settings, engage the reverse gear. Version 18.09.2018 HW (V30) RL5-UCON65... -
Page 14: Specifications
Video input 0.7V - 1V Video input formats NTSC / PAL RGB-video amplitude 0.7V with 75 Ohm impedance Temperature range -40°C to +85°C Dimensions PCB 90x 68 x 10 mm (W x H x D) Version 18.09.2018 HW (V30) RL5-UCON65... -
Page 15: Faq - Trouble Shooting, Rl5 Interface Functions
The grey wire of the 6pin Apply +12V from the reverse light. Use a relay or camera input when reverse cable doesn’t receive the electronics to "clean" reverse gear lamp power. gear is engaged. +12V reverse signal Version 18.09.2018 HW (V30) RL5-UCON65... -
Page 16: Technical Support
Technical Support Please note that direct technical support is only available for products purchased directly from NavLinkz GmbH. For products bought from other sources, contact your vendor for technical support. NavLinkz GmbH distribution/tech dealer-support Eurotec-Ring 39 D-47445 Moers +49 2841 949970 Email mail@navlinkz.de...
Need help?
Do you have a question about the RL5-UCON65 and is the answer not in the manual?
Questions and answers