
Related Manuals for Ricoh FAX2500L


Summary of Contents for Ricoh FAX2500L
- Page 1 OPERATOR’S MANUAL RICOH FAX4500L A laser recording facsimile with dual access, expandable memory, and optional Group 4 Please read all of these instructions and keep this manual by your machine.
- Page 2 Optional Equipment ISDN Kit This allows you to send and receive messages using the ISDN. Memory Either a 1-Mbyte memory card, a 2-Mbyte memory card, or a 20 Mbyte hard disk can be added. Paper Feed Unit Up to 4 extra 500-sheet paper feed units can be added to the machine. Also, this option allows you to use A4, A5, or B4 size paper;...
- Page 3 IMPORTANT SAFETY INSTRUCTIONS 1. Read all of these instructions. 2. Save these instructions for later use. 3. Follow all warnings and instructions marked on the product. 4. Unplug this product from the wall outlet before cleaning. Do not use liquid cleaners or aerosol cleaners.
-
Page 4: Table Of Contents
CONTENTS INTRODUCTION WHAT DOES A FAX MACHINE DO? BAD TELEPHONE LINES AFFECT FAX COMMUNICATION HOW TO USE THIS MANUAL CONVENTIONS STORING TELEPHONE NUMBERS STORING NAMES AND LABELS IF YOU MAKE A MISTAKE FACSIMILE FEATURE AVAILABILITY TABLE LIMITATIONS ON VARIOUS FEATURES GENERAL PRECAUTIONS POWER AND GROUNDING COLD WEATHER POWER-UP... - Page 5 1-8. Redialling 2. RECEIVING FAX MESSAGES 2-1. Selecting the Reception Mode 2-1-1. Manual Receive (TEL) Mode 2-1-2. Auto Receive (FAX) Mode 2-2. Substitute Reception 2-3. Confidential Reception (Memory Card or Hard Disk Required) 3. USING THE MACHINE FOR TELEPHONE CALLS 3-1.
- Page 6 3-7. Chain Dialling 3-8. Restricted Access 3-9. Counters 3-10. Communication Result Display 3-11. Length Reduction 3-12. Label Insertion 3-13. Ordering Toner SECTION 4. PROGRAMMING THE MACHINE 1. PROGRAMMING AT INSTALLATION 1-1. Language Selection 1-2. Date and Time 1-3. Country Code 1-4.
- Page 7 SECTION 5. PRINTING REPORTS 1. AUTOMATICALLY PRINTED REPORTS 1-1. Table of the Reports 1-2. Report Formats 2. USER-INITIATED REPORTS 2-1. Journal 2-2. File List 2-3. Quick Dial List 2-4. Speed Dial List 2-5. Group Dial List 2-6. Program List 2-7. User Function List 2-8.
- Page 8 APPENDIX APPENDIX A. PAPER FEED UNIT APPENDIX B. HARD DISK UNIT 1. PRECAUTIONS 2. GENERAL 3. OPERATION 4. SPECIFICATIONS APPENDIX C. ISDN OPTION TYPE 40 1. INTRODUCTION 2. OPERATION 3. TROUBLESHOOTING INDEX FUNCTION LIST QUICK REFERENCE NOTICE TO USERS...
-
Page 9: Introduction
INTRODUCTION Thank you for purchasing this product. This compact machine is ideal for growing businesses, branch offices, or those users who wish to upgrade to a plain paper fax machine with a wide range of features. WHAT DOES A FAX MACHINE DO? When you write a letter, you normally seal it in an envelope, attach a stamp, and post it in the near- est letter box. -
Page 10: How To Use This Manual
HOW TO USE THIS MANUAL This manual contains instructions on how to operate and take care of the ma - chine. To get the best performance from the machine, read the descriptions of the features in the Facsimile Features Manual, and follow the instructions in the Op - erator’s Manual carefully. -
Page 11: Storing Telephone Numbers
HOW TO USE THIS MANUAL Most procedures start from standby mode, MEMORY TRANS 4 APR 12:25 that is, when the display is as shown on the SET DOCUMENT right. The value after "MEMORY" shows MEMORY 100% how much memory space is remaining. If a procedure does not start at standby mode, the display at the start of the proce - dure is shown. -
Page 12: If You Make A Mistake
HOW TO USE THIS MANUAL Punctuation Marks and Symbols SELECT P 1/5 If you press while entering a label, a 2" 6& menu of symbols will appear, as shown 7’ TO CANCEL on the right. To select a symbol, press the required key on the ten-key pad. For example, if you wish to enter a ’#’, press If the symbol that you need is not on the screen, scroll through the pages of ↑... -
Page 13: Facsimile Feature Availability Table
HOW TO USE THIS MANUAL FACSIMILE FEATURE AVAILABILITY TABLE This table shows whether a feature is available or not in your machine. Some of these features have to be switched on before they can be used, or may be switched off if not wanted. The "Reference" column of the following table shows where you can find information on how to activate such features. - Page 14 HOW TO USE THIS MANUAL FACSIMILE FEATURES MANUAL NOTE REFERENCE FEATURE NAME AND SECTION NUMBER Handset On Hook Dial Speakerphone Music on Hold ADVANCED FEATURES Sect. 2 Broadcasting Keystroke Programs Confidential Transmission Confidential Reception Transfer Request Memory or hard disk required if the machine will be used as the transfer broadcasting station.
- Page 15 HOW TO USE THIS MANUAL FACSIMILE FEATURES MANUAL NOTE REFERENCE FEATURE NAME AND SECTION NUMBER AI Short Protocol 3-23 Service Dedicated Transmission Parameters 3-24 Service MDF (Manual Document Feed) 3-25 Chain Dialling 3-26 Tonal Signals 3-27 Memory Lock 3-28 User: p. 71 Wild Cards 3-29 File Management...
- Page 16 HOW TO USE THIS MANUAL FACSIMILE FEATURES MANUAL NOTE REFERENCE FEATURE NAME AND SECTION NUMBER Polling Result Report User: p. 73 Polling Clear Report 1-10 User: p. 73 Confidential File Report 1-11 User: p. 71 Transmission Deadline Report 1-12 Polling Confirmation List Journal Quick Dial List Speed Dial List...
-
Page 17: Limitations On Various Features
HOW TO USE THIS MANUAL LIMITATIONS ON VARIOUS FEATURES The tables on the next two pages show the limitations for each feature. Limitations for some features can be changed by a service technician. COMMUNICATION PAGE MAX. NUMBER OF TOTAL TOTAL MAX. - Page 18 HOW TO USE THIS MANUAL OTHER FEATURES MAXIMUM VALUE NOTES Redial Number of times: 253 Default settings: times Memory transmission Intervals: 40 minutes 4 times/5 minutes Immediate transmission 2 times/2 minutes Keystroke Programs Authorized Reception 50 RTI/CSIs Forwarding 5 forwarding stations 30 RTI/CSIs Multi-sort Document Re - 9 copies...
-
Page 19: General Precautions
GENERAL PRECAUTIONS WARNING: Do not attempt any maintenance or troubleshooting other than that mentioned in this manual. This machine contains a laser beam generator and direct exposure to laser beams can cause permanent eye damage. POWER AND GROUNDING Pay attention to the following. Power Supply 1. -
Page 20: Cold Weather Power-Up
GENERAL PRECAUTIONS COLD WEATHER POWER-UP Avoid raising the room temperature abruptly when it is below 14 ° C, or condensation may form inside the machine. 1. Raise the room temperature to 20 ° C at less than 10 ° C per hour. 2. -
Page 21: Copy Paper
GENERAL PRECAUTIONS COPY PAPER 45-90 g/m copy paper is recommended: A4, A5, B4 Do not use damp paper, or copies will be defective. Keep in a vinyl bag if it will not be used for a long time. Store in a dry, cool, dark place. Store flat. -
Page 22: Location
GENERAL PRECAUTIONS LOCATION For the best possible performance, install your machine in a place which satisfies the following conditions. Not exposed to direct sunlight Well ventilated (air turnover at least three times per hour) Level Not subject to vibration Away from other electronic equipment, to 10 cm avoid interference Away from areas containing corrosive... -
Page 23: Section 1. Component Guide
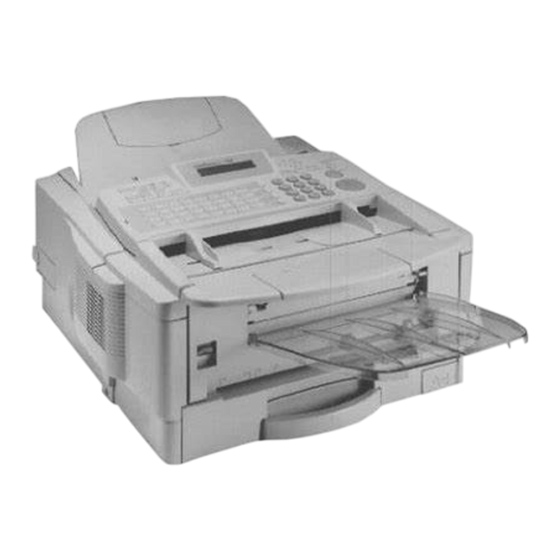
SECTION 1. COMPONENT GUIDE 1. EXTERNAL VIEW Document Guide Scanner Release Document Table Lifting Handle Operation Panel Front Cover Release Telephone: optional Cassette Manual Feed Button Copy Tray Document Tray Lower Cassette(s) or Drawers: optional (see the next page). Up to 4 units can be added below the upper cassette. -
Page 24: Operation Panel
SECTION 1. COMPONENT GUIDE 2. OPERATION PANEL... - Page 25 SECTION 1. COMPONENT GUIDE Lights when the power switch is on. Power Indicator Lights when a fax message is being transmitted or received. Communicating Indicator Lights when an incoming message was received into memory Receive File because the machine was out of paper or jammed. Indicator Lights when a confidential file has been received and stored in Confidential File...
- Page 26 SECTION 1. COMPONENT GUIDE Displays prompts, warnings, and selected modes. Display Press to use one of the numbered functions. Function Key Yes/No Keys Use to answer questions on the display When an arrow is shown on the display, use this key to access Scroll Key the options, items, or functions indicated by the arrow.
-
Page 27: Section 2. Routine Operation
SECTION 2. ROUTINE OPERATION 1. SENDING A FAX MESSAGE 1-1. Recommended Types of Document Before you send your document, make sure that it meets the following require - ments. CAUTION: Documents that do not meet these requirements can cause your machine to jam or may cause some components of the machine to become damaged or dirty. - Page 28 SECTION 2. ROUTINE OPERATION Page Condition Do not place damaged pages into the feeder. BINDING HOLES CURLED Flatten Trim the Make edges copies DOG EARED FOLDED, TORN, OR PATCHED TOGETHER PAGES STUCK Make Shuffle TOGETHER copies the stack Your document must not contain any of the following. Note: Copies made with a copier that uses silicone oil may cause a misfeed.
-
Page 29: Transmission Procedure At A Glance
SECTION 2. ROUTINE OPERATION 1-2. Transmission Procedure at a Glance 1. Make sure that the machine is in MEMORY TRANS 4 APR 12:25 standby mode. SET DOCUMENT MEMORY 100% 2. Carefully place the document into the MEMORY TRANS OPTIONS auto document feeder. ENTER FAX NUMBER Not more than 50 pages. - Page 30 SECTION 2. ROUTINE OPERATION Possible Problems You want to take out the document Press the scanner release button, open the scanner, and take out the document. CAUTION: If you do not open the scanner before you pull out the document, you may damage the machine.
-
Page 31: Contrast, Resolution, And Halftone Modes
SECTION 2. ROUTINE OPERATION 1-3. Contrast, Resolution, and Halftone Modes - Contrast - Normal: Suitable for most documents Darken: Use for documents with faint writing (such as those written in pencil) Lighten: Use for documents that have a dark or patchy background - Resolution - Standard: Suitable for most typewritten documents Detail: Use for documents with small print or fine details... -
Page 32: Optional Features For Transmission
SECTION 2. ROUTINE OPERATION 1-5. Optional Features for Transmission The following options are only available if " OPTIONS " can be seen in the top right corner of the display 1-5-1. Personal Code ↓ 1. Press PERSONAL CODE ENTER CODE Note: You may program one of the TO END User Function Keys to acti -... -
Page 33: Transmission Deadline (Trd)
SECTION 2. ROUTINE OPERATION 1-5-3. Transmission Deadline (TRD) ↓ 1. Press ENTER TRD TIME 12:15 TO END 2. Example: The deadline is 1250 pm. PRESS TODAY 12:50 (PM 12:50) MEMORY TRANS OPTIONS ENTER FAX NUMBER Note: The TRD time cannot be more than 24 hours into the future. If the deadline passes without successful transmission, a report will be printed. -
Page 34: Others
SECTION 2. ROUTINE OPERATION 1-5-5. Others ↓ 1. Press OPTION SELECT TO END AUTO REDUCE ↑ ↓ 2. Scroll through the following list of options using the arrows of the scroll key. Automatic Reduction ID Transmission (You must have stored an ID Code before you can use this feature;... -
Page 35: Redialling
SECTION 2. ROUTINE OPERATION 1-8. Redialling Automatic Redialling 2125551234] Redialling is done 4 times at 5 minute inter - MEMORY TRANS 4 APR 12:25 vals. During redialling, the number being SET DOCUMENT dialled is displayed in brackets at the top of MEMORY 99% the screen, as shown on the right. -
Page 36: Receiving Fax Messages
SECTION 2. ROUTINE OPERATION 2. RECEIVING FAX MESSAGES 2-1. Selecting the Reception Mode There are two reception modes. Press the reception mode key to switch between the modes. 2-1-1. Manual Receive (TEL) Mode This mode is selected when the Manual Receive indicator is lit. Operation is as follows. -
Page 37: Auto Receive (Fax) Mode
SECTION 2. ROUTINE OPERATION 2-1-2. Auto Receive (FAX) Mode This mode is selected when the Auto Receive indicator is lit. 1. The telephone rings once. 2. The machine automatically starts to receive the message. 2-2. Substitute Reception If the Receive File indicator is lit, check the following: The printer paper may be used up. -
Page 38: Using The Machine For Telephone Calls
SECTION 2. ROUTINE OPERATION 3. USING THE MACHINE FOR TELEPHONE CALLS A handset is required to execute the procedures in this section. 3-1. Making a Telephone Call 3-1-1. Using On Hook Dial On Hook Dial ON HOOK MODE Note: Do not pick up the handset. 2. -
Page 39: Answering The Telephone
SECTION 2. ROUTINE OPERATION 3-2. Answering the Telephone If the telephone rings just once: A fax is coming in. Do not pick up the handset. If the telephone rings continuously: 1. Pick up the handset and speak to the other party. Note: If you hear a high-pitched tone, a fax is coming in. -
Page 40: Phoning And Faxing On The Same Call
SECTION 2. ROUTINE OPERATION 3-3. Phoning and Faxing on the Same Call 3-3-1. To Talk Before Sending a Fax (On Hook Dial) On Hook Dial 2. Dial. Do not use the handset. Do not press Start . 3. If you hear a voice from the machine’s built-in speaker, pick up the handset and speak to the other party. -
Page 41: Section 3. Advanced Features
SECTION 3. ADVANCED FEATURES 1. TRANSMISSION 1-1. Broadcasting Make sure that the Memory indicator is lit. If it is not, press Memory . 1. Place your document in the feeder. MEMORY TRANS OPTIONS To broadcast without placing the document ENTER FAX NUMBER in the feeder first, see page 42. -
Page 42: Keystroke Programs
SECTION 3. ADVANCED FEATURES 1-2. Keystroke Programs Storing a Program 1. Place a sheet of paper in the feeder. MEMORY TRANS OPTIONS Note: Skip this step if you are making ENTER FAX NUMBER a polling reception program. 2. Select all required features (such as MEMORY TRANS OPTIONS Transfer Request) and telephone num -... - Page 43 SECTION 3. ADVANCED FEATURES Labelling a Program Function PROGRAM CHOOSE KEY PRINT LIST TO CANCEL Note: If you press → Start , a Pro- gram List will be printed. 2. Press the Quick Dial key that holds the program that you wish to label. Example: PROGRAM ENTER LABEL...
- Page 44 SECTION 3. ADVANCED FEATURES Using a Program - Transmission - 1. Place your document in the feeder. MEMORY TRANS OPTIONS ENTER FAX NUMBER 2. Press the programmed Quick Dial Key. The program begins at once, or at the later time specified by the program. You do not need to press Start .
-
Page 45: Confidential Transmission
SECTION 3. ADVANCED FEATURES 1-3. Confidential Transmission 1. Place your document in the feeder. Then: Function CONF. TRANS. OPTIONS Note: You may program one of the ENTER FAX NUMBER User Function Keys to acti - vate this feature. See page 56 for how to do this. -
Page 46: Polling Transmission
SECTION 3. ADVANCED FEATURES 1-4. Polling Transmission 1-4-1. Free Polling 1. Place your document in the feeder, then: Function FREE POLLING OPTIONS PRESS START See page 39 for the options that are available with polling. 2. Start Your fax message is stored and held on polling standby. Note: If you see FILE EXISTS CLEAR? PRESS NO , you already have a message on Free Polling Standby. -
Page 47: Stored Id Override
SECTION 3. ADVANCED FEATURES 1-4-3. Stored ID Override This procedure will override the ID Code stored in your machine. The override is only effective for this one transmission. 1. Place your document in the feeder, then Function POLLING TRANS. OPTIONS PRESS START ↓... - Page 48 SECTION 3. ADVANCED FEATURES - Options for Polling Transmission - The options are only available if the following can be seen in the top right corner of the display: ↓ OPTIONS ↓ OPTION SELECT TO END AUTO REDUCE ↑ ↓ 2.
-
Page 49: Transfer Request
SECTION 3. ADVANCED FEATURES 1-5. Transfer Request You may program one of the User Function Keys to activate this feature. See page 56 for how to do this. 1. Place your document in the feeder. MEMORY TRANS OPTIONS ENTER FAX NUMBER Function TRANSFER OPTIONS... -
Page 50: Telephone Directory
SECTION 3. ADVANCED FEATURES 5. Either: Enter more destinations for this transfer broadcaster - go to step 4. ↓ Input another transfer broadcaster and its destinations: - go to step 3. Start the transfer request: Start NOTE: You may use some transmission options, such as Send Later. See page 23. -
Page 51: Secure Transmission
SECTION 3. ADVANCED FEATURES 1-7. Secure Transmission Before using this feature, you must program one of the User Function Keys to acti - vate this feature (Function 35; see page 56). 1. Place your document in the feeder. 2. Press the User Function Key that you have programmed for Secure Transmis - sion. -
Page 52: Reception
SECTION 3. ADVANCED FEATURES 2. RECEPTION 2-1. Polling Reception Function POLLING RECV. OPTIONS ENTER FAX NUMBER Note: You may program one of the User Function Keys to acti - vate this feature. See page 56 for how to do this. 2. -
Page 53: Authorized Reception
SECTION 3. ADVANCED FEATURES 2-2. Authorized Reception Function AUTHORIZ. RX SELECT DEST. 6 PRINT LIST DEST. 6 on the opposite display shows that 1. RTI PROG 2. RTI TO CANCEL there are 6 RTIs/CSIs programmed so far. In a new machine, you will see DEST.0. Note: At this time, you can print an Authorized →... -
Page 54: Night Timer
SECTION 3. ADVANCED FEATURES ↓ 6. Scroll through the stored RTIs/CSIs on the screen with It is not possible to edit an RTI/CSI; if you wish to do so, you must delete the incorrect entry and reinput it. To delete the displayed RTI/CSI: Clear . -
Page 55: Forwarding (Memory Card Or Hard Disk Required)
SECTION 3. ADVANCED FEATURES 4. Either: Program the timer for another day: Go back to step 2. Finish: Function NOTE: For the Night Timer to take effect, you must switch it on. See page 71 for how to do this. To print the received messages while the heater is off, press any key. - Page 56 SECTION 3. ADVANCED FEATURES 4. Input the telephone number of this for - warding station. (If your machine is be - hind a PBX, add the access code before the number, unless the forwarding sta - tion is an extension connected to the same PBX as your machine.) Then press FORWARDING...
- Page 57 SECTION 3. ADVANCED FEATURES 6. Type in an RTI or CSI, then press Yes . FORWARDING STORE AS WILD CARD? You can input up to 30 RTIs/CSIs XYZ. CO. for each forwarding station. 7. Either: Store this RTI as a wild card: Otherwise: FORWARDING ENTER RTI/CSI...
- Page 58 SECTION 3. ADVANCED FEATURES Editing the Forwarding Feature Function FORWARDING SET FORWARD CODE PRINT LIST TO CANCEL 2. Input the code number of the forwarding station that you wish to edit (see the Forwarding List for a list of these codes).
- Page 59 SECTION 3. ADVANCED FEATURES If you wish to view another forward - ing station number: Yes . FORWARDING SET FORWARD CODE Go to step 2. PRINT LIST TO CANCEL Finish: Function ↓ until the RTI/CSI that you wish to delete appears. To delete the RTI/CSI: Clear , then FORWARDING...
-
Page 60: Specified Cassette Selection (Optional Paper Feed Unit Required)
SECTION 3. ADVANCED FEATURES 2-5. Specified Cassette Selection (Optional Paper Feed Unit Required) Function CST SELECT SELECT DEST. 6 PRINT LIST DEST. 6 on the opposite display shows that 1. RTI PROG 2. RTI TO CANCEL there are 6 RTIs/CSIs programmed so far. In a new machine, you will see DEST. -
Page 61: Multi-Sort Document Reception (Memory Card Or Hard Disk Required)
SECTION 3. ADVANCED FEATURES ↓ 6. Scroll through the stored RTIs/CSIs on the screen with It is impossible to edit a previously stored RTI or CSI; if you wish to do so, you must erase the old one and input a new one. To delete the displayed RTI/CSI: Clear When you have finished:... -
Page 62: Other Features
SECTION 3. ADVANCED FEATURES 3. OTHER FEATURES 3-1. Copying 1. Press Copy . COPY MODE NO. OF COPIES: SET DOCUMENT PAPER Note: To cancel copy mode, press Copy again. ← → arrows on the 2. Use the scroll key to select the required copy pa - per size. -
Page 63: File Management
SECTION 3. ADVANCED FEATURES 3-2. File Management 3-2-1. Erasing a File from Memory Fax message file (Memory Transmission): Function Instruction file (Polling Reception): Function Fax message file (Polling Transmission): Function (Example display: Using Function 21) CLEAR TRANS. FILE SCROLL FILE NO. : PRINT LIST LAST FILE : 0015 TO CANCEL... -
Page 64: Printing A File
SECTION 3. ADVANCED FEATURES 3-2-2. Printing a File Fax message file (Memory Transmission): Function Fax message file (Polling Transmission): Function (Example display: Using Function 24) PRINT TRANS. FILE SCROLL FILE NO. : PRINT LIST LAST FILE : 0015 TO CANCEL 2. -
Page 65: User Function Keys
SECTION 3. ADVANCED FEATURES 3-3. User Function Keys Each of the User Function Keys F1 - F5 can be programmed with one of the fol - lowing functions. In a new machine, the F1 to F4 keys have already been pro - grammed, as shown in the table below in boldface. -
Page 66: Function Programs
SECTION 3. ADVANCED FEATURES 3-4. Function Programs Storing a Function Program For example, store Function 32 (Programming Speed Dial) into Function Key F5 as a Function Program. You can only use the User Function Keys F1 to F5 for this feature. Function SPEED DIAL ENTER SPEED CODE... -
Page 67: Printing From Memory Lock (Memory Card Or Hard Disk Required)
SECTION 3. ADVANCED FEATURES 3-5. Printing from Memory Lock (Memory Card or Hard Disk Required) Function PRT MEM. LOCK ID SETTING MEMORY LOCK ID: TO CANCEL 2. Input the Memory Lock ID. Example: PRT MEM. LOCK PRESS START MEMORY LOCK ID: °°°°... -
Page 68: Chain Dialling
SECTION 3. ADVANCED FEATURES 5. Input the digits that you need, such as your code number, to use the remote facility. These digits will depend on the remote facility. Note: Do not press Start 6. After you have finished your business with the remote facility, hang up. 3-7. -
Page 69: Counters
SECTION 3. ADVANCED FEATURES 3-9. Counters Function COUNTERS TO END TX: 003256 SCN: 003287 RX: 002648 PRT: 002703 2. When you have finished: 3-10. Communication Result Display → 1. Function PERS. CODE 7346 TO CANCEL 10 OCT 08:23 RX OK 10PAGES 01012125551234 2. -
Page 70: Label Insertion
SECTION 3. ADVANCED FEATURES 3-12. Label Insertion In this model, your message will appear as follows at the other end if Label Inser - tion is switched on in your machine. Your fax message as re- ceived at the other end TTI (32 characters) Date and Time To: MR SMITH... -
Page 71: Ordering Toner
SECTION 3. ADVANCED FEATURES 3-13. Ordering Toner To use this feature, you must do the following in advance: Make sure that digit 7 of User Parameter Switch 4 is at 1. (The machine is given this setting when it leaves the factory, so if you have not changed it, you don’t need to worry about this.) See page 72 for details on how to do this. -
Page 72: Section 4. Programming The Machine
SECTION 4. PROGRAMMING THE MACHINE 1. PROGRAMMING AT INSTALLATION Installation will be done by a service technician. CAUTION Do not switch on until everything is connected up properly. If you wish to move the machine to a new location, contact a service technician. -
Page 73: Date And Time
SECTION 4. PROGRAMMING THE MACHINE 1-2. Date and Time Function CLOCK INPUT DATE/TIME FEB 1992 (SAT) 13:56 TO END ← → arrows on the scroll key to move the cursor across 2. Use the the display. Use the keypad to correct the parts that need correcting. To change the month, move the cursor to the month and scroll through the ↑... -
Page 74: Telephone Number
SECTION 4. PROGRAMMING THE MACHINE 1-4. Telephone Number Function ↓ OWN ANALOG NUMBER TO SET PREVIOUS TO CANCEL NEXT OWN ANALOG NUMBER TO END 3. Input your fax terminal’s telephone number. You must add your country’s inter - national dial and country codes at the start of the number. Check these codes with your local telecommunications operator. -
Page 75: Next Transfer Station (Group 4 Kit Required)
SECTION 4. PROGRAMMING THE MACHINE 1-6. Next Transfer Station (Group 4 Kit required) Function ↓ NEXT TRANSF. TO SET PREVIOUS TO CANCEL NEXT NEXT TRANSF. ENTER FAX NUMBER TO CANCEL 3. Input the number of the Next Transfer NEXT TRANSF. Station. -
Page 76: Confidential Id (Memory Card Or Hard Disk Required)
SECTION 4. PROGRAMMING THE MACHINE 1-8. Confidential ID (Memory Card or Hard Disk required) Function 1 then ↓ until the screen is as CONFIDENTIAL ID shown opposite. TO SET PREVIOUS If no memory card or hard disk is in - TO CANCEL NEXT stalled, you will not see this prompt. -
Page 77: Rti
SECTION 4. PROGRAMMING THE MACHINE 1-10. RTI Function 1 then ↓ until the screen is as shown opposite. TO SET PREVIOUS TO CANCEL NEXT TO CANCEL 3. Input the RTI that you will be using. Example: XYZ COMPANY Note: Not more than 20 characters. Input and editing are explained on XYZ COMPANY page 2. -
Page 78: Tti
SECTION 4. PROGRAMMING THE MACHINE 1-11. TTI Function 1 then ↓ until the screen is as shown opposite. TO SET PREVIOUS TO CANCEL NEXT LABEL INSERTION SELECT TO END 1. INPUT 2. COPY RTI 3. Either: Copy the RTI across and store that as the TTI: 2 ↑... -
Page 79: Csi
SECTION 4. PROGRAMMING THE MACHINE 1-12. CSI Function 1 then ↓ until the screen is as shown opposite. TO SET PREVIOUS TO CANCEL NEXT TO END 3. Input your telephone number. Note: Not more than 20 digits. If you wish to input a "+" sign, to signify your international dial ac - cess code: 31 +4471-555-1234... -
Page 80: Settings
SECTION 4. PROGRAMMING THE MACHINE 2. SETTINGS 2-1. On/Off Switches Function PSTN LINE TYPE SELECT TO END The first displayed item is the telephone line type: DP = Pulse Dial, TT = Touch Tone. In the above display, TT is currently selected. 2. -
Page 81: User Parameter Settings
SECTION 4. PROGRAMMING THE MACHINE 2-2. User Parameter Settings Function USER PARAMETER PRINT LIST DEFAULT: 00000000 SWITCH00: TO END 00000000 Note: At this time, you can print a User Parameter List if you → press Start 2. The current settings for switch 00 are now displayed on the bottom line of the display (the top line shows the settings normally seen in a machine just deliv - ered from the factory). - Page 82 SECTION 4. PROGRAMMING THE MACHINE Switch 00 - Home position settings Digit Purpose Marker 0: Off 1: On (successfully scanned documents will be marked) Contrast Bit 2 Bit 1 Setting Bit 2 Bit 1 Setting Normal Darken Lighten Darken Resolution Bit 4 Bit 3 Setting Bit 4 Bit 3 Setting Standard...
-
Page 83: Economy Transmission Time
SECTION 4. PROGRAMMING THE MACHINE Switch 03 - Automatic printing of reports Digit Purpose Inclusion of part of the image on the following reports: Transmission Result Report, Memory Storage Report, Polling Clear Report, Communication Failure Report, Transfer Result Report, Transmission Deadline Report, Polling Confirmation List 1: Yes 1 to 7 Do not change these settings. -
Page 84: Adjustments
SECTION 4. PROGRAMMING THE MACHINE 3. ADJUSTMENTS 3-1. Volume Adjustments Function MONITOR VOLUME SET VOLUME TRANSMISSION: >>>> PRESS TO END START → Increase: ← Decrease: Test the current setting: Start . Press Stop when you have fin - ished the test. Accept: MONITOR VOLUME SET VOLUME... -
Page 85: Telephone Numbers And Personal Codes
SECTION 4. PROGRAMMING THE MACHINE 4. TELEPHONE NUMBERS AND PERSONAL CODES 4-1. Programming Quick Dial This machine has 32 Quick Dial Keys (01 to 32), each of which can be pro - grammed as one of the following. The page number shows the location of the pro - gramming procedure. - Page 86 SECTION 4. PROGRAMMING THE MACHINE QUICK DIAL ENTER LABEL 6. Either: Input a label using the Quick Dial keys. Then press Yes . Inputting and editing labels: see page 2. Do not program a label: Press Yes . QUICK DIAL OPTION SETTING LABEL INSERTION SELECT...
- Page 87 SECTION 4. PROGRAMMING THE MACHINE ← → 4. Edit the number ; use to move the cursor, and use Clear to delete the cursor character. After entering the new number, press Yes . QUICK DIAL Note: Check that you have input XYZ CO.
-
Page 88: Programming Speed Dial
SECTION 4. PROGRAMMING THE MACHINE QUICK DIAL 2125551234 4. Erase the number: No . QUICK DIAL ENTER FAX NUMBER TO CANCEL After erasing a number, you may store a new one to replace it if you wish. If you do not wish to store a new number, press again. - Page 89 SECTION 4. PROGRAMMING THE MACHINE SPEED DIAL ENTER LABEL 6. Either: Input a label using the Quick Dial keys (such as XYZ CO. LONDON). Then press Yes . SPEED DIAL Inputting and editing labels: INPUT: see page 2. Do not program a label for this number: Press Yes .
- Page 90 SECTION 4. PROGRAMMING THE MACHINE Editing a Speed Dial Function SPEED DIAL ENTER SPEED CODE PRINT LIST TO CANCEL 2. Input the Speed Dial Code that you wish to edit. Example: 0 If the wrong number is displayed, ↑ press No , or use the ↓...
- Page 91 SECTION 4. PROGRAMMING THE MACHINE ← → 7. Switch Label Insertion on or off. Use the arrows on the scroll key to select the re - quired setting. Then: SPEED DIAL ENTER SPEED CODE PRINT LIST TO CANCEL 8. Either Program another: Go to step 2.
-
Page 92: Programming Groups
SECTION 4. PROGRAMMING THE MACHINE 4-3. Programming Groups Groups allow you to combine numbers already stored in Quick Dial Keys or Speed Dial Codes or other numbers entered at the keypad into one group, for easy sequential transmission to all the numbers in that group. Note: See page 32 for information on how to dial a group. -
Page 93: Storing Numbers In A Group
SECTION 4. PROGRAMMING THE MACHINE Storing Numbers in a Group First, enter Group Programming mode as explained on page 83. Then: 1. Press GROUP DIAL ENTER FAX NUMBER G 01 08 DEST. 0 TO CANCEL 2. Input the number that you wish to store in the group. For example: Quick Dial 25: GROUP DIAL G 01... -
Page 94: Checking Which Numbers Are Already In The Group
SECTION 4. PROGRAMMING THE MACHINE Checking Which Numbers are Already in the Group First, enter Group Programming mode as explained on page 83. Then: 1. Press GROUP DIAL TO CANCEL G 01 08 DEST. 1/25 CLR: 2125551234 ↓ to scroll through the numbers on the display. 2. -
Page 95: Storing A Group Transfer Station
SECTION 4. PROGRAMMING THE MACHINE Storing a Group Transfer Station First, enter Group Programming mode as explained on page 83. Then: 1. Press 4 . GROUP DIAL ENTER TRANSF. STN G 01 08 DEST. 0 TO CANCEL 2. Store the telephone number of the termi - nal that you wish to act as the Group Transfer Station for this group. -
Page 96: Erasing The Group
SECTION 4. PROGRAMMING THE MACHINE Erasing the Group This procedure deletes this Group and all the numbers stored in it. The Speed Dial Codes and Quick Dial Keys that you used in this Group will not be deleted from the memory; you can continue to use them for other purposes. First, enter Group Programming mode as explained on page 83. -
Page 97: Personal Codes
SECTION 4. PROGRAMMING THE MACHINE 4-4. Personal Codes Personal Codes allow you to track machine usage; they are printed for each com - munication on the TCR and other reports. They can also be used with the Re- stricted Access feature, to ensure that unauthorized personnel do not use the machine. - Page 98 SECTION 4. PROGRAMMING THE MACHINE 4. Input a name for this Personal Code us - PERS. CODE ing the Quick Dial keys. 5477 Example: JOHNSON JOHNSON Inputting and editing labels: see page 2. If you do not wish to store a label: Yes .
- Page 99 SECTION 4. PROGRAMMING THE MACHINE Editing or Erasing a Personal Code Function PERS. CODE ENTER ID CODE PRINT LIST TO CANCEL 2. Input the Personal Code that you wish to edit. Example: 5 PERS. CODE 5477 JOHNSON CLR: Press if you entered the wrong code.
-
Page 100: Automatically Printed Reports
SECTION 5. PRINTING REPORTS 1. AUTOMATICALLY PRINTED REPORTS 1-1. Table of the Reports AUTOMATICALLY PRINTED SETTINGS REPORTS ON/OFF DEFAULT Confidential File Report Use Function 81 (see page 71). Communication Failure Report [Note] Error Report Contact a service technician. Memory Storage Report User Parameter Switch 02, digit 2 Polling Clear Report User Parameter Switch 02, digit 6... -
Page 101: Report Formats
SECTION 5. PRINTING REPORTS 1-2. Report Formats Example 1. Error Report The following report means that the machine sent four pages but there were er - rors during the first two pages. Error Report (28 Apr 1992 12:09) *** XYZ COMPANY File Pers. - Page 102 SECTION 5. PRINTING REPORTS The following pages explain the symbols that appear in certain columns of the re - ports. The Mode Column See the bottom of the Journal for a full listing of the symbols on the Journal. On other reports such as the File List, a code is given, informing the type of com - munication.
- Page 103 SECTION 5. PRINTING REPORTS The Results Column OK: Successful Communication E: An error occurred The Footnote on the Reports TX Counter: Total number of transmitted pages RX Counter: Total number of received pages On the User Parameter List, you will also see the following counter: OPU Counter: Total number of pages printed so far with the current master unit.
-
Page 104: User-Initiated Reports
SECTION 5. PRINTING REPORTS 2. USER-INITIATED REPORTS 2-1. Journal 2-11. Specified Cassette Selection List Function Start Function → Start 2-2. File List 2-12. User Parameter List Function Start Function 2-3. Quick Dial List → Start Function Start 2-4. Speed Dial List Note: You may program User Function Keys to print the Journal and the Function... -
Page 105: Section 6. Looking After The Machine
SECTION 6. LOOKING AFTER THE MACHINE 1. REPLACING PAPER When the Add Paper indicator ( ) on the operation panel is lit, the upper cassette is empty. When the Add Paper indicator ( ) on the lower cassette is lit, the lower cassette is empty (only when the lower cassette is installed). -
Page 106: Replacing The Toner Cassette
SECTION 6. LOOKING AFTER THE MACHINE 2. REPLACING THE TONER CASSETTE When the Add Toner indicator ( ) starts to blink, the toner cassette is al - most empty. You will be able to make 100 more copies before you have to change the toner cassette. - Page 107 SECTION 6. LOOKING AFTER THE MACHINE 5. On the new toner cassette, remove the two green plastic stoppers. 6. Slide the new toner cassette into the machine along the rails until it stops. CAUTION Do not touch the cleaning blade [A].
-
Page 108: Replacing The Marker
SECTION 6. LOOKING AFTER THE MACHINE 3. REPLACING THE MARKER When the mark made by the marker becomes pale, replace the marker as de - scribed below. 1. Remove the document tray. 2. Open the scanner cover. 3. Replace the marker. 4. -
Page 109: Changing The Paper Size Of The Cassette
SECTION 6. LOOKING AFTER THE MACHINE 4. CHANGING THE PAPER SIZE OF THE CASSETTE When you want to use a different size of paper in the cassette, do the following. NOTE: You need a philips screwdriver for this procedure. If you wish to use A5 size paper, contact a service technician. 4-1. - Page 110 SECTION 6. LOOKING AFTER THE MACHINE 4. Change the position of the two side fences [C] to match the new paper size. 5. Change the paper size actuator [D] to the appropriate one. 6. Push down the bottom plate [E]. 7.
-
Page 111: Lower Cassette(S)
SECTION 6. LOOKING AFTER THE MACHINE 4-2. Lower Cassette(s) 1. Remove the lower cassette. CAUTION: To avoid dropping the cassette, hold it by the front and side while pulling it out. 2. Remove the side fences [F]. 3. Change the position of the bracket [G]. NOTE: If necessary, hold up the bottom plate [H]. -
Page 112: User Maintenance Procedure
SECTION 6. LOOKING AFTER THE MACHINE 5. USER MAINTENANCE PROCEDURE To ensure that your fax continues to operate smoothly, some simple maintenance is required. This entails cleaning a few components. User maintenance should be done once every 6 months. 5-1. User Maintenance Table The following table shows what items you need to look after from time to time. -
Page 113: User Maintenance Procedure
SECTION 6. LOOKING AFTER THE MACHINE 5-2. User Maintenance Procedure 5-2-1. Scanner... - Page 114 SECTION 6. LOOKING AFTER THE MACHINE 1. Prepare a soft damp cloth. 2. Turn off the main power switch. Note for users that have not installed the optional hard disk unit Before turning off the main switch, make sure that the remaining memory capacity is 100%.
- Page 115 SECTION 6. LOOKING AFTER THE MACHINE 6. Clean the separation roller [E] with the soft damp cloth, while rotating the roller. This roller is near the decal. 7. Clean the white strip [F] with a soft damp cloth. CAUTION: Do not damage the sensor actuator [G] (black plastic) below the white strip.
- Page 116 SECTION 6. LOOKING AFTER THE MACHINE 9. Turn the main power switch off. 10. Clean the exposure glass [I] with the soft damp cloth. 11. Clean the pick-up and feed rollers [J] with the soft damp cloth, while rotat - ing the rollers in the direction shown in the diagram.
-
Page 117: Main Body
SECTION 6. LOOKING AFTER THE MACHINE 5-2-2. Main Body... - Page 118 SECTION 6. LOOKING AFTER THE MACHINE 1. Remove the upper cassette [K]. CAUTION: To avoid dropping the cassette, hold it by the front and side while pulling it out. 2. Clean the three registration roll - ers [L] with the soft damp cloth, while rotating them in the direc - tion shown in the diagram.
- Page 119 SECTION 6. LOOKING AFTER THE MACHINE 3. Clean the white paper feed rollers [N] in the cassette, while rotating them. 4. Put back the cassette. 5. Open the front cover [O]. 6. Remove the toner cassette [P]. CAUTION: To prevent your table from getting dirty, lay a sheet of paper on it before removing the toner cassette.
- Page 120 SECTION 6. LOOKING AFTER THE MACHINE 7. Lay a sheet of paper on top of the master belt [S] (dark green plastic belt), to avoid damage to the master belt. CAUTION: Do not touch the master belt. 8. Slide the blue plastic corona wire cleaner [T] from its home position all the way across to the right side of the machine.
-
Page 121: Lower Paper Feed Unit(S) (If One Or More Are Installed)
SECTION 6. LOOKING AFTER THE MACHINE 5-2-3. Lower Paper Feed Unit(s) (If one or more are installed) 1. Remove the lower cassette. CAUTION To avoid dropping the cassette, hold it by the front and side while pulling it out. 2. Clean the paper feed roller [U] with the soft damp cloth, while rotating it in the direction shown in the diagram. -
Page 122: Section 7. Solving Problems
SECTION 7. SOLVING PROBLEMS CAUTION: Do not attempt any repairs other than those mentioned in this manual. Removing covers may expose you to dangerous voltages and other risks. Refer all servicing to qualified personnel. CHECK THE INDICATORS AND DISPLAY PANEL Check the indicators on the operation panel to check if there are any problems. - Page 123 SECTION 7. SOLVING PROBLEMS -Adjustment- If you normally scan thin or thick sheets of paper you can adjust the auto docu - ment feeder mechanism. Also, this is useful when you have document multifeed or non-feed problems. If you open the scanner cover you can find the adjustment knob (blue color) and scale easily.
-
Page 124: Copy Jams
SECTION 7. SOLVING PROBLEMS 2. COPY JAMS If the Clear Copy indicator ( ) blinks, there is a copy jam. There are five pos - sible locations: Cassette entrance Inside the machine Copy feed-out area Lower cassette entrance (for machines with one or more lower paper feed units) A. - Page 125 SECTION 7. SOLVING PROBLEMS B. Inside the Machine 1. Remove the trays, and pull open the cassette. 2. Open the front cover. 3. Pull out the jammed paper carefully by the leading or trailing edge, or by the center if both edges are jammed. CAUTIONS: Do not touch the fusing unit (the parts inside the machine col -...
- Page 126 SECTION 7. SOLVING PROBLEMS C. Copy Feed-out Area 1. Remove the document table and copy tray, and pull open the cas - sette. 2. Open the copy feed out cover. 3. Gently pull out the misfed paper. Do not leave any pieces inside. 4.
-
Page 127: Communication Problems
SECTION 7. SOLVING PROBLEMS D. Lower Cassette Entrance CAUTION If there is a paper feed problem in the lower cassette entrance, please slide out the cassettes one by one, from the top cassette downwards, before removing the paper. 1. Pull open the lower cassette. 2. -
Page 128: Operating Difficulties
SECTION 7. SOLVING PROBLEMS 4. OPERATING DIFFICULTIES SYMPTOM REQUIRED ACTION SET DOCUMENT is not displayed. Switch the power on. If the Power indicator does not light, check that the power cord is plugged in. The machine cannot dial out. The telephone line is disconnected. Check the telephone line type setting (see page 71). - Page 129 SECTION 7. SOLVING PROBLEMS SYMPTOM REQUIRED ACTION The telephone keeps ringing and no fax is You are in Manual Receive mode. printed. Change to Auto Receive mode (see page 27). Power is switched off. No printout; the Add Paper indicator is lit. The cassettes are empty.
-
Page 130: Document Misfeeds
SECTION 7. SOLVING PROBLEMS 5. DOCUMENT MISFEEDS Incorrect operation or use of a non-recommended document type may cause a multifeed or a non feed. CAUSE REQUIRED ACTION Incorrect Position Put the document in the feeder correctly. See page 20. Incorrect Setting Method Align the edges of the document. -
Page 131: Displayed Error Messages
SECTION 7. SOLVING PROBLEMS 6. DISPLAYED ERROR MESSAGES The following messages may appear while you are operating or programming the machine. You cannot use the auto-dialler at the moment. Use the ten- CHECK AUTO-DIALLING key pad or the handset. NO BOOKING FOR POLLING RECV No polling reception operations have been programmed. -
Page 132: Section 8. Specifications
SECTION 8. SPECIFICATIONS Dimensions: 496 mm x 477 mm x 305 mm (W x D x H) Excluding trays, handset, cassettes, and optional kits. Weight: 19 kg Excluding trays, handset, cassettes, and optional kits. Power Supply: 220 - 240 Vac, 50 Hz; single phase Maximum Power Standby: 25 W Consumption:... -
Page 133: Appendix A. Paper Feed Unit
APPENDIX A. PAPER FEED UNIT WARNING: Do not attempt any maintenance or troubleshooting other than that mentioned in this manual. OPERATION Up to four paper feed units can be installed. Each paper feed unit can hold up to 500 sheets of paper, which means that you can add an extra 2,000 sheets of copy paper capacity to your fax machine. -
Page 134: Appendix B. Hard Disk Unit
APPENDIX B. HARD DISK UNIT 1. PRECAUTIONS WARNING Do not attempt any maintenance or troubleshooting other than that mentioned in this manual. Before you start to use the machine, note the operating precautions mentioned in the section entitled "Precautions" at the front of the manual for the facsimile ma - chine. -
Page 135: Operation
APPENDIX B. HARD DISK UNIT 3. OPERATION When you switch the machine on, switch both the facsimile machine and the hard disk unit on. The power indicator on the hard disk unit lights when the hard disk is switched on. The operating procedures are the same as those already described in this manual. -
Page 136: Appendix C. Isdn Option Type 40
APPENDIX C. ISDN OPTION TYPE 40 1. INTRODUCTION The ISDN Option Type 40 allows you to send and receive fax messages on high- speed high-quality digital networks. It will allow you to connect the machine to an ISDN (Integrated Services Digital Network) for either Group 4 or Group 3 fax com - munication. -
Page 137: Operation
APPENDIX C. ISDN OPTION TYPE 40 2. OPERATION Dialling and Storing Telephone Numbers Introduction After installing the ISDN Option Type 40, you must be careful to select the correct signalling type (Group 3 or Group 4) when dialling, or when storing a telephone number as a Speed Dial or Quick Dial. - Page 138 APPENDIX C. ISDN OPTION TYPE 40 Transmission Procedure The following example shows how to dial (assuming that the ISDN Option Type 40 has been installed). The differences between this procedure and the procedure for the base machine (refer to page 20) are as follows: Step 3 - you have to select G3 or G4 before you dial a number.
- Page 139 APPENDIX C. ISDN OPTION TYPE 40 Storing a Telephone Number The following example shows how to store a Quick Dial if the ISDN Option Type 40 has been installed. The differences between this procedure and the procedure for the base machine (refer to page 76) are as follows: Step 3 - you have to select G3 or G4 before you input a Quick Dial or Speed Dial Step 4 - you may have to input a subaddress for a G4 number if the destination...
- Page 140 APPENDIX C. ISDN OPTION TYPE 40 QUICK DIAL ENTER LABEL 6. Either: Program a label for this number: go to step 7. Do not program a label: Yes ; go to step 8. 7. Input a label using the Quick Dial keys. Then press Yes .
-
Page 141: Troubleshooting
APPENDIX C. ISDN OPTION TYPE 40 3. TROUBLESHOOTING Call Progress Signals (CPS) Sometimes, a Call Progress Signal and an error message will appear on the dis - play panel. Possible messages are as follows. DIALLING The machine is dialling; do not press Stop. -
Page 142: Index
INDEX Date and Time Destination Check Dialling 20, 32 Add Paper Indicator 96, 120 Direct Fax Number Entry Add Toner Indicator Document Jam AI Redial 17, 26 Document size, allowable Alarms Document types, allowable Authorized Reception 9, 44 Authorized Reception List 44, 95 Authorized Reception, on/off Economy Transmission... - Page 143 ID Transmission 25, 66 Center mark Immediate Transmission 22, 25 Checkered mark Indicators Command Information Line (CIL) Add Paper 96, 120 Add Toner Confidential File Report Clear Copy 115, 120 Forwarding Clear Original 21, 113, 119 Forwarding mark Confidential File Halftone Line Fail 21, 118 - 119...
- Page 144 Stored ID Override (Polling Transmission) Confidential Reception Manual (TEL) Mode Polling Clear Report, on/off Mode Selection Polling Reserve Report, on/off 73 Substitute Reception 28, 52 Polling Result Report, on/off Reception Time, on/off Power Indicator Redialling 9, 17, 26 Power Supply Reduction, automatic Printing a file from memory Reduction, length...
- Page 145 Specified Cassette Selection List 51, 95 User Function Keys 17, 56 User Function List 56, 95 Specified Cassette Selection, on/off User Maintenance Procedures 103 User Parameter List 72, 94 - 95 Speed Dial User Parameters Programming Using a Speed Dial number 20, 32 Speed Dial List 79, 95 Voice Request...
- Page 146 CERTIFICATION LABEL Certification Label RICOH UNITECHNO CO., LTD Complies with FDA radiation performance standards, 21 CFR Subchapter J. TSURUGASONE YASHIO-SHI SAITAMA-KEN JAPAN MANUFACTURED: PPC2100SL HS...
-
Page 147: Function List
QUICK REFERENCE FUNCTION LIST FUNCTION FUNCTION Confidential Transmission Functions 60 and above can only be used after a password has been entered. Transfer Request System Set-up: Your Country Code, Your Fax Secured Polling Transmission Terminal’s Telephone Number, Your Inter-city Free Polling Transmission Access Code, Next Transfer Station **, ID Code, Polling Reception Confidential ID*, Memory Lock ID*, Secure ID, RTI,... - Page 148 FUNCTION LIST FUNCTION PAGE Confidential Transmission Transfer Request Secured Polling Transmission 37, 38 Free Polling Transmission Polling Reception Direct Fax Number Entry Erasing Memory Files Erasing Polling Reception Files Erasing Polling Transmission Files Printing the Contents of a Memory File Printing the Contents of a Polling File Programming Quick Dial/Printing the Quick Dial List Programming Speed Dial/Printing the Speed Dial List...
-
Page 149: Notice To Users
CONNECTION TO THE PSTN OR A PBX EXTENSION If there is a line or jack socket already installed, you may connect the Ricoh FAX4500L using the line lead supplied with the machine. If you require a socket to be fitted, complete the attached form and send it to your local telephone managers office. - Page 150 SUPPLIES CAUTION: Ricoh shall not be responsible for any damage or expense that may result from the use of parts other than recommended parts. TONER CASSETTES TONER CASSETTE TYPE 30 is recommended for the best performance. MARKER MARKER TYPE 30 is recommended for the best performance.
- Page 151 We wish to install a RICOH FAX4500L facsimile transceiver, Approval Number NS/3135/3/N/603491, at the address shown below: Please supply a *direct exchange line/*master jack unit/ *telephone type: ..............Installation Address: ..............................................Contact Name: ................Company Address: ................................
Need help?
Do you have a question about the FAX2500L and is the answer not in the manual?
Questions and answers