Table of Contents
Advertisement
Quick Links
THANK YOU!
Thank you for your purchase of HYT mobile radio TM-600. We believe this
easy-to-use
radio
will
provide
you
with
dependable
and
reliable
communications at peak efficiency. Please read this manual carefully before
use. The information presented herein will help you to derive maximum
performance from your radio.
MODELS COVERED IN THIS MANUAL
TM-600 VHF Mobile Radio
TM-600 UHF Mobile Radio
第 1 页 共 31 页
Advertisement
Table of Contents

Related Manuals for HYT TM-600 VHF


Summary of Contents for HYT TM-600 VHF
- Page 1 THANK YOU! Thank you for your purchase of HYT mobile radio TM-600. We believe this easy-to-use radio will provide with dependable reliable communications at peak efficiency. Please read this manual carefully before use. The information presented herein will help you to derive maximum performance from your radio.
- Page 2 HOT SURFACE Avoid c onta ct durin g prolonged us e Do not touch the metal surface of the radio while it is in use. Do not mount the radio such that the chassis can come in contact with skin. High temperatures may burn you skin.
- Page 3 trunk lid if the minimum safe distance is observed. Antenna substitution: Don’t substitute any antenna for the one supplied or recommended by the manufacturer or radio dealer. You may be exposing person(s) to excessive radio frequency radiation. You may contact your radio dealer or the manufacturer for further instructions.
-
Page 4: Table Of Contents
Contents Caution MANDATORY SAFETY INSTRUCTIONS User Safety, Training, and General Information Compliance with RF Energy Exposure Standards FCC Compliance Precautions Product Inspection Radio Installation and Warnings Radio Overview Basic Operations Radio Power On/Off Adjust the Volume Monitor Select a Channel Receive Transmit Programmable Power Output... - Page 5 Selectable Squelch Level User Selectable CTCSS/DCS(UST) Public Address(PA) Dual Home Channel 2-Tone Encode Select Compander Scrambler Optional Accessories 第 5 页 共 31 页...
-
Page 6: User Safety, Training, And General Information
BEFORE USING YOUR HYT MOBILE RADIO. Compliance with RF Energy Exposure Standards Your HYT mobile radio is designed and tested to comply with a number of national and international standards and guidelines (listed below) regarding human exposure to radio frequency electromagnetic energy. This radio complies with the IEEE and ICNIRP exposure limits for occupational/controlled RF exposure environment at operating duty factors of up to 50% transmitting and is authorized by the FCC for occupational use only. -
Page 7: Fcc Compliance
FCC Licensing Requirements Your radio must be properly licensed Federal Communications Commission prior to use. Your HYT Wireless dealer can assist you in meeting these requirements. Your dealer will program each radio with your authorized frequencies, signalling codes, etc., and will be there to meet your communications needs as your system expands. - Page 8 * Do not expose the radio to direct sunlight over a long time, nor place it close to heating source. * Do not place the radio in excessively dusty, humid areas, nor on unstable surfaces. * Refer service to qualified technicians only. Operation Safety Guidelines * For vehicles equipped with electronic anti-skid braking systems, electronic ignition systems or electronic fuel injection systems, interferences may occur during the radio...
-
Page 9: Product Inspection
Product Inspection Please carefully unpack the radio. Before use, it is recommended that you inspect the product as follows. First check the shipping carton for any signs of damage. Confirm the supplied product against the packing slip to assure accuracy. If any items are missing or have been damaged during shipment, please file a claim to the carrier immediately. - Page 10 Radio Installation ■ Installing the Radio 1、 Attach the mounting bracket, using the 4.8 x 20mm self-tapping screws, in a location where convenient operation is accessible. 2、 Connect the antenna and the supplied power cable to the radio. 3、 Slide the radio into the mounting bracket and secure it using the Adjustment knobs. 4、...
- Page 11 ▇ Installation Tools 1. Electric drill: ¢6mm or above 2. Cross head screwdriver 3. Hex socket (used to fix 4.8 × 20mm self-tapping screws) ▇ Warnings * The radio operates in 13.6 ± 15%V negative ground systems only. Check the voltage and polarity of the power supply on the vehicle before installation.
-
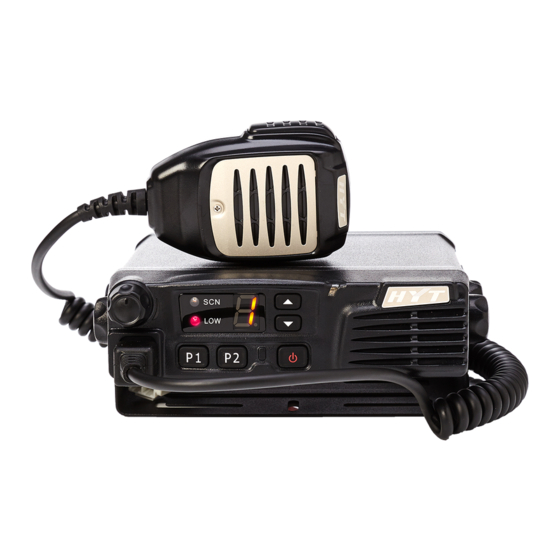
Page 12: Radio Overview
Radio Overview ■ Front Panel View ① Volume Knob Turn the knob clockwise to adjust upwards and counterclockwise to adjust downwards. ② LED Indicator & 8-segment Numeric Display Please refer to the “LED status indicator and 8-segment numeric display” section. ③... - Page 13 ② External Speaker Jack Used to connect external speaker, for the 3.5mm plug ③ Power inlet Use HYT supplied DC power cable to access 13.6V DC power. ④ Antenna Pedestal Used to connect external antenna. 第 13 页 共 31 页...
- Page 14 ▇ LED Indicators Name Display Radio Status Transmit a signal Green Receive a signal Tx-Rx indicator Orange flash Receives encode squelch, selcall, 2-Tone/DTMF signalling call SCN indicator Green Scan LOW indicator Lit up for low power, goes out for high power ▇...
- Page 15 16. Home channel 17. Public address 18. Scrambler 19. Compander 20. Emergency Call 第 15 页 共 31 页...
-
Page 16: Basic Operations
Basic Operations Radio Power On/Off Press the power switch to turn on the radio. Press and hold down the power switch for about 1 second to turn off the radio. Adjust the Volume Turn the Volume Control Knob clockwise to increase the volume, or counter-clockwise to decrease the volume. -
Page 17: Receive
The Rx/Tx frequency on each channel is set by your dealer. Press the [Channel Up] key (programmable) to select a higher numbered channel; press the [Channel Down] key to select a lower numbered channel. Receive If CTCSS/CDCSS, 2-Tone has been programmed on the current channel by your dealer, you can receive calls with matched tones or codes only. -
Page 18: Scan
Scan Radio scans all the channels that have been added into the scan list of the current zone. ▇ Scan Start ① Add one or several non-priority channels into the scan list. ② Press the Channel Scan key (programmable) to initiate scan from the current channel, then scanning proceeds in ascending order by channel number, while the scan LED lit up. -
Page 19: Busy Channel Lockout(Bcl
Temporarily delete the selected channel from the scan list during scanning. When scan pauses on an unwanted channel due to noise, press the Add/Del Scan key (programmable) to temporarily delete the channel from the scan list. Then scan is reactivated immediately. Note: the temporary delete is not memorized once radio exits from the scan mode. -
Page 20: Code Squelch
▇ DTMF Speed 6, 8, 10 or 15 digits per second is programmable by your dealer. The feature is designed to reduce false decoder operation by providing a fixed time period between digits. ▇ Auto Dial 1. Press the [*] on the Mic keypad. 2. -
Page 21: Auto Transpond
Please refer to the [TTS] key for 2-Tone transmission. 3. Upon release the [PTT], the signalling squelch is disabled and LED flashes orange. Green LED lit up when signal is received. 4. If the Monitor key (programmable) is pressed, or no signal is received within the preset time period, the signalling squelch is enabled. -
Page 22: Emergency Call
▇ TOT Re-key Time The radio has a TOT Re-key timer. Since transmission is terminated upon the TOT timer expires, transmission is inhibited if press the [PTT] before the expiration of TOT Re-key timer (programmable by your dealer as Off, 1~60s). ▇... -
Page 23: Programmable Auxiliary Functions
Programmable Auxiliary Functions The [P1]-[P2], ▲/▼ are respectively programmable with one of the following auxiliary functions by your dealer. Reverse Frequency If communications between radios are disrupted because of a long distance from the repeater, the Reverse Frequency function can be used to re-establish communications with another radio. - Page 24 4. Repress the [UST] key to exit the UST mode, then LED resets to the original display mode. Public Address (PA) The PA feature amplifies audio inputted from the microphone, and the audio can be heard from the external speaker which is connected via 15PIN expansion port. 1.
- Page 25 Note: If no signal is received within the preset time period, the signalling squelch is enabled. Compander Press the Compander key (programmable) to toggle the compander feature ON or OFF. Scrambler Press the Scrambler key (programmable) to toggle the Scrambler feature ON or OFF. Note: The emphasis/de-emphasis feature is disabled while the Scrambler is ON, and enabled while the Scrambler is OFF.
- Page 26 Key Assignment Programmable function keys [P1]-[P2], ▲/▼. Key Assignment No Function keys Setting Display Remarks [P1] No function CH Number CH Up Channel Up CH Number CH Down Channel Down CH Number MONI A MONI A: Carrier Squelch-momentary CH Number MONI B MONI B: Carrier Squelch-toggle CH Number...
- Page 27 Scrambler CH Number Scrambler Compander CH Number Compander Emergency Call EmergencyCH Number (1- 8) Emergency call [P2] CH Number No function CH Up CH Number Channel Up CH Down Channel Down CH Number MONI A: Carrier Squelch-momentary MONI A CH Number MONI B: Carrier Squelch-toggle MONI B CH Number...
- Page 28 Compander CH Number Compander mergency Call EmergencyCH Number (1- 8) Emergency call 3 ▲ CH Number No function ( [UP] ) CH Up (default) CH Number Channel Up CH Down CH Number Channel Down MONI A: Carrier Squelch-momentary MONI A CH Number MONI B: Carrier Squelch-toggle MONI B...
- Page 29 Emergency Call EmergencyCH Number (1- 8) Emergency Cal 4 ▼ ( [DOWN] ) CH Number No function CH Up CH Number Channel Up CH Down (default) CH Number Channel Down MONI A MONI A: Carrier Squelch-momentary CH Number MONI B MONI B: Carrier Squelch-toggle CH Number MONI C...
- Page 30 5 Selector Knob Volume Knob CH Number Volume Knob Note: the above “CH Number” can be any value among “1 – 8”. 第 30 页 共 31 页...
- Page 31 All the above specifications and design are subject to change by HYT without notice. All the reproduction and translation of this manual without authorization of HYT is not allowed. 第 31 页 共 31 页...