Advertisement
Quick Links
Advertisement

Related Manuals for dg casa Ocean 16650


Summary of Contents for dg casa Ocean 16650
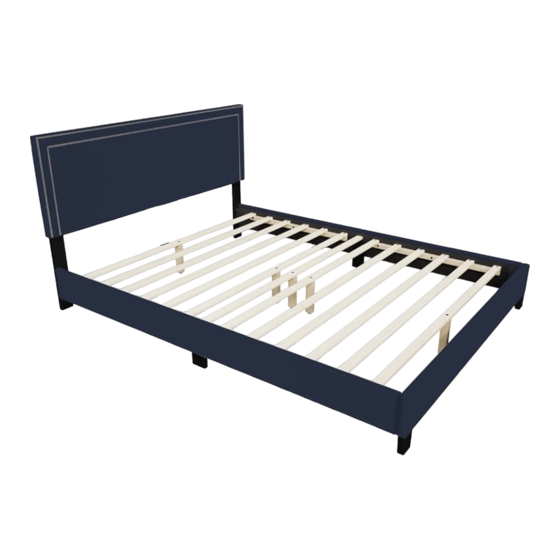
- Page 1 16650 Ocean Bed 1-866-4-DGCASA service@dgcasa.com www.dgcasa.com...
- Page 2 IMPORTANT INFORMATION Seller and Manufacturer disclaim all and any liability for property damage, personal injury, or loss, direct, indirect, or incidental, resulting from the incorrect assembly, inadequate maintenance, improper use, or neglect of this product. NOTICE Keep these assembly instructions for future reference. �...
- Page 3 DAYBED PARTS Headboard Headboard Leg (Left) Headboard Leg (Right) Footboard Footboard Foot Side Rail A Side Rail B Side Support Leg Bed Slat x 12 Center Rail Center Support Leg Single Bed Slat Center Support Leg (Big)
- Page 4 HARDWARE HARDWARE Wood Screw Small Bolt - Long x 26 M4 x 32mm M6 x 60mm Small Bolt - Medium Small Bolt - Short M6 x 50mm M6 x 30mm Large Bolt Flat Washer Spring Washer M8 x 20mm Adjustable Glide...
- Page 5 BED ASSEMBLY - STEP 1 Components and Hardware to build the bed are located inside of the Headboard . Unzip the back of the Headboard to access these parts.
- Page 6 BED ASSEMBLY - STEP 2 Small Bolt - Medium Spring Washer M6 x 50mm Fasten Headboard Leg (Left) and Headboard Leg (Right) to Headboard with Small Bolt - Medium and Spring Washer...
- Page 7 BED ASSEMBLY - STEP 3 Small Bolt - Medium M6 x 50mm Fasten Footboard Foot to Footboard with Small Bolt - Medium...
- Page 8 BED ASSEMBLY - STEP 4 Large Bolt M8 x 20mm B & C Attach Large Bolt to the Headboard Leg (Left) , Headboard Leg (Right) and Footboard shown. Do not completely tighten the bolts at this time.
- Page 9 BED ASSEMBLY - STEP 5 Small Bolt - Short Flat Washer M6 x 30mm Attach Side Support Leg to Side Rail A and Side Rail B as shown with Small Bolt and Flat Washer...
- Page 10 BED ASSEMBLY - STEP 6 B & C Attach Side Rail A to Headboard Leg (Right) and Side Rail B to Headboard Leg placing the bracket into place. Next, attach Side Rail B and Side Rail A to Footboard placing the bracket into place. Fully tighten all bolts...
- Page 11 BED ASSEMBLY - STEP 7 Small Bolt - Long M6 x 60mm Attach Center Support Leg to Center Rail and the Bed Slat with Small Bolt - Long...
- Page 12 BED ASSEMBLY - STEP 8 Small Bolt - Medium M6 x 50mm Attach Center Support Leg (Big) to Single Bed Slat with Small Bolt - Medium...
- Page 13 BED ASSEMBLY - STEP 9 Wood Screw x 24 M4 x 32mm Attach Assembled Bed Slat to Assembled Bed with Wood Screw as shown.
- Page 14 BED ASSEMBLY - STEP 10 Wood Screw M4 x 32mm Attach Assembled Bed Slat to Side Support Leg with Wood Screw as shown.
- Page 15 BED ASSEMBLY - STEP 11 Adjustable Glide K & M WARNING! Make Sure that Center Support Legs and Center Support Legs (Big) are perpendicular to the floor before using the bed. Rotate Adjustable Glide clockwise or counter clockwise until it is firmly against the floor.
-
Page 16: Frequently Asked Questions
FAQs FREQUENTLY ASKED QUESTIONS WE ARE OPEN MONDAY TO FRIDAY TO ASSIST YOU AND WILL REPLY TO ANY OF YOUR MESSAGES WITHIN 24-48 HOURS. THE AVERAGE RESPONSE TIME IS WITHIN 24 HOURS. IF YOU ENCOUNTER AN ISSUE THAT IS NOT MENTIONED BELOW, PLEASE MESSAGE US IN OUR CONTACT PAGE BY VISITING WWW.DGCASA.COM WHERE IS THE REST OF MY ORDER? THE PACKAGE I RECEIVED SAYS CARTON NO.
Need help?
Do you have a question about the Ocean 16650 and is the answer not in the manual?
Questions and answers