Table of Contents
Advertisement
Quick Links
Component List
O - Sliding Door x 2
Q - Adjustable
Center Shelf x 1
Designed by Matthew Weatherly
These distinctive product configurations are protected by US and international
patents, trade dress, and/or copyright laws.
BDI are trademarks of Becker Designed, Inc.
All Rights reserved. © 2010 BDI
Made in China. 8158 Revision: 031610
CIRRUS
8158
A - Phillips Screwdriver
B - 4mm Hex Driver
C - Dowel Pin x 8
D - Cam Bolt x 4
E - Cam Fastener
x 4
F- Leg Assembly
x 2
G - Rear Rail x 1
H - Front Rail x 1
I - Assembled Cabinet
x 1
J - Washer x 8
K - 1/4-20 x 55mm
Machine Screw x 8
L - 1/4-20 x 90mm
Machine Screw x 2
M - 1/4-20 x 38mm
Machine Screw x 4
N - Center Wheel Block
x 1
P - Back Panel
x 2
R - Adjustable Shelf
x 4
Cirrus is engineered for easy assembly. Carefully follow this procedure to
prevent any damage.
Placement and Maintenance
Cirrus is designed for indoor use on level floors. Clean glass with glass
cleaner, and steel parts and wood veneer with a moist cloth.
Step 1
Unpack and Identify
Unpack and identify the components at left. Note that some components
are shipped inside the cabinet. The assembly workspace should be a
nonmarring surface such as carpet. For missing hardware pieces, please
contact BDI Customer Service at customerservice@bdiusa.com. For all
other concerns, please contact your BDI Retailer.
Step 2
Build Base Assembly
Install Cam Bolts (D) near front and rear edge of each Leg Assembly (F)
using provided Phillips Screwdriver (A) . Next, insert Dowel Pins (C) into
holes at ends of Front Rail (H) and Rear Rail (G) . Then join both Rails
and Leg Assemblies together, aligning holes for all Cam Bolts and Dowel
Pins.
Once all Cam Bolts and Dowel Pins are fully inserted to the respective
holes, fasten together by inserting Cam Fastener (E) and turning about
one-half turn clockwise using Phillips Screwdriver (A) .
F
H
F
D
1
ASSEMBLY INSTRUCTIONS
BDIUSA.COM
CUSTOMERSERVICE@BDIUSA.COM
G
E
G
C
H
C
F
F
Advertisement
Table of Contents

Related Manuals for BDI CIRRUS 8158


Summary of Contents for BDI CIRRUS 8158
- Page 1 The assembly workspace should be a nonmarring surface such as carpet. For missing hardware pieces, please E - Cam Fastener contact BDI Customer Service at customerservice@bdiusa.com. For all other concerns, please contact your BDI Retailer. F- Leg Assembly...
- Page 2 Step 3 Front Rail (H) Attach Base Assembly Rear Rail (G) is wood veneered Attach Base Assembly to Assembled is painted Black Cabinet (I) with Front Rail (H) oriented towards cabinet front (see drawing). Leg Assembly Fasten into place using Washers (J) and Screws (K) at Front Rail (H) and Rear Rail (G) and tighten with Hex Driver (B) .
- Page 3 Step 6 Install Sliding Doors Install Sliding Doors (O) by carefully inserting wheels at door edge with brass plate into track as shown. Make sure each door rolls smoothly side to side, then push downward with gentle, firm motion and tip wheels at opposite door edge carefully into opposite track. NOTE: Match Labels on Door with Labels on Cabinet.
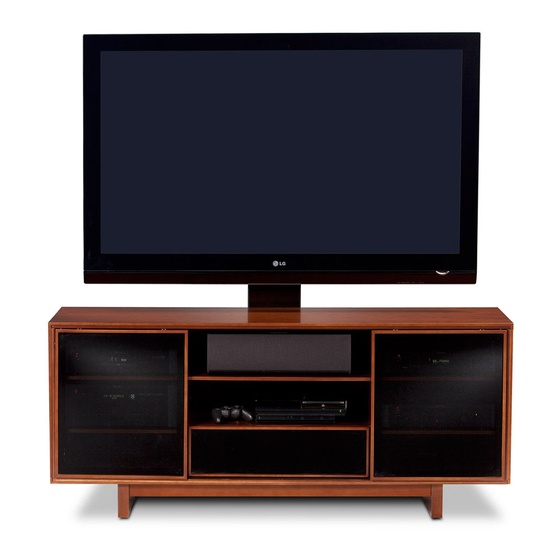
- Page 4 Optional Flat Panel TV Mount This BDI cabinet is compatible with BDI’s Flat Panel TV Mount Arena 9972 (sold separately) , with the following features: accommodates most TVs up to 60" swivel allows for rotating for optimal viewing...
Need help?
Do you have a question about the CIRRUS 8158 and is the answer not in the manual?
Questions and answers