Table of Contents
Advertisement
Advertisement
Table of Contents

Related Manuals for Sharp CV -P09FX


Summary of Contents for Sharp CV -P09FX
- Page 1 * Plasmacluster is a trademark of SHARP Corporation. * Plasmacluster est une marque de commerce de SHARP Corporation. CV - P09FX PORTABLE TYPE ROOM AIR CONDITIONER INSTALLATION AND OPERATION MANUAL CLIMATISEUR DE CHAMBRE DE TYPE PORTATIF MANUEL D’INSTALLATION ET D’UTILISATION...
-
Page 3: Table Of Contents
ENGLISH This manual explains the proper use of your new air conditioner. Please read this manual carefully before using the product. This manual should be kept in a safe place for handy reference. CONTENTS • FOR CUSTOMER ASSISTANCE (U.S.) ... E-2 •... -
Page 4: For Customer Assistance (U.s
Address City State Telephone TO PHONE: Dial 1-800-BE-SHARP (237-4277) for: SERVICE (for your nearest Sharp Authorized Servicer) PARTS (for your Authorized Parts Distributor) ACCESSORIES ADDITIONAL CUSTOMER INFORMATION TO WRITE: For service problems, warranty information, missing items and other assistance: Sharp Electronics Corporation... -
Page 5: Consumer Limited Warranty (U.s
Product, and shall constitute full satisfaction of all claims, whether based on contract, negligence, strict liability or otherwise. In no event shall Sharp be liable, or in any way responsible, for any damages or defects in the Product which were caused by repairs or attempted repairs performed by anyone other than an authorized servicer. -
Page 6: For Customer Assistance (Canada
City Province Postal Code Telephone TO PHONE: Dial 1-905-568-7140 for: SERVICE (for your nearest Sharp Authorized Servicer) PARTS (for your Authorized Parts Distributor) ACCESSORIES ADDITIONAL CUSTOMER INFORMATION TO WRITE: For service problems, warranty information, missing items and other assistance: Sharp Electronics of Canada Ltd. -
Page 7: Limited Warranty
Sharp product or the loss of information. The purchaser will be responsible for any removal, reinstallation, transportation and insurance costs incurred. -
Page 8: Precautions
• Reorient or relocate the receiving antenna. • Increase the separation between the room air conditioner and radio/TV receiver. • Connect the room air conditioner into an outlet on a circuit different from that to which the radio/TV receiver is connected. -
Page 9: Usage Cautions
• Do not splash or pour water directly onto the unit. Water can cause electrical shock or equipment damage. • Drainage should be performed whenever moving the air conditioner. (See Page 29) If any water remains in the tank, it may spill out while being moved. -
Page 10: Notes On Operation
• In the event of a power failure during use, allow 3 minutes before restarting the unit. After power is reinstated, restart the air conditioner. If the power was off for less than three minutes, be sure to wait at least three minutes before restarting the unit. If you restart the air conditioner within three minutes, a protective device in the unit may cause the compres- sor to shut off. -
Page 11: Location
LOCATION • The air conditioner should be placed on a firm founda- tion to minimize noise and vibration. For safe and se- cure positioning, place the unit on a smooth, level floor strong enough to support the unit. • The unit has casters to aid placement, but it should only be rolled on smooth, flat surfaces. -
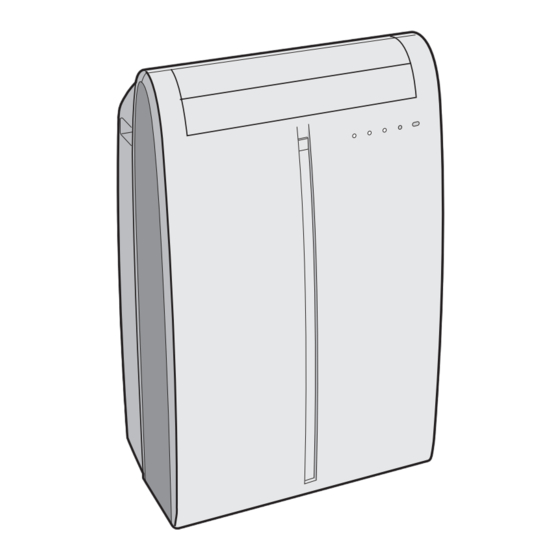
Page 12: Part Names
PART NAMES FRONT VIEW REAR VIEW NOTE: Actual unit might vary slightly from above illustration. 1 Air Outlet 2 Vertical louvers 3 Horizontal louvers 4 PLASMACLUSTER Lamp (blue) 5 Remote control signal receiver window 6 AUX. Button 7 OPERATION Lamp (red) 8 TIMER Lamp (orange) 9 MEGA COOL Lamp (green) 0 Air inlet... -
Page 13: Remote Control
REMOTE CONTROL REMOTE CONTROL DISPLAY 1 Transmitter 2 Display 3 POWER Button 4 LIGHTS Button 5 TEMPERATURE Button 6 PLASMACLUSTER Button 7 1 hr OFF Button 8 MODE Button 9 ON TIMER Button 0 FAN Button q OFF TIMER Button w CANCEL Button e LOUVERS Button r RESET Button... -
Page 14: Install Window Panel
INSTALL WINDOW PANEL Installation in a double-hung sash window (See page 14 for installation in a sliding sash window. ) Connect the rain guards to the insect guard net. Insert all three projections on each rain guard into the holes in the insect guard net. Side “A”... - Page 15 If the inner width of the window is between 24" (609mm) and 36.8" (934mm) inclusive. (1) Open the window sash and place the window panel on the window stool. (2) Slide the adjustment panel to fit the window frame width. (3) Secure the window panel to the stool with 3 screws.
-
Page 16: Installation In A Sliding Sash Window
INSTALL WINDOW PANEL Installation in a sliding sash window (See page 12 for installation in a double-hung window.) Connect the rain guards to the insect guard net. Insert all three projections on each rain guard into the holes in the insect guard net. Side “A”... - Page 17 If the inner height of the window is between 24" (609mm) and 36.8" (934mm) inclusive. (1) Open the window sash and place the window panel on the window frame. (2) Slide the adjustment panel to fit the window frame height. (3) Secure the window panel to the window frame with 3 screws.
-
Page 18: Installation And Removal Of Exhaust Hose
INSTALLATION AND REMOVAL OF EXHAUST HOSE The exhaust hose must be installed or removed in accordance with the usage mode. MODE COOL, FAN, VENTILATION, DEHUMIDIFICATION with no container DEHUMIDIFICATION with container(minimum capacity 3 gallons) Installation of the exhaust hose Attach the window exhaust adapter to the exhaust hose. -
Page 19: Removal Of The Exhaust Hose
Removal of the exhaust hose Remove the window exhaust adapter. Pull out and remove the window exhaust adapter by pushing down two markings, and slide and close the exhaust cover in the window panel. Remove the exhaust hose adapter from the unit. -
Page 20: Pre-Operation Checks
The circuit breaker is activated, power is supplied, and the air conditioner is now ready for use. Do not attempt to use the air conditioner if the above procedure is impossible, as it is malfunctioning. Disconnect the power plug and request service. -
Page 21: How To Use The Remote Control
HOW TO USE THE REMOTE CONTROL Point the remote control towards the units signal receiver window and press the desired button. A beep will sound when the unit receives the signal. • Make sure nothing, such as curtains, blocks the signal receiver window. •... -
Page 22: Cool Mode
COOL MODE Drainage nozzle "CLOSE" position Stopcock Install the exhaust hose (See Page16), turn the drainage nozzle to the CLOSE position, and check the drainage nozzle is covered with the stopcock. Press the MODE button to select COOL mode. COOL DEHUM Press the POWER button to start op- eration. -
Page 23: Dehumidification Mode
DEHUMIDIFICATION MODE In this mode, the air conditioner dehumidifies the room. Dehumidification with container Remove the exhaust hose (See Page 17) Turn the drainage nozzle to the OPEN position. Pull the stopcock out from the drainage nozzle. • When the stopcock is removed, a small amount of water may be discharged from the drainage nozzle. -
Page 24: Fan Mode
FAN MODE In this mode, the air conditioner simply circulates the air without cooling it. Install the exhaust hose (See Page16), turn the drainage nozzle to the CLOSE position, and check the drainage nozzle is covered with the stopcock. VENTILATION MODE In this mode, the air conditioner ventilates the air to outdoors. -
Page 25: To Change Air Flow Direction
TO CHANGE AIR FLOW DIRECTION UP / DOWN AIR FLOW DIRECTION LEFT / RIGHT AIR FLOW DIRECTION CAUTION Never attempt to adjust the horizontal louvers manually. • Manual adjustment of the horizontal louvers can cause the unit to malfunction when the remote control is used for adjustment. -
Page 26: Plasmacluster Operation
PLASMACLUSTER OPERATION The Plasmacluster ion generator inside the air conditioner will release positive and negative Plasmacluster ions into the room. Approximately the same numbers of posi- tive and negative ions released into the air. Press the PLASMACLUSTER button during operation. -
Page 27: Mega Cool Operation
MEGA COOL OPERATION In this operation, the air conditioner fan works at extra high speed with a setting temperature of 59°F. NOTES: • You cannot set the temperature or fan speed during MEGA COOL operation. • The fan returns to the HIGH speed setting after the unit has run for 30 minutes in MEGA COOL mode. -
Page 28: Timer Operation
TIMER OPERATION OFF TIMER The unit will turn off automatically according to your setting. Timer duration can be set from a minimum of half an hour (30 minutes) to a maximum of 12 hours. Up to 9.5 hours, you can set in half-hour (30-minutes) increments and from 10 to 12 hours, in 1-hour increments. - Page 29 ON TIMER The unit will turn on automatically according to your setting. Timer duration can be set from a minimum of half an hour (30 minutes) to a maximum of 12 hours. Up to 9.5 hours, you can set in half-hour (30-minute) increments and from 10 to 12 hours, in 1-hour increments.
-
Page 30: Auxiliary Mode
AUXILIARY MODE AUXILIARY MODE Use this mode when the remote control is not available. NOTES: • If the AUX. button is pressed during normal operation, the unit will turn off. • Upon starting AUXILIARY operation, the drainage pump inside the unit runs for about a minute, which may produce an audible gurgling sound. -
Page 31: Drainage
DRAINAGE Prepare for drainage and drain out water within the unit in the following cases. If the unit stops operating and the TIMER, OPERATION and MEGA COOL lamps are blinking. (This indicates that the water tank inside the unit is full.) Make sure to turn the unit off. -
Page 32: Maintenance
(120°F/50°C or hotter) when cleaning. CLEANING THE INSECT GUARD NET Insect guard net MAINTENANCE AFTER AIR CONDITIONER SEASON Perform drainage to drain out water within the unit. (See Page 29 "When the unit is not used for a long time"). -
Page 33: Before Calling For Service
• Did you restart the unit within 3 minutes of a power failure? If the power was off for less than 3 minutes when, you restarted the air conditioner, a protective device may cause the compressor to shut off, preventing cooling for about 5 minutes.
Need help?
Do you have a question about the CV -P09FX and is the answer not in the manual?
Questions and answers
What would cause my unit to shout down by its self then the lights start blinking