
Related Manuals for Crestron Automate VX Series


Summary of Contents for Crestron Automate VX Series
- Page 1 IV-SAM-VXP-1B and IV-SAM-VXS-1B 1 Beyond Automate™ VX Series Product Manual Crestron Electronics, Inc.
- Page 2 Crestron disclaims any proprietary interest in the marks and names of others. Crestron is not responsible for errors in typography or photography.
-
Page 3: Table Of Contents
Contents Overview Features IV-SAM-VXP-1B Features IV-SAM-VXS-1B Features IV-PROSERVICE-1B Features Physical Description Specifications IV-SAM-VXP-1B Specifications Product Specifications IV-SAM-VXS-1B Specifications Product Specifications Installation In the Box Wire the Camera System Connect to the System Configuration Initial Setup Assign Network Interfaces Set Static IP Addresses Use Remote Support System Configuration Access the Web Configuration Interface... - Page 4 Cameras Menu Camera Setup Tool Resources Crestron Support and Training Product Certificates Related Documentation iv • Contents Product Manual — Doc. 9324A...
-
Page 5: Overview
Overview The 1 Beyond Automate™ VX series provides voice-activated camera switching solutions that bring a full multicamera studio experience to meetings, town halls, and classrooms. Camera switching and movement are done automatically based on the active speaking participant. Automate VX comes with built-in recording and streaming capability along with outputs for video conferencing. -
Page 6: Features
Features Refer to the following sections for more information on the features provided by various 1 Beyond Automate™ VX models. IV-SAM-VXP-1B Features on page 3 IV-SAM-VXS-1B Features on page 5 IV-PROSERVICE-1B Features on page 7 2 • IV-SAM-VXP-1B and IV-SAM-VXS-1B Product Manual — Doc. 9324A... -
Page 7: Iv-Sam-Vxp-1B Features
The 1 Beyond Automate system requires the purchase of 1 Beyond Camera Systems Remote Professional Services. An Equipment Proposal issued by the Crestron Sales Support Services team is required before placing an order for IV-SAM-VXP-1B and IV-SAM-VXS-1B. All orders must reference the Equipment Proposal number and include the complete camera system outlined in the Equipment Proposal, including Professional Services. - Page 8 Browser or Third-Party Control Turn on autoswitching, record/stream, and change room configurations or layouts from most phones, tablets or browsers. An API for Crestron® or Zoom Rooms™ Control is also provided. Conference, Stream, and/or Record In addition to high-quality output for hard or soft codecs, the system has a built-in encoder and recorder to enable multiple live streams and over 100 hours of recording.
-
Page 9: Iv-Sam-Vxs-1B Features
The 1 Beyond Automate system requires the purchase of 1 Beyond Camera Systems Remote Professional Services. An Equipment Proposal issued by the Crestron Sales Support Services team is required before placing an order for IV-SAM-VXS-1B. All orders must reference the Equipment Proposal number and include the complete camera system outlined in the Equipment Proposal, including Professional Services. - Page 10 Browser or Third-Party Control Turn on autoswitching, record/stream, and change room configurations or layouts from most phones, tablets or browsers. An API for Crestron® or Zoom Rooms™ Control is also provided. Conference, Stream, and/or Record In addition to high-quality output for hard or soft codecs, the system has a built-in encoder and recorder to enable multiple live streams and over 100 hours of recording.
-
Page 11: Iv-Proservice-1B Features
Automate™ VX voice-activated camera tracking solution. An Equipment Proposal issued by Crestron’s Sales Support Services team is required before placing an order for any Automate VX system. All orders must reference the Equipment Proposal number and include the complete camera system as set forth in the Equipment Proposal, including 1 Beyond Camera Systems Remote Professional Services (IV-PROSERVICE-1B). - Page 12 Remote Commissioning and Validation Following installation, the Crestron support team will connect remotely with your onsite team to help deploy the solution and configure the Automate VX software. The support team accesses the Automate VX system remotely with your permission and assistance.
-
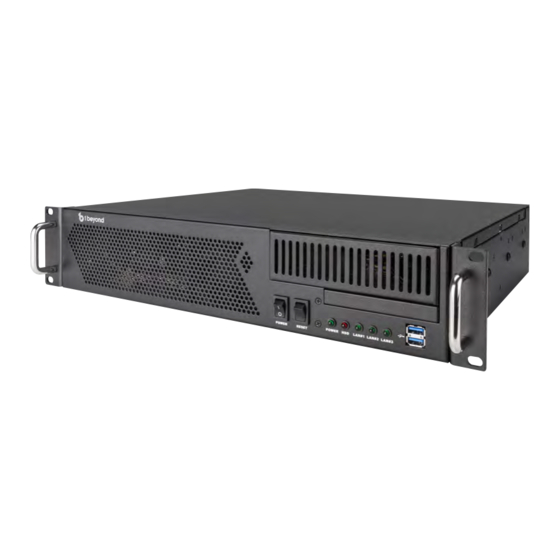
Page 13: Physical Description
Physical Description The camera switcher provides the following connectors and indicators. IV-SAM-VXP-1B Connectors and Indicators IV-SAM-VXS-1B Connectors and Indicators Name Description Power AC power BIOS Flashback Not used Button Wi-Fi Connects the antenna to the onboard Wi-Fi™ network chip HDMI Not used USB 3.2 Gen 1 2x USB Type-A ports for peripheral device connections Audio Connections Orange: Central/bass speaker out... - Page 14 Name Description USB 3.2 Gen1 USB Type-A port for peripheral device connections USB 3.2 Gen2 USB Type-C® port for faster data rates Thunderbolt™ 4 ETH2 2.5 Gbps RJ-45 Ethernet port USB 3.2 Gen2 USB Type-A port for faster data rates USB 3.2 Gen2 USB Type-C port for faster data rates Thunderbolt 4 USB 3.2 Gen 1...
-
Page 15: Specifications
Specifications Refer to the following sections for more information on the specifications for various 1 Beyond Automate™ VX models. IV-SAM-VXP-1B Specifications on page 12 IV-SAM-VXS-1B Specifications on page 14 Product Manual — Doc. 9324A IV-SAM-VXP-1B and IV-SAM-VXS-1B • 11... -
Page 16: Iv-Sam-Vxp-1B Specifications
IV-SAM-VXP-1B Specifications Product specifications for the IV-SAM-VXP-1B and IV-SAM-VXS-1B are provided below. Product Specifications Automate VX Pro Capabilities Titles, Graphics, Layouts Titles, logos, backgrounds can be added, Easy-to-use graphic designer to create any multi-source layout Program Record MP4 file (H.264 codec). User-selectable bitrate up to 10 Mbps ISO Record MJPEG MOV (30–200 Mbps) Individually selectable Recording Capacity... - Page 17 Power 400 W, 100–240VAC Dimensions Height 3.5 in. (89 mm) Width 16.75 in. (425 mm) Depth 14.5 in. (368 mm) Weight 14 lb (6.35 kg) Product Manual — Doc. 9324A IV-SAM-VXP-1B and IV-SAM-VXS-1B • 13...
-
Page 18: Iv-Sam-Vxs-1B Specifications
IV-SAM-VXS-1B Specifications Product specifications for the IV-SAM-VXP-1B and IV-SAM-VXS-1B are provided below. Product Specifications Automate VX Capabilities Titles, Graphics, Layouts Titles, logos, backgrounds can be added, Easy-to-use graphic designer to create any multi-source layout Program Record MP4 file (H.264 codec). User-selectable bitrate up to 10 Mbps ISO Record MJPEG MOV (30–200 Mbps) Individually selectable Recording Capacity... - Page 19 Power 400 W, 100–240VAC Dimensions Height 3.5 in. (89 mm) Width 16.75 in. (425 mm) Depth 14.5 in. (368 mm) Weight 14 lb (6.35 kg) Product Manual — Doc. 9324A IV-SAM-VXP-1B and IV-SAM-VXS-1B • 15...
-
Page 20: Installation
Installation Use the following procedures to install the Automate VX system. In the Box Qty. Description IV-SAM-VXP-1B or IV-SAM-VXS-1B, Automate™ VX Camera Switcher Additional Items Rail, 20 in. (508 mm) Power Cord, IEC Wi-Fi™ Network Antenna SDI to HDMI® Signal Converter DisplayPort™ to HDMI (female) Signal Adapter Feet Set, Chassis IV-SAM-VXP-1B Only Cable, MiniDIN to BNC... -
Page 21: Connect To The System
5. Connect the DisplayPort™ computer monitor output to a display (either directly or through a matrix). 6. To perform initial device setup, either connect the Ethernet port to a computer for remote desktop control, our use a mouse and keyboard for direct control. For more information, refer to Connect to the System below. -
Page 22: Configuration
Configuration Use the following procedures to configure the Automate VX system. This section provides the following information: Initial Setup on page 19 System Configuration on page 21 Wirecast Configuration on page 34 18 • IV-SAM-VXP-1B and IV-SAM-VXS-1B Product Manual — Doc. 9324A... -
Page 23: Initial Setup
Initial Setup Use the following procedures to set up the Automate VX system following installation. Assign Network Interfaces The Automate VX system has two NICs labeled Ethernet and Ethernet 2. The Ethernet ports have the following default addressing configuration: The Ethernet port is set as a static IP for initial configuration via the VNC Viewer. The Ethernet 2 port is set to use DHCP and is used for the Dante®... -
Page 24: Use Remote Support
To assign IP addresses for 1 Beyond cameras, refer to the documentation for your 1 Beyond camera model. It is also recommended to change the camera names to match the global camera IDs that have been designated in the Automate VX system software. For more information, refer to the 1 Beyond Camera Manager Product Manual Use Remote Support The Automate VX system can be configured from a laptop on the same subnet as the system... -
Page 25: System Configuration
NOTE: Most system configuration can be accomplished by using the Intelligent Video Room Designer tool. This tool is available on the Crestron website and locally on the Automate VX system. Access the Web Configuration Interface To access the web configuration interface for the Automate VX system, open the Chrome®... -
Page 26: Camera Settings
Web Configuration Interface - Main Tab To enter the system settings, select the gear icon at the top of the web configuration interface. Camera Settings Select the Camera tab to view the available camera settings. Camera Tab The following camera settings can be configured. Select Control Protocol Use the Select Control Protocol drop-down menu to select between Serial or IP control. - Page 27 Camera Table For IP control, enter the IP address of each connected camera in the IP column of the Camera Table. The camera number in the table must match the SDI port number that the camera is connected to. Camera Table Setting The following camera models can be selected from the Model drop-down menu: AutoTracker Transfer Camera Presets Camera preset settings can be exported once installation is complete and then imported into...
-
Page 28: Microphone Settings
Microphone Settings Select the Microphone tab to view the available microphone settings. Microphone Tab The following microphone settings can be configured. These settings can also be modified by editing the Room Designer file. Microphone Device Settings The Microphone Device Settings table is used to add the control IP addresses of each microphone or automix device used within the camera switching system. - Page 29 If using multiple devices, a P300, Q-SYS, SCM-820, or Tesira device (or the Intellimix Room software) must be set as an adjudicator. To set an adjudicator device, select the Enable Adjudicator check box, then enter the control IP address of the device into the Adjudicator IP text field.
- Page 30 Microphone Table The Microphone Table setting shows the relationship between microphones and cameras in the system using five columns per row (Device Number, Mic Number, Camera Preset, Primary Camera, and Secondary Camera). The number of devices and microphones is determined by the Microphone Device Settings table. The Microphone Table updates automatically when the configuration is saved.
-
Page 31: General Settings
Microphone Table - Static Title Column Select Dynamic Titling from Mic. Devices to dynamically pull titles from a Shure Discussion System (if using). Select Setup Titling from Dev/Mic. Number for use during system configuration. The active device and corresponding microphone numbers will be displayed to verify that the correct camera preset calls are made. - Page 32 1080i 60 1080p 23.98 1080p 24 1080p 25 1080p 29.97 1080p 30 1080p 50 1080p 59.94 1080p 60 720p 50 720p 59.94 720p 60 Layout Settings Layouts are a way of switching between different composite shots. Layout Settings Each layout is given an ID (A to Z) and can be named using the Layout Name text field. To add additional layouts, select Add Row.
- Page 33 Select the Enabling Pause check box to provide pausing functionality during recording. Incomplete recordings are stored in D:/Recording_Temp. Once a recording has been stopped, the incomplete recordings are joined into a complete recording and saved in D:/Recordings. Home Shot Settings The following home shot settings are provided.
- Page 34 The Default Switch Time field sets the duration that must elapse (in milliseconds) after the last active participant stops speaking before the default shot is called. The Automate VX system will select between the Primary Camera and Secondary Camera to call a default shot after the default switch time expires. Enter the camera number into the Address field and the preset number that should be called into the Preset field.
-
Page 35: Advanced Settings
NOTE: Loading a room configuration will discard any unsaved changes on your current room configuration. Ensure any changes are saved prior to making a new selection. Selecting a room configuration can also be called with an API or Crestron command. Product Manual — Doc. 9324A... -
Page 36: Admin And User Settings
Load MXA910 Presets When using multiple room configurations, it is possible to load corresponding presets for MXA-910 microphone arrays. This is useful when multiple room and lobe layouts are used. Load MXA910 Presets Select the Enable on changing to this room configuration check box to load to corresponding numbered preset in any MXA-910 microphone arrays when the room configuration is changed. - Page 37 Change Password Select the Change Password tab to update the password for an existing user. User Settings - Change Password 1. Select the user from the Username drop-down menu 2. Enter the existing password in the Old Password text field. 3.
-
Page 38: Wirecast Configuration
Wirecast Configuration The Automate VX system uses Wirecast® streaming software to change live shots, layouts, and output. During initial setup, changes may need to be made to the Wirecast document to customize the system, such as setting custom layouts with logos. The Wirecast document is located within C:\Program Files\1 Beyond\Automate Project.wcst. -
Page 39: Create Layouts
Side-by-Side Wirecast Shots When creating side-by-side shots in the Wirecast document, place the first camera on the left and the second camera on the right. Add Titles Titles are placed in shots in the layer above the basic and side-by-side shots. Each layout has a regular title and a side-by-side title (for example, A_Title and A_Title_S). -
Page 40: Configure Audio
Configure Audio Audio input to the Automate VX system is not required for voice-activated camera switching. For video conferencing, send audio directly from your DSP to your codec with a 400ms delay in order to ensure proper lip sync. For local recording or streaming with the system, activate the installed Dante Virtual Soundcard by purchasing a license from www.audinate.com. -
Page 41: Operation
Operation Use the following procedures to operate the Automate VX system. This section provides the following information: Basic Operation on page 38 Camera Setup Tool on page 41 Product Manual — Doc. 9324A IV-SAM-VXP-1B and IV-SAM-VXS-1B • 37... -
Page 42: Basic Operation
Basic Operation The following procedures describe how to operate basic functions of the Automate VX system. Main Menu Select the Main tab to view and perform common functions for the Automate VX system. Main Menu Selections Select AutoSwitch to start and stop automated switching. A blue outline is shown around the button when autoswitching is turned on, and the system output will switch automatically based on the active speaking participant. -
Page 43: Layouts Menu
Layouts Menu Select the Layouts tab to view and select preset layouts for the Automate VX system. Layouts Menu Selections To change layouts during AutoSwitch mode, select the button that corresponds with the desired layout. The layout changes immediately. Room Configs Menu Select the Room Configs tab to view and select preset room configurations for the Automate VX system. - Page 44 Cameras Menu Select the Cameras tab to view and select individual cameras for manual control. Cameras Menu Selections To select a camera for manual control, select a button under Cameras that corresponds to the desired camera. The live shot will change to the selected camera immediately. After selecting a camera, use the buttons under Presets to select a saved camera preset.
- Page 45 Camera Setup Tool The Automate VX system provides a Camera Setup tool that allows microphones to be paired with their corresponding camera shot for each configuration. The tool also simplifies changing any camera presets. To access the camera setup tool, select the camera icon within the settings page. Camera Icon Selection The Camera Setup page is displayed.
- Page 46 NOTE: The selections in this list will be formatted as "Device #, Mic: #" unless custom titling has been turned on. Select the microphone icon button to turn on AutoLocate mode, which activates the microphone closest to the active speaking participant. After selecting a microphone, select a numbered button next to the camera icon to select a camera.
- Page 47 Resources The following resources are provided for the Automate VX system. NOTE: You may need to provide your Crestron.com web account credentials when prompted to access some of the following resources. Crestron Support and Training Crestron True Blue Support Crestron Resource Library Crestron Online Help (OLH) support.crestron.com/app/answers/detail/a_id/1001561...
- Page 48 Product Manual — Doc. 9324A Crestron Electronics, Inc. 15 Volvo Drive, Rockleigh, NJ 07647 06/07/22 Tel: 888.CRESTRON Specifications subject to Fax: 201.767.7656 change without notice. www.crestron.com...
Need help?
Do you have a question about the Automate VX Series and is the answer not in the manual?
Questions and answers