
Related Manuals for Kramer VW-16


Summary of Contents for Kramer VW-16
- Page 1 VW-16 USER MANUAL MODEL: VW-16 4X4 Video Wall Driver P/N: 2900-301546 Rev 1 www.kramerAV.com...
-
Page 2: Table Of Contents
Viewing the Ethernet Type (Static or HDCP) Viewing the MAC Address Changing the IP Address Setting the Unit’s ID Viewing the Fan Speed Resting the VW-16 to its Factory Default Resetting Device Upgrading Firmware Technical Specifications Default Communication Parameters Default EDID... -
Page 3: Introduction
Kramer Electronics Ltd. Introduction Welcome to Kramer Electronics! Since 1981, Kramer Electronics has been providing a world of unique, creative, and affordable solutions to the vast range of problems that confront the video, audio, presentation, and broadcasting professional on a daily basis. In recent years, we... -
Page 4: Overview
European Advanced Recycling Network (EARN) and will cover any costs of treatment, recycling and recovery of waste Kramer Electronics branded equipment on arrival at the EARN facility. For details of Kramer’s recycling arrangements in your particular country go to our recycling pages at www.kramerav.com/support/recycling. -
Page 5: Typical Applications
Rental and staging events. • Monitoring in control rooms, banks, and stock markets. • Security and surveillance systems. Controlling your VW-16 Control your VW-16 directly via the front panel push buttons with on-screen menus, or: • By RS-232 serial commands transmitted by a touch screen system, PC, or other serial controller. -
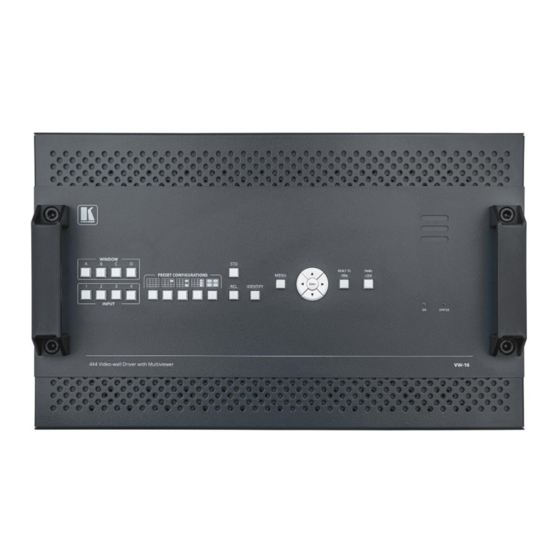
Page 6: Defining Vw-16 4X4 Video Wall Driver
Kramer Electronics Ltd. Defining VW-16 4X4 Video Wall Driver This section defines VW-16. Figure 1: VW-16 4x4 Video Wall Driver Front Panel Feature Function Metal handles (x2) Rigid metal handles for easy lifting. INPUT Buttons (1 to 4) After pressing a Window button (above), press an input button to select this input for that window. - Page 7 Lights green when power is on and the machine is working normally. STATUS LED Lights green when fan operates properly. Flashes in case of fan malfunction. Figure 2: VW-16 4x4 Video Wall Driver Rear Panel Feature Function SERVICE USB Port Connect a USB flash drive to perform firmware upgrade.
-
Page 8: Mounting
Kramer Electronics Ltd. Mounting VW-16 This section provides instructions for mounting VW-16. Before you start the installation, make sure that the environment is within the recommended range: • Operation temperature – 0 to 40C (32 to 104F). • Storage temperature – -20 to +60C (-4 to +140F). - Page 9 Kramer Electronics Ltd. Connecting VW-16 Always switch off the power to each device before you connect it to your VW-16. After connecting your VW-16, connect its power and then turn on the power to each device. Figure 3: Connecting to the...
-
Page 10: Connecting
Stereo Audio Acceptor The following are the pinouts for connecting the output to a balanced stereo audio acceptor: Figure 4: Connecting to a Balanced Stereo Audio Acceptor Connecting to VW-16 via RS-232 You can connect to VW-16 via an RS-232 connection using, for example, a PC. -
Page 11: Operating And Controlling
For All & Save or Menu Only & Save Lock modes – Press and hold PANEL LOCK and RESET TO 1080P simultaneously for about five seconds. The PANEL LOCK button light turns off and the front panel buttons are unlocked. VW-16 – Operating and Controlling VW-16... -
Page 12: Controlling Device Via Osd Menu
The values defined in the different menus may change according to the firmware version (you can download the up-to-date firmware version from our Web site at www.kramerav.com/support/product_downloads.asp). VW-16 – Operating and Controlling VW-16... - Page 13 2. Select SCREEN SETTING > EDID and define the EDID parameters based on the information in the following table: Menu Item Function EDID Default EDID: 1080p. EDID on INPUT 1 Select the EDID for INPUT 1 which is applied to all outputs. EDID is defined. VW-16 – Operating and Controlling VW-16...
- Page 14 2. Select VIDEO WALL > VIDEO SOURCE press Enter and define the video source parameters based on the information in the following table: Menu Item Function INPUT 1 – INPUT 4 Select a source to input vide: Inputs 1-4. The video wall’s video source is set. VW-16 – Operating and Controlling VW-16...
- Page 15 Set the position and size of the windows of each custom screen layout from Custom1 to Custom 7. Single Picture The video of one source is only presented over the video wall. The multi-viewer layout settings are configured. VW-16 – Operating and Controlling VW-16...
- Page 16 Press, followed by an Input button (1 to 4), to save the current wall configuration. (Store) Press, followed by an Input button (1 to 4), to recall a pre-saved wall configuration. (Recall) The RCL and STO are configured. VW-16 – Operating and Controlling VW-16...
- Page 17 Menu Item Function H Offset 0-100 V Offset 0-100 Transparency IDENT. Timeout OFF/5-50 MENU. Timeout OFF/5-50 INFO. Timeout OFF/5-50 INFO. Display ON/OFF The OSD settings are configured. VW-16 – Operating and Controlling VW-16...
-
Page 18: Operating Via Ethernet
If you want to connect via a router and your IT system is based on IPv6, speak to your IT department for specific installation instructions. For info on configuring the Ethernet, see Defining System Settings on page 32. VW-16 – Operating and Controlling VW-16... - Page 19 4. Highlight either Internet Protocol Version 6 (TCP/IPv6) or Internet Protocol Version 4 (TCP/IPv4), which is based on the requirements of your IT system. 5. Click Properties. The Internet Protocol Properties window (specific to your IT system) shows as in Figure Figure VW-16 – Operating and Controlling VW-16...
- Page 20 6. Select Use the following IP Address for static IP addressing and enter the details as shown in Figure For TCP/IPv4 you can use any IP address in the range 192.168.1.1 to 192.168.1.255 (excluding 192.168.1.39) provided by your IT department. VW-16 – Operating and Controlling VW-16...
-
Page 21: Acquiring And Setting Current Edid Using Rs-232 Serial Commands
RJ-45 connectors. Acquiring and Setting Current EDID Using RS-232 Serial Commands 1. Connect a PC, or other serial controller to VW-16 RS-232. 2. Use Protocol 3000 commands, see Protocol 3000 Commands on page 41. VW-16 – Operating and Controlling VW-16... -
Page 22: Using Vw-16 Embedded Webpages
The following operating systems and Web browsers are supported: Operating Systems Versions Windows 7 Firefox Chrome Safari Windows 10 Edge Firefox Chrome Safari Safari Some features might not be supported by some cellphone operating systems. VW-16 – Using VW-16 Embedded Webpages... -
Page 23: Browsing Vw-16 Webpages
24. • Configuring the Screen Layout on page 25. • Audio Settings: on page 26. • Color Settings on page 27. • Layout Settings on page 27. • Resetting Device on page 34. VW-16 – Using VW-16 Embedded Webpages... -
Page 24: Configuring The Screen Settings
Input the screen’s outside screen width and length (which includes the bezel) and inside visual width and length (excluding bezel) for auto compensation. Figure 11: Bezel and Gap Compensation VW-16 – Using VW-16 Embedded Webpages... - Page 25 Screen Visual Length Input the visual length (vertical) of the display (excluding the bezel of display). Rotation Select the rotation angle R90° (clockwise), L90° (anti-clockwise) or Off. The default is Off. Click “Apply” to confirm the setting. Apply The screen settings are set. VW-16 – Using VW-16 Embedded Webpages...
-
Page 26: Configuring The Output Resolution Settings
To copy the EDID for INPUT 1 to all connected inputs: 1. From the Navigation List, select Screen Settings. 2. Below EDID, in Management, click the down arrow and choose Copy. Figure 14: EDID Page – Selecting an EDID Source VW-16 – Using VW-16 Embedded Webpages... -
Page 27: Configuring The Screen Layout
In this example, Column is set to 4 columns and Row is set to 4 rows: Figure 16: Example Screen Layout 3. To save the changes, click Apply. 4. Reload the webpage. The Screen layout is now configured. VW-16 – Using VW-16 Embedded Webpages... -
Page 28: Setting Up The Multi-Viewer Video Wall Page
1, INPUT 2, INPUT 3, or INPUT 4. Figure 17: Embedded Webpages – Setting the Source to Output Audio Note - To mute the source audio, select MUTE and click Apply. 3. Click Apply. The audio source to output is set. VW-16 – Using VW-16 Embedded Webpages... - Page 29 Multiview mode presents 3 PiP windows over a parent picture in the video wall. Layout E Multiview mode presents 4 windows over the video wall. Note – In this setting, input sources are fixed to the corresponding window. VW-16 – Using VW-16 Embedded Webpages...
- Page 30 Users can reset and restore the custom screen layout at any time. There are two ways to define the custom layout: • Move the slider to set the size and position of the window. Figure 18: Webpages – Adjusting the Slider in Custom Layout VW-16 – Using VW-16 Embedded Webpages...
- Page 31 2. In Custom, select a custom layout (1-7). The graphic layout window shows the selected custom layout. In this example, Custom 2 is selected: Figure 20: Example Webpage with Custom Multi-Viewer 3. Click Apply. The Custom layout is set. VW-16 – Using VW-16 Embedded Webpages...
- Page 32 Sets the length of the selected window. To adjust the tier setup: Tier 1, Tier 2, Tier 3, and Tier 4 indicate the tier of the overlapped window. For example, the bottom tier, Tier 1, is the background layer. VW-16 – Using VW-16 Embedded Webpages...
- Page 33 3. To enable a window, do one of the following: 4. Click the “X” icon of each window that shows at the bottom of the webpage. 5. To save the changes, click Apply. The selected window is enabled. VW-16 – Using VW-16 Embedded Webpages...
-
Page 34: Defining System Settings
Setting the Unit’s ID on page 33. • Viewing the Fan Speed on page 34. • Resting the VW-16 to its Factory Default on page 34. • Resetting Device on page 34. Viewing the Ethernet Type (Static or HDCP) To view the Ethernet type (Static or HDCP): 1. -
Page 35: Setting The Unit's Id
6. In a web browser, access the webpages via the new IP address. The new IP address is configured. Setting the Unit’s ID 1. From the Navigation List, click System Settings. 2. Below System, select the number after Unit ID. Figure 25: Setting the Unit ID VW-16 – Defining System Settings... -
Page 36: Viewing The Fan Speed
1. From the Navigation List, click System Settings. 2. Below System > Fan speed. Fan speed is viewed. Resting the VW-16 to its Factory Default To reset to factory default: 1. From the Navigation List, click System Settings. 2. Below System, select Factory default. -
Page 37: Upgrading Firmware
After the firmware update is complete, the front panel lights turn off and the system reboots. c. The FW upgrade status shows this message in the terminal “Updating Firmware”. d. The front panel button lights turn on. The firmware upgrade is complete. VW-16 – Upgrading Firmware... -
Page 38: Technical Specifications
49cm x 35.5cm x 49cm (1.6' x 1.1' x 1.6') W,D,H Net Weight 16.3kg (36lbs) approx. Shipping Weight 17.2kg (38lbs) approx. Accessories Included OEM Power Cord EU & US C-14 L-180CM Specifications are subject to change without notice at www.kramerav.com VW-16 – Technical Specifications... -
Page 39: Default Communication Parameters
Modeline...."1920x1080" 148.500 1920 2008 2052 2200 1080 1084 1089 1125 +hsync +vsync Standard timings supported 640 x 480p at 60Hz - IBM VGA 640 x 480p at 72Hz - VESA 640 x 480p at 75Hz - VESA VW-16 – Technical Specifications... - Page 40 Supports YCbCr 4:4:4..Yes Supports dual-link DVI... No Maximum TMDS clock..300MHz Audio/video latency (p).. n/a Audio/video latency (i).. n/a HDMI video capabilities.. Yes EDID screen size..No additional info 3D formats supported..Not supported Data payload..... 030C001000783C20008001020304 VW-16 – Technical Specifications...
- Page 41 YCbCr 4:2:0 capability map data Data payload..... 0F000003 Report information Date generated... 3/9/2022 Software revision..2.91.0.1043 Data source....File - NB: improperly installed Operating system..10.0.19044.2 Raw data 00,FF,FF,FF,FF,FF,FF,00,2D,B2,0D,06,31,00,00,00,06,18,01,03,80,1F,11,8C,C2,90,20,9C,54,50,8F,26, 21,52,56,2F,CF,00,A9,40,81,80,90,40,D1,C0,31,59,45,59,61,59,81,99,08,E8,00,30,F2,70,5A,80,B0,58, 8A,00,BA,88,21,00,00,1E,02,3A,80,18,71,38,2D,40,58,2C,45,00,BA,88,21,00,00,1E,00,00,00,FC,00,56, 57,2D,31,36,0A,20,20,20,20,20,20,20,00,00,00,FD,00,17,3D,0F,88,3C,00,0A,20,20,20,20,20,20,01,57, 02,03,3B,F0,52,10,1F,04,13,05,14,02,11,06,15,22,21,20,5D,5E,5F,60,61,23,09,07,07,83,01,00,00,6E, 03,0C,00,10,00,78,3C,20,00,80,01,02,03,04,67,D8,5D,C4,01,78,80,00,E4,0F,00,00,03,9A,29,A0,D0,51, 84,22,30,50,98,36,00,10,0A,00,00,00,1C,66,21,56,AA,51,00,1E,30,46,8F,33,00,10,09,00,00,00,1E,28, 3C,80,A0,70,B0,23,40,30,20,36,00,10,0A,00,00,00,1A,00,00,00,00,00,00,00,00,00,00,00,00,00,00,E7 VW-16 – Technical Specifications...
-
Page 42: Protocol 3000
(<…>) and must be separated by a period (.). The command framing varies according to how you interface with VW-16. The following figure displays how the # command is framed using terminal communication software (such as Hercules): VW-16 –... -
Page 43: Protocol 3000 Commands
(refer to device definitions). In devices that enable showing multiple outputs on one display – each in a separate window – this command relates only to the window associated with the output indicated in the out-index parameter. VW-16 – Protocol 3000... - Page 44 (refer to device definitions). In devices that enable showing multiple outputs on one display – each in a separate window – this command relates only to the window associated with the output indicated in the out-index parameter. VW-16 – Protocol 3000...
- Page 45 FEEDBACK This command deletes #FACTORY<CR> ~nn@FACTORYok<CR><LF> all user data from the device. The deletion can take some time. Your device may require powering off and powering on for the changes to take effect. VW-16 – Protocol 3000...
- Page 46 Set the image size: 1 – Scaler1 #IMAGE-PROPscaler_id<CR> #IMAGE-PROP1<CR> Sets the image 2 – Scaler2 FEEDBACK properties of the selected – Status video_mode ~nn@IMAGE-PROPscaler_id,video_mode…<CR><LF> scaler. 0 – Video enabled 1 – Video disabled 2 – Blank picture VW-16 – Protocol 3000...
- Page 47 – Number that indicates the out_index MUTE? Get audio mute. COMMAND Get mute status of output 1 #MUTE?out_index<CR> specific output: 1-N (N= the total number of outputs) #MUTE1?<CR> FEEDBACK – On/Off mute_mode ~nn@MUTEout_index,mute_mode<CR><LF> 0 – Off 1 – On VW-16 – Protocol 3000...
- Page 48 ~nn@NET-MACid,mac_address<CR><LF> 1,2,3…. parameter can be omitted. – Unique MAC address. mac_address In this case, the Network Format: XX-XX-XX-XX-XX-XX where X ID, by default, is 0, which is hex digit is the Ethernet control port. VW-16 – Protocol 3000...
- Page 49 90 degree) ~nn@ROTATEout_id,win_id,angle<CR><LF> – 0 out_id ROTATE? Get output rotation angle. COMMAND Get output rotation – 0 win_id angle: #ROTATE?<CR> – 0 - off, 1 left 90 degree, 2 #ROTATE?<CR> angle FEEDBACK right 90 degree) ~nn@ROTATEout_id,win_id,angle<CR><LF> VW-16 – Protocol 3000...
- Page 50 Get the input signal lock #SIGNAL?in_index<CR> status of IN 1: specific input: #SIGNAL?1<CR> 1-N (N= the total number of inputs) FEEDBACK – Signal status according to status ~nn@SIGNALin_index,status<CR><LF> signal validation: 0 – Off 1 – On VW-16 – Protocol 3000...
- Page 51 Get the device serial number. #SN?<CR> number: factory assigned #SN?<CR> FEEDBACK ~nn@SNserial_num<CR><LF> firmware_version – XX.XX.XXXX VERSION? Get firmware version COMMAND Get the device firmware number. #VERSION?<CR> version number: where the digit groups are: #VERSION?<CR> major.minor.build version FEEDBACK ~nn@VERSIONfirmware_version<CR><LF> VW-16 – Protocol 3000...
- Page 52 58=720(1440)x480i@239.76/240Hz 59=720(1440)x480i@239.76/240Hz 60=1280x720p@23.97Hz/24Hz 61=1280x720p@25Hz 62=1280x720p@29.97Hz/30Hz 63=1920x1080p@119.88/120Hz 64=1920x1080p@100Hz 65=800x600p@60Hz 66=1024x768@60Hz 67=1280x768p@60Hz 68=1280x1024p@60Hz 69=1600x1200p@60Hz 70=1680x1050p@60Hz 71=1920x1200@60Hz 72=3840x2160p@24Hz 73=3840x2160p@25Hz 74=3840x2160p@30Hz 75=3840x2160p@50Hz 76=3840x2160p@60Hz 77-100=(Reserved) 100=Custom resolution 1 101=Custom resolution 2 102=Custom resolution 3 103=Custom resolution 4 104=Custom resolution 5 104-254=(Reserved) VW-16 – Protocol 3000...
- Page 53 51=720(1440)x480i@119.88/120Hz 52=720x576p@200Hz 53=720x576p@200Hz 54=720(1440)x576i@200Hz 55=720(1440)x576i@200Hz 56=720x480p@239.76/240Hz 57=720x480p@239.76/240Hz 58=720(1440)x480i@239.76/240Hz 59=720(1440)x480i@239.76/240Hz 60=1280x720p@23.97Hz/24Hz 61=1280x720p@25Hz 62=1280x720p@29.97Hz/30Hz 63=1920x1080p@119.88/120Hz 64=1920x1080p@100Hz 65=800x600p@60Hz 66=1024x768@60Hz 67=1280x768p@60Hz 68=1280x1024p@60Hz 69=1600x1200p@60Hz 70=1680x1050p@60Hz 71=1920x1200@60Hz 72=3840x2160p@24Hz 73=3840x2160p@25Hz 74=3840x2160p@30Hz 75=3840x2160p@50Hz 76=3840x2160p@60Hz 77-100=(Reserved) 100=Custom resolution 1 101=Custom resolution 2 102=Custom resolution 3 VW-16 – Protocol 3000...
- Page 54 Get window overlay Set all window overlay #W-LAYER?win_num<CR> value: contrast value – Hue value orders. #W-LAYER?1<CR> #W-LAYER?0xFF<CR> FEEDBACK ~nn@W-LAYERwin_num,value<CR><LF> In case of ~nn@W-LAYER0xFF,value1,value2,…,valueN<CR><LF> overlays order list, number of expected layers is maximum number of windows in device. VW-16 – Protocol 3000...
- Page 55 Set window position: border. #WND-BRDwin_num,enable<CR> #WND-BRD1,1<CR> enable/disable – 1, disable 0 enable FEEDBACK ~nn@WND-BRDwin_num,enable<CR><LF> – Window number to win_num WND-BRD? Get window border status. COMMAND Set window position: #WND-BRD?win_num<CR> enable/disable #WND-BRD?1<CR> enable – 1, disable 0 FEEDBACK ~nn@WND-BRDwin_num,enable<CR><LF> VW-16 – Protocol 3000...
-
Page 56: Result And Error Codes
(Reserved) ERR_RESERVED_8 (Reserved) ERR_RESERVED_9 (Reserved) ERR_RESERVED_10 (Reserved) ERR_RESERVED_11 (Reserved) ERR_RESERVED_12 (Reserved) ERR_EDID_CORRUPTED EDID corrupted ERR_NON_LISTED Device specific errors File has the same CRC – not changed ERR_SAME_CRC ERR_WRONG_MODE Wrong operation mode ERR_NOT_CONFIGURED Device/chip was not initialized VW-16 – Protocol 3000... - Page 57 This limited warranty gives you specific legal rights, and you may have other rights which vary from country to country or state to state. This limited warranty is void if (i) the label bearing the serial number of this product has been removed or defaced, (ii) the product is not distributed by Kramer Electronics or (iii) this product is not purchased from an authorized Kramer Electronics reseller.
- Page 58 SAFETY WARNING Disconnect the unit from the power supply before opening and servicing For the latest information on our products and a list of Kramer distributors, visit our website where updates to this user manual may be found. We welcome your questions, comments, and feedback.
Need help?
Do you have a question about the VW-16 and is the answer not in the manual?
Questions and answers