Advertisement
Quick Links
Scan for full manual
Step 1: Check what's in the box
VW-16
4x4 video-wall Driver with Multiviewer
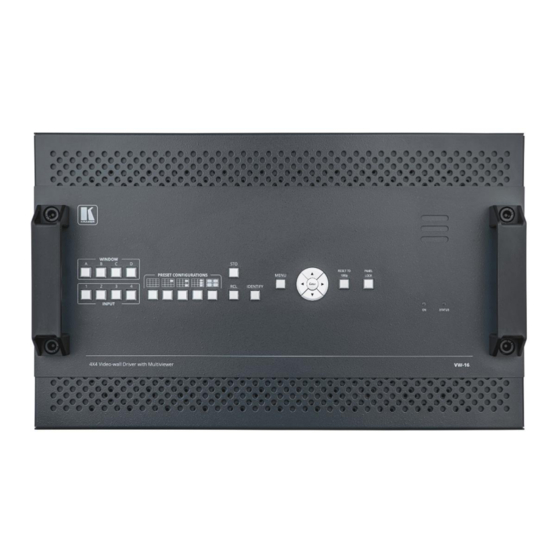
Step 2: Get to know your VW-16
#
Feature
1
Metal handles (x2)
2
INPUT Buttons (1 to 4)
3
WINDOW Buttons (A to D)
4
PRESET CONFIGURATION Buttons Press a configuration button to set one of the following presets (each window in the
5
STO Button
VW-16 Quick Start
VW-16 Quick Start Guide
This guide helps you install and use your
Go to
www.kramerav.com/downloads/VW-16
upgrades are available.
Function
Rigid metal handles for easy handling.
After pressing a Window button (above), press an input button to select this input for
that window.
If the wall configuration has only one window, then pressing an input button will
select that input for the wall.
Press to select window A, B, C or D.
Multiview mode can be resized and repositioned via the embedded web pages):
Press, followed by an Input button (1 to 4), to save the current wall configuration.
VW-16
for the first time.
to download the latest user manual and check if firmware
1 Set of rack ears
1 Quick start guide
Video wall mode – the video of one source only is presented over the
video wall.
Multiview mode, presenting 1 PiP window over a parent picture in the
video wall.
Multiview mode, presenting 2 PiP windows over a parent picture in the
video wall.
Multiview mode, presenting 3 PiP windows over a parent picture in the
video wall.
Multiview mode, presenting 4 windows over the video wall.
P/N: 2 9 0 0 - 3 0 1 5 2 6 QS
2 Power cords
Rev: 1
Advertisement

Related Manuals for Kramer VW-16


Summary of Contents for Kramer VW-16
- Page 1 VW-16 4x4 video-wall Driver with Multiviewer 1 Set of rack ears 1 Quick start guide 2 Power cords Step 2: Get to know your VW-16 Feature Function Metal handles (x2) Rigid metal handles for easy handling. INPUT Buttons (1 to 4) After pressing a Window button (above), press an input button to select this input for that window.
- Page 2 Plug in the power cord and use the switch to power the unit on or off. The terms HDMI, HDMI High-Definition Multimedia Interface, and the HDMI Logo are trademarks or registered trademarks of HDMI Licensing Administrator, Inc. Step 3: Mount VW-16 • Ensure that the environment (e.g., maximum ambient To rack mount the machine, attach both temperature &...
- Page 3 Step 4: Connect inputs and outputs Always switch OFF the power on each device before connecting it to your VW-16. This diagram shows an example of configuring a 4x4 video wall in multi-viewer mode. Other configurations can be set via the embedded webpages.
- Page 4 Step 6: Operate VW-16 RS-232 Control / Protocol 3000 Operate Product via: • Baud Rate: 115,200 Parity: None Front panel buttons. • Data Bits: Command Format: ASCII Remotely, by RS-232/RS-422/RS-485 serial Stop Bits: commands transmitted by a Example: (mute video on output 1): #VMUTE 1,1...
Need help?
Do you have a question about the VW-16 and is the answer not in the manual?
Questions and answers