
Related Manuals for urmet domus NVR H264


Summary of Contents for urmet domus NVR H264
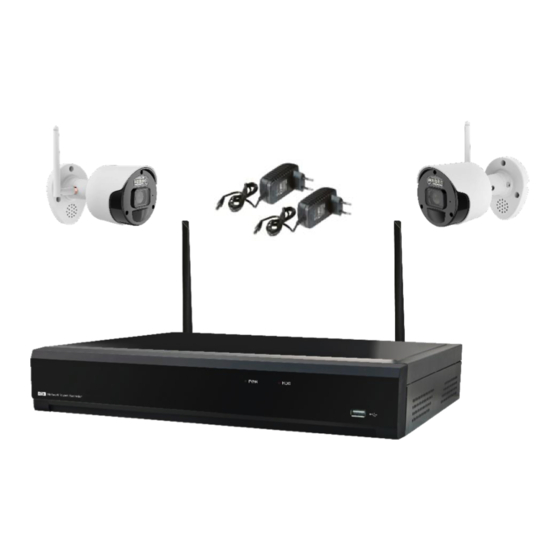
- Page 1 Mod. 1098 DS1098-047 NVR H264/H265+ WIFI WITH HDMI NVR WiFi Kit Double Antenna Ref. 1098/820 USER MANUAL...
-
Page 2: Table Of Contents
ENGLISH INDEX General information ..........................4 Product Description ........................4 1.1.1 General Features ............................4 Opening the package ........................5 1.2.1 Contents of the package ..........................5 Warnings ...........................6 1.3.1 Power................................6 1.3.2 Safety precautions ............................6 1.3.3 Installation precautions ..........................6 1.3.4 Cleaning the device ............................ - Page 3 4.5.2 DDNS................................29 4.5.3 Email ................................29 4.5.3.1 Email configuration ..........................29 4.5.3.2 Email schedule ............................30 4.5.4 FTP ................................30 4.5.4.1 FTP ................................30 4.5.4.2 FTP schedule ............................31 4.5.5 IP Filter ............................... 31 Device ............................. 32 4.6.1 Disk ................................32 4.6.1.1 Disk .................................
-
Page 4: General Information
GENERAL INFORMATION Dear Customer, Thank you for purchasing this product. This quick start guide was written to help you set up the URMET 8-Channel NVR of the WiFi Kit Ref. 1098/820. Read this manual which contains information for correct, safe use carefully. We advise you to keep this manual at hand so that you can refer to it when needed. -
Page 5: Opening The Package
The main features are summarised in the following table: Function Description HDMI output (if available); supports Urmet UVS Pro client software, MP live Live monitoring and zoom in/out, automatic sequence and PiP display. Video compression standard: H.264/H265+; adjustable recording quality, resolution Record and frame rate;... -
Page 6: Warnings
WARNINGS 1.3.1 POWER ➢ Check mains rating before plugging the power unit in. ➢ Do not pull the cord to unplug the device. ➢ Switch the device off before unplugging power unit. This operation must not be performed when the WiFi NVR is recording, playing or from the configuration menu. -
Page 7: Description Of The Parts
DESCRIPTION OF THE PARTS FRONT PANEL NVR stands for Network Video Recorder Equipment. 2.1.1 NVR WIFI FRONT PANEL Ref. 1098/820 Writing or Number Symbol Function and description indicator Power indicator The green LED on means that the NVR is powered correctly. The red LED blinking means that the user is reading or writing on the hard disk. -
Page 8: Rear Panel
REAR PANEL 2.2.1 NVR WIFI REAR PANEL Ref. 1098/820 Number Physical port Connection method Terminal for connecting a separate earth. Connection to earth * Make sure to use an earth cable to use the device safely Aerial Wireless camera signal receiver WAN port Router network input interface/IP camera connection Reset button... -
Page 9: Operation With Mouse
OPERATION WITH MOUSE TYPE Function After having selected the main menu, click once on a menu item and confirm the selection. Left click (1) In live viewing mode, left click to open the Camera Quick Toolbar camera. In motion mode, click and hold pressed to drag the viewed areas or left-click and hold pressed to set the values of the sliders of the values of the scales. -
Page 10: Password
PASSWORD For the first time when you run the WIRELESS NVR, you must be required to set your own password immediately in order to protect your privacy. Please be sure to record your username and password and save them in a secure place. Language: Choose an OSD language. -
Page 11: System Initialisation
SYSTEM INITIALISATION Plug the power supply cable of the NVR into the wall socket to open the system initialisation screen shown above. STARTUP WIZARD Startup Wizard will help to configure the system and get the WIRELESS NVR works quickly. 3.1.1 STARTUP WIZARD Click the Start Wizard to proceed to the next step. -
Page 12: Date/Time
If you connect to a router allows to use DHCP, please check the DHCP box. The router will assign automatically all the network parameters for your WIRELESS NVR. Unless the network is manually addressed below parameters: IP Address: The IP address identifies the WIRELESS NVR in the network. It consists of four groups of numbers between 0 to 255, separated by periods. -
Page 13: Disk
Check the “NTP” box, and select the NTP server. DST stands for Daylight Savings Time. DST: Enable it if Daylight Saving Time (DST) is observed in your region. Time Offset: Select the amount of time to offset for DST. Time Mode: Choose to set the daylight saving time in weeks or in day. Start Time/End Time: Set the start time and end time for daylight saving. -
Page 14: Mobile
3.1.6 MOBILE If your WIRELESS NVR come with a P2P ID, you can scan the QR code with your mobile app to view the WIRELESS NVR remotely. 3.1.7 SUMMARY check system summary information start wizard finish wizard. Tick “Don't show this window next time" if you don’t want to display Start Wizard when system reboot next time. -
Page 15: Live Viewing Screen
LIVE VIEWING SCREEN Status Icons This indicates that the WIRELESS NVR is currently recording. This icon appears when the camera has detected PIR. This icon appears when the camera has detected motion. This icon indicates that the HDD is in error to work. This icon indicates the HDD is unformatted. -
Page 16: Taskbar
Click to adjust the image color of the channel. You can adjust the HUE, BRIGHT, CONTRAST & SATURATION of the image. To switch the live view video stream between HD & SD. HD is mainstream live view, SD is substream live view. Click to turn on white light. -
Page 17: Guide To The Main Menu
GUIDE TO THE MAIN MENU After the system has initialised, right-click on the main interface to access the pop-up menu. At this point, you can set parameters and select Main Menu, Multi-Pics, Stream Switch, Preview Policy, Playback, Mute, Start Sequence, Shutdown, etc. - Page 18 General Settings General Settings Port Configuration DDNS Email Configuration Email Email Schedule Network Configuration FTP Schedule IP FILTER IP FILTER Disk Disk Device S.M.A.R.T. Cloud Main Menu General Settings General Date and time Settings Multi-User Output Settings Configuration Load Default Upgrade Maintenance Settings...
-
Page 19: Nvr System Setup
NVR SYSTEM SETUP You are able to configure the Channel, Record, Alarm, Network, Device & System parameters from Taskbar (Start menu) -> Setup. CHANNEL In this section, you are allowed to configure the Wireless camera, live viewing display, pairing, IP camera’s image adjustment, MESH mode switch setting and so on. -
Page 20: Wireless Channel
Switch: Choose OFF to unbind the NVR and the camera. Mode: The mode that camera communicates with NVR. AP --- The camera connects to the NVR’s own routing WiFi, through which the camera communicates with the NVR. STA --- The connection between the camera and the NVR is through the same LAN router network communication. 4.2.1.2 Wireless Channel Region: NA/UK/MKK depends on the region. -
Page 21: Deterrence
Switch: Enable or disable Motion Detection. Sensitivity: Set the sensitivity level. Level 1 is the lowest sensitivity level while level 8 is the highest sensitivity level. Deterrence: Turn on or turn off the associated white light warning. Setup: Click icon to enter the setup interface. Motion Detection Area: Click Select All to set up the entire screen of the camera as the motion detection area. - Page 22 White light Deterrence area: Click Select All to set up the entire screen of the camera as the white light deterrence area. Click Clear All to clear the entire area. If you want to edit the size of the area, please select the frame and change its position.
-
Page 23: Record
RECORD This menu allows you to configure the recording parameters. 4.3.1 ENCODE This menu allows you to configure the image quality of recorded video or network transmission. In general, the "main stream" is the quality of the recorded video to be saved in the HDD; the substream is the preview video quality through remote access (such as web client and CMS). -
Page 24: Record Settings
4.3.2.1 Record settings Record Switch: Enable it to allow the video to be recorded. Stream Mode: Choose the recording quality. If you choose Dualstream, the system will record main stream and substream at the same time; if you choose single stream, the system will only record single stream video. PreRecord: this option... -
Page 25: Capture
4.3.3.1 Capture Auto Capture: Enable or disable automatic capturing on the channel. Stream Type: Select the image resolution by mainstream or substream. Normal Interval: Snapshots are captured based on normal interval. Alarm Interval: Snapshots are captured based on alarm interval only when a motion is detected. 4.3.3.2 Capture schedule Channel: Select the channel to set its snapshot capturing parameters. -
Page 26: Motion Alarm Setting
4.4.1 MOTION ALARM SETTING Channel: Channel name. Buzzer: The NVR can use its internal buzzer to sound an alarm. You can set the buzzer duration in seconds when motion is detected. Record: Click icon to choose which channel to be recorded when the motion detection is triggered. Post Recording: You can set the duration of the NVR's continuous recording after the event occurs. -
Page 27: Alarm Schedule
Show Message: Check the box to display a message on the screen when No Space on Disk, Disk Error, or Video Loss event happens. Send Email: Let the WIRELESS NVR to send you an auto-email when an event occurs. 4.4.3 ALARM SCHEDULE In this menu, you can set the alarm schedule for alarm output, push notification, FTP upload, cloud upload, buzzer and other functions. -
Page 28: Port Configuration
IPv6 Address: The IPv6 address identifies the WIRELESS NVR in the network. It consists of eight groups of letters and numbers from 0 to FFFF, which separated by colon. For example, “ABCD:EF01:2345:6789:ABCD:EF01:2345:6789”. DNS1/DNS2: DNS1 is the primary DNS server and DNS2 is a backup DNS server. It is usually enough just to enter the DNS1 server address. -
Page 29: Ddns
4.5.2 DDNS This menu is used to configure DDNS settings. DDNS provides a static address to simplify the remote connection with the NVR. To use DDNS, at first, you need to open an account on the web page of the DDNS service provider. DDNS: Check to enable DDNS. -
Page 30: Email Schedule
SMTP Server: Enter the SMTP server address of your email. User Name: Enter your email address. Password: Enter the password of your email. Receiver 1~3: Enter the email address that you want to receive the event notifications from the WIRELESS NVR. Interval: Configure the length of the time interval between the notification emails from the WIRELESS NVR. -
Page 31: Ftp Schedule
Video Stream Type: Set up the stream type of the video that is uploaded to the FTP. Main stream and substream are optional. Max Package Interval: Set the maximum video time interval, that is, the maximum recording time of an event. After this time, another recording file will be created to continue recording. -
Page 32: Device
DEVICE In this section, you can configure the internal HDD and Cloud function. 4.6.1 DISK 4.6.1.1 Disk This menu allows you to check & configure the internal HDD(s). You need to format the HDD only at the first startup and if you replace a new HDD Format HDD: Select the HDD you want to format and then click Format HDD. -
Page 33: Cloud
Note: When performing the test, your WIRELESS NVR will continue to work as normal. If an HDD S.M.A.R.T error are found, the HDD can be continued to use, but there will be a risk to lose recording data. It is recommended to replace a new HDD. -
Page 34: System
SYSTEM Change system information, such as date, time and region, change password and permissions, etc. 4.7.1 GENERAL SETTINGS 4.7.1.1 General Settings Device Name: Enter the name for your WIRELESS NVR. The name can include both letters and numbers. Device ID: Enter the desired ID for your WIRELESS NVR. The device ID is used to identify the WIRELESS NVR, and can only be composed of numbers. -
Page 35: Output Configuration
Date & Time Date: Click the calendar icon to change the date. Time: Click the dialogue box to change the time. Date Format: Select the preferred date format. Time Format: Select the preferred time format. Time Zone: Select a time zone relevant to your region or city. NTP Settings The NTP (Network Time Protocol) function allows your WIRELESS NVR to automatically sync its clock with a time server. -
Page 36: Multi-User Management
Select LIVE-OUT mode in the Video Output drop-down menu. VGA/HDMI Resolution: Select a display resolution that is suitable for your TV. 1920 x 1080 will suit most TVs. If your WIRELESS NVR supports 4K output resolution, you can select either 2K (2560 x 1440) or 4K (3840 x 2160) to adapt to higher resolution monitors. -
Page 37: Add New Users
4.7.2.2 Add New Users Select one of the user accounts that is currently disabled, click the User Edit icon Select Enable from the “User Enable” drop-down menu to enable the user. Click "User Name" to edit the user name. Click Password: enter the password to be set. Click Confirm and enter the password again to confirm. -
Page 38: Setting User Permissions
4.7.2.3 Setting User Permissions The administrator account is the only account that has full control of all system functions. You can enable or disable access to certain menus and functions of each user account. 1. Click the edit icon under Permission tab. 2. -
Page 39: System Maintenance
4.7.3 SYSTEM MAINTENANCE In this section, you will be able to search and view the system log, restore default settings, upgrade the system, export & import system parameters and configure system auto reboot. 4.7.3.1 The system log shows you important system events, such as motion alarms and system warnings. You can easily create a backup file of the system log for a set time period to a USB flash drive. -
Page 40: Load Default
4.7.3.2 Load Default Reset the WIRELESS NVR settings to its out-of-box state. You can choose to reset all settings at once, or just settings on specific menus. Restoring default settings will not delete recordings and snapshots saved to the hard drive. Check the items you want to restore, or check Select All to choose all items. -
Page 41: Parameter Management
4.7.3.4 Parameter Management You can export the main menu settings you have configured to a USB flash drive, or import an exported setting file from USB flash drive to the WIRELESS NVR. Save Settings: Click to save the WIRELESS NVR current system settings to the USB device. You will be required to input the Admin password to authenticate. -
Page 42: Developer Mode
4.7.3.6 Developer Mode 4.7.4 IP CAMERA MAINTAIN 4.7.4.1 Upgrade This menu allows you to upgrade the IP camera’s firmware. 1. Choose one of the IP cameras you want to upgrade firmware. 2. Click Select File to select the update file from your USB flash drive, then click OK. 3. -
Page 43: Network State
4.7.5.2 Network State View network information DS1098-047... -
Page 44: Search, Playback And Backup
SEARCH, PLAYBACK AND BACKUP The Search function gives you the ability to search for and play previously recorded videos as well as snapshots that are stored on your WIRELESS NVR’s hard drive. You have the choice of playing video that matches your recording schedule, manual recordings or motion events only. -
Page 45: Search And Play Video In General
Video Clip. Quickly save a section of video to a USB flash drive. Save Video Clip. Volume Control: scroll the slider bar to increase or decrease volume. Snapshots: to capture a snapshot image to your USB flash drive. If the video playback is in split-screen view, move the mouse cursor to the channel you want to capture, and then click the icon to save the snapshot. -
Page 46: Video Clip Backup
5.1.1.1 Video Clip Backup 1. Insert your USB flash drive to the WIRELESS NVR. 2. Start a video recording playback. 3. Click icon. 4. Check the channel(s) you want to make a video clip backup. 5. Move the mouse cursor to the timeline where you want to start the video clip. 6. -
Page 47: Event Search, Playback And Backup
5.1.2 EVENT SEARCH, PLAYBACK AND BACKUP Event search lets you view a list of video recordings with the channel, start time and end time, and recording type conveniently summarized. You can also quickly back up events to a USB flash drive. To search, play &... -
Page 48: External File
Detailed view. You can view the details of the events. In the detailed view mode, you can lock the video events to keep events from being overwritten in the hard drive. Click the icon to lock or click to unlock the events. 8. -
Page 49: Picture Search
5.1.3 PICTURE SEARCH This function can be used to search, play and copy snapshots to a USB flash drive To search, play & back up pictures: 1. Click the icon to choose the date & time you want to search. 2. - Page 50 List view: The events will be displayed in list. Detailed view: You can view the details of the events. 8. When you click the left button of your mouse upon one of the pictures, system will show the picture information on the left bottom corner of the screen.
-
Page 51: Remote Access Via Web Client
REMOTE ACCESS VIA WEB CLIENT Use the Web Client to remotely access your WIRELESS NVR at any time via a PC. Before you access the Web Client, you need to ensure that the network settings of the WIRELESS NVR are configured properly. 6.1 SYSTEM ENVIRONMENT REQUIREMENTS The minimum requirements for hardware and OS required to run Web Client are given as below. - Page 52 3. After step 2, enter the Web control page of the WIRELESS NVR. 4. Click Download and install the player in the Web, download the plugin and refresh the Web to view. Note: If you use Google Chrome, please use Version V41 or lower. If you use V42 to V44, you need to enable NPAPI plugins.
- Page 53 Download the plug-in "Surveillance Client ", locate the downloaded file and double click it. Click on "Continue" → "Install". Enter user name and password for Mac computer. Click on "Install Software" → "Close" to finish installation. 4. Close SAFARI and repeat step 1 to open the Web Client login page. DS1098-047...
-
Page 54: Web Client Manager
WEB CLIENT MANAGER The web client supports to fully control the WIRELESS NVR with administrator account. Please make sure to protect your user name & password to prevent illegal login. 6.3.1 LIVE INTERFACE This is the first page after you logged in to the Web Client. Here you can open or close live preview, record video to local computer manually, take snapshots of the screens, and adjust color etc 1- Channel List: Open the channel list n of the quick camera function. - Page 55 6- Color setting: Click to show or hide the color controls. 7- Live view control button: Split screen display Open the live view of all the channel previews Close all channel previews Original ratio: Display live video in original ratio Stretch: Stretch the real-time video to fit the entire area of each channel on the screen Enlarge the web client to full screen Manual capture: Click to capture the current images of all displayed channels and save them to your...
-
Page 56: Playback
6.3.2 PLAYBACK You can search & play recorded files stored on the HDD inside the WIRELESS NVR, and save the video on your PC. Record Search: 1. Click the Playback icon in the upper right corner to enter the playback interface. 2. - Page 57 Select the file you want to download, press the start download icon to start, and you will see the download status. Press the stop download icon to stop downloading. Playback speed: Click to select the playback speed. Play all channels: Click to play all the channels you choose to search. Only available when the synchronized playback option is not selected.
-
Page 58: Picture Playback
6.3.2.2 Picture Playback After setting up the screenshot, you can search for the captured pictures here. You can search for up to 5000 pictures at a time, and you can modify the time interval to search as needed. Search for screenshots: 1. -
Page 59: Remote Settings
6.3.3 REMOTE SETTINGS You can configure the NVR settings remotely here. Please refer to Chapter 4 NVR System Setup for more details about NVR settings. DS1098-047... -
Page 60: View The Backup Video On Pc/Mac
VIEW THE BACKUP VIDEO ON PC/MAC This section is about playing the backup file with the powerful video player included in the CD. For Mac users, please install the application "VideoPlayer_x.x.xx_xxxx_xx_x.dmg", for example: VideoPlayer_1.0.15_2017_01_6.dmg。 For PC users, please install the application "VideoPlayer_x.x.xx_xxxx_xx_xx.exe", for example: VideoPlayer_1.0.15_2017_01_06.exe. - Page 61 Video Player Control 1. Play List Add files. Delete files. Select the play mode: play a single file and stop; play all listed files in order; repeat one file, repeat all files. Filter by file name. Hide/Show Play List. Click to open file or load folder. 3.
- Page 62 Basic Settings: Set up stick-on-top mode. Capture Settings: Set the save format and save path of the snapshot. DS1098-047...
-
Page 63: Specifications Of The Wifi Nvr Kit Ref. 1098/800 (Pal Format)
SPECIFICATIONS OF THE WIFI NVR KIT REF. 1098/820 (PAL FORMAT) Features Function NVR WiFi 1098/820-DA kit Compression formats: Video: H.264/H265+ 8CH WiFi 802.11 b/g 1920x1080 (Full HD) / Video Inputs/Outputs 1 CH Video HDMI Output Max 120fps@1080p Frame Rate - Main stream: Max 15fps@1080p per channel - Sub stream: Max15fps@640x360 per channel Recording resolution Max 15fps@1080p per channel... -
Page 64: Appendix
APPENDIX TROUBLESHOOTING 1. Q: What can I do if the system does not detect the HDD? A: Check if the power supply system is properly connected and data cord and power cables are securely connected, and if something wrong with the HDD interface. Or you may check if your HDD is supported by referring to the specifications or descriptions. -
Page 65: Usage Maintenance
USAGE MAINTENANCE 1. To shut down WIRELESS NVR, please firstly shut down the system and then turn off the power. Do not turn off the power directly, otherwise HDD data will be lost or damaged. 2. Please keep WIRELESS NVR away from heat sources or places. 3. - Page 66 DS1098-047...
Need help?
Do you have a question about the NVR H264 and is the answer not in the manual?
Questions and answers