
Subscribe to Our Youtube Channel
Related Manuals for ADLINK Technology Qseven


Summary of Contents for ADLINK Technology Qseven
- Page 1 Qseven Starter Kit Quick Start Guide Manual Rev.: Revision Date: May 15, 2018 Part Number: 50-1Z249-1000...
- Page 2 Preface Copyright Copyright 2018 ADLINK Technology, Inc. This document contains proprietary information protected by copyright. All rights are reserved. No part of this manual may be reproduced by any mechanical, electronic, or other means in any form without prior written permission of the manufacturer.
-
Page 3: Table Of Contents
Table of Contents Preface ..........................ii Table of Contents ......................iii Introduction ........................ 1 1.1. How to Order the Qseven Starter Kit ................. 1 1.2. What’s Included in the Qseven Starter Kit ..............2 Getting Started ......................5 2.1. Unpacking ......................... 5 2.2. -
Page 4: Preface
This page intentionally left blank. Preface... -
Page 5: Introduction
The Qseven Starter Kit also includes a USB flash drive with SEMA pre-installed in a Linux OS environment. This helps customers quickly review the features provided by the EAPI. -
Page 6: What's Included In The Qseven Starter Kit
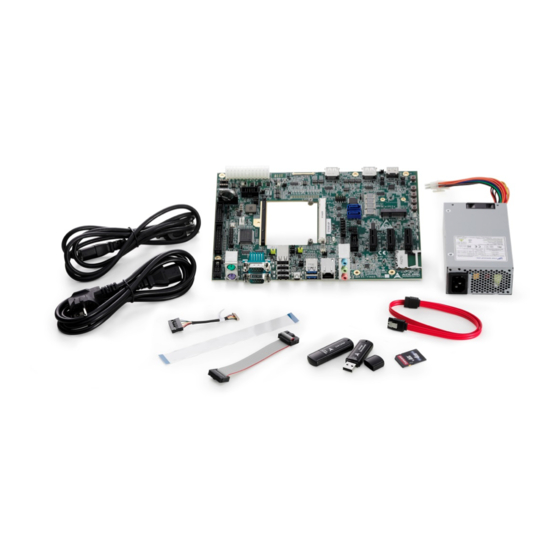
1.2. What’s Included in the Qseven Starter Kit 1.2.1. Standard Items Photo Part Number Description 91-77A02-100E Q7-BASE (LVDS version) Qseven reference carrier board 91-77A02-110E (eDP version) 31-32220-0000 Power Supply Unit 29-02480-0040 USB Flash Drive (2pcs) One containing documents One with SEMA pre-installed in... - Page 7 Qseven Starter Kit 1.2.2. Optional Items Photo Part Number Description See data sheet Qseven module of your choice A = Heat spreader Thermal solution of your (high profile) choice (only one thermal solution included in standard B = Heat spreader kit.)
- Page 8 This page intentionally left blank. Introduction...
-
Page 9: Getting Started
Qseven Starter Kit 2. Getting Started 2.1. Unpacking Check that the EPE foam contains the items shown below: Thermal Solution Qseven Module Qseven Carrier Remove the EPE foam and ensure the underneath accessory boxes contain items shown below: ATX Power Supply... -
Page 10: Board Installation
Board Installation Procedure Required Items Step 1 Remove all protective membranes from the thermal pads on the thermal solution (either heat spreader or passive heatsink.) Heat Spreader Qseven Heat Spreader Thermal Pad Protective Membranes Protective Membranes Thermal Pad Qseven Passive Heatsink... - Page 11 Qseven Starter Kit Step 2 Assemble the thermal solution (either heat spreader or passive heatsink) onto the Qseven module as shown in the following two photos. Heat Spreader Not Applicable Passive Heatsink Getting Started...
- Page 12 Step 3 Insert the Qseven module connector into the Qseven interface slot on the Qseven carrier board as shown in following two photos. Not Applicable Getting Started...
- Page 13 Qseven Starter Kit Step 4 Install four 2.7mm countersink screws to mount the heat spreader to the carrier board as shown in the following photo or use four 2.7mm panhead screws to mount the passive heatsink as shown in the second photo.
-
Page 14: Power And I/O Connectors
2.3. Power and I/O Connectors Connect the Power Supply Required Items Plug in the ATX connector of the power supply to CN1 on the Q7- BASE carrier board. Plug the AC power cord into the power supply. Connect the Keyboard, Mouse and External GPU Card Required Items Plug in the display cable and USB keyboard and mouse cables to the respective connectors on the carrier. -
Page 15: Powering Up The Qseven System
Qseven Starter Kit 2.4. Powering Up the Qseven System Powering up the Qseven system Required Items Plug in the AC power cord to a wall outlet and turn on the power supply. The 80h POST LEDs (LED6 and LED7) on the Q7-BASE will display the bootup status. - Page 16 This page intentionally left blank Getting Started...
-
Page 17: Display Leds And Mini Leds
SYS_RESET# LED lights on active reset signal of Qseven module 3.3. BMC Status The BMC_STATUS LED shows the status of the BMC on the Qseven module. Behavior (blue) Description Blinking A blinking BMC_STATUS LED indicates a failure during power up. The number of flashes indicates the error code. - Page 18 This page intentionally left blank. Display LEDs and Mini LEDs...
-
Page 19: Safety Instructions
Qseven Starter Kit Safety Instructions Read and follow all instructions marked on the product and in the documentation before you operate your system. Retain all safety and operating instructions for future use. • Please read these safety instructions carefully. •... -
Page 20: Getting Service
5215 Hellyer Avenue, #110, San Jose, CA 95138, USA Tel: +1-408-360-0200 Toll Free: +1-800-966-5200 (USA only) Fax: +1-408-360-0222 Email: info@adlinktech.com ADLINK Technology (China) Co., Ltd. Address: 300 Fang Chun Rd., Zhangjiang Hi-Tech Park, Pudong New Area Shanghai, 201203 China Tel: +86-21-5132-8988 Fax: +86-21-5132-3588 Email: market@adlinktech.com...
Need help?
Do you have a question about the Qseven and is the answer not in the manual?
Questions and answers