
Related Manuals for PRESONUS Revelator io44


Summary of Contents for PRESONUS Revelator io44
- Page 1 Revelator io44 USB-C Compatible Audio Interface with Integrated Loopback Mixer and Effects 与USB-C兼容的音频接口,集成回环混音 器和效果器 Owner’s Manual 用户手册...
-
Page 2: Table Of Contents
3.3.2 Windows 系统 3.3.3 macOS 系统 3.3.4 Using Revelator io44 for Skype 在Revelator io44中Skype的使用 3.3.5 Using Revelator io44 for Google Meet 在Revelator io44中谷歌会议的使用 37 3.3.6 Using Revelator io44 for OBS 用于Revelator io44 的OBS 3.3.7 Using Revelator io44on Chromebook 在Chromebook上使用Revelator io44 3.3.8 Using Revelator io44 with Zoom on Chromebook 在Chromebook上使用Revelator... - Page 3 4.1.1 Factory Presets 出场预置 4.1.2 Changing Preset Button Slots 改变预置按钮位置 4.1.3 Storing New Presets 存储新的预置 4.1.4 Exporting/Importing Presets 导出/导入预置文件 4.1.5 Scenes - Save and Recall 场景-保存和调用 4.1.6 Sharing Scenes and Presets分享场景和预置 Fat Channel and Voice Effects Fat Channel 和音效 Fat Channel and Voice FX Fat Channel和语音特效 Mixing and Loopback Audio 混音和回环音频...
- Page 4 Studio One Artist Quick Start 快速入门 Installation and Authorization 安装和授权 Setting Up Studio One Artist 设置 Studio One Artist 8.2.1 Configuring Audio Devices 配置音频设备 Configuring MIDI Devices 配置MIDI 设备 Creating a New Song 创建一首新歌 Configuring Your I/O 配置你的I/O Creating Audio and Instrument Tracks 创建音频和音轨 10.0.1 Recording an Audio Track 录制一个音轨...
-
Page 5: Overview 概述
免问题。 Throughout this manual you will find Power User Tips. These tips and tricks will help you to become a Revelator io44 expert—as well as help you to better understand audio terminology, so you can get the most from your purchase and get the best sound quality possible. -
Page 6: What's In The Box? 都有什么
Your Revelator io44 package contains: 你的Revelator io44都包括: Revelator io44 USB audio interface Revelator io44 USB 音频接口 1M USB-C-to-USB-A Cable. Use this to connect your Revelator io44 to a USB port on your computer or a powered USB hub. 1M USB-C转USB-A电缆。用它来连接你的Revelator io44和你电脑上的... -
Page 7: What Is In Your Mypresonus Account 在你的Mypresonus帐户里有什么
Warranty/Registration Card. 保修/注册卡。 1.2.1 What is in your MyPreSonus account 你的MyPreSonus账户里有什么? There’s more to your Revelator io44 than what comes in the box! Let’s take a moment to register your Revelator io44 and download the digital products that come with it. These include: 你的... - Page 8 Fill in the form with the required information. Make sure to verify that you are, in fact, human and agree to our PreSonus Terms of Use. If you’d like to receive occasional emails about promotions and new video content, check that box now as well.
- Page 9 In the pop-up menu, click on the Hardware tab. Select your purchase date and enter your Revelator io44 Serial Number. You can find your serial number on the bottom of your interface as well as on your Quick Start Guide.
- Page 10 Step 2: Download and Install Universal Control 第2步:下载并安装通用控制 From the Revelator io44 product listing in MyPreSonus, click the “Download Universal Control” button at the top. MyPreSonus will scan your computer and present the correct installer for your operating system. 从 MyPreSonus的Revelator io44产品列表中,点击顶部的 "Download Universal Control "按钮。...
-
Page 11: Step 3: Download And Install Studio One Artist (Optional)
From the Revelator io44 product listing in MyPreSonus, locate Studio One Artist from the product listing. Quick links to every digital product that comes with your Revelator io44 will be listed here. Click the “Download Installer” button at the bottom of the Studio One Artist listing. MyPreSonus will scan your com- puter and present the correct installer for your operating system. - Page 12 Step 4: Download and Install Studio Magic (Optional) 第四步:下载并安装Studio Magic(可选) From the Revelator io44 product listing in MyPreSonus, you will also find a complete list with links to all the Studio Magic products that came with your Revelator io44 registration. Click on the “View More Details”...
-
Page 13: Connections And Controls 链接和控制
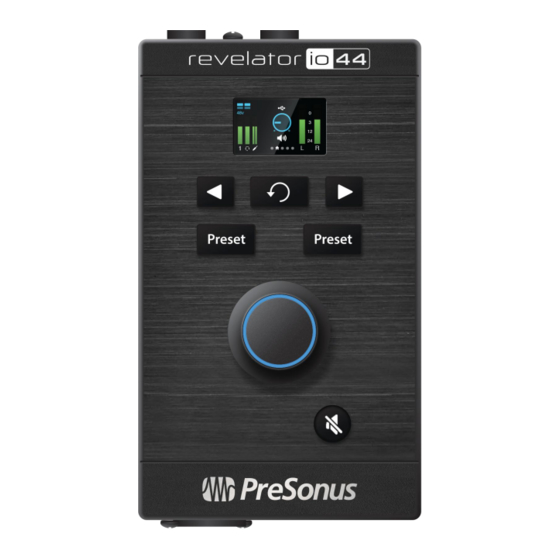
Control Panel 控制面板 Multipurpose Encoder Knob. This is a lot more than a simple volume knob! It’s also a button, and can be used to control many features of your Revelator io44: 多用途编码器旋钮。这不仅仅是一个简单的音量旋钮! 它也是一个按钮,可 以用来控制你的Revelator io44的许多功能: From the Home screen, press it to cycle through Headphone volume, Main ... - Page 14 静音。启用/停用主输出。对耳机输出没有影响。 The Screen 屏幕 The screen displays metering, preset selection, and other important information. The following information is displayed on Revelator io44’s Home screen. This is the default screen you’ll see when you first use Revelator io44. 该屏幕显示仪表、预置选择和其他重要信息。 以下信息显示在 Revelator io44 的主屏幕上。这是你第一次使用 Revelator io44 时,将看到的默认屏幕。...
- Page 15 1. Input Meters. These meters indicate the input level of the analog inputs on your Revelator io44. The red Clip indicator will light when your input signal reaches -0.5 dBFS. At this level, the signal will begin to overload the analog-to-digital converters and exhibit signs of clipping. Use the gain controls to keep the signal below this level.
- Page 16 +48v幻象电源。旋转编码器来启用/禁用+48v电源,用于连接电容式麦克风。 Other information on the Channel screen includes: 频道屏幕上的其他信息包括: 4. Input Meter. This meter indicates the input level of the selected channel on your Revelator io44, just like on the Home screen. 输入表。这个表显示你的 Revelator io44 上所选频道的输入电平,就像在主屏幕上一样。 5. Gain reduction meter. If you’re running any compression or limiting via Revelator io44’s DSP (Digital Signal Processing), the amount of gain reduction being applied will be indicated by this blue meter.
-
Page 17: Front Panel 前面板
请注意,在耳机和线路输入频道上没有+48v的选项,在线路输入通道上也没有高通滤波器选项。这是 正常的。 2.1.1 Front Panel 前面板 Mic/Inst input. Channel 1 of your Revelator io44 interface is equipped with a combo jack. This convenient connector accepts either a ¼-inch TS connection for high-impedence instrument sources like guitars and basses, or an XLR connector for professional microphones. The XLR connection's XMAX-L solid-state microphone preamp is optimized for bus power. -
Page 18: Back Panel 后面板
Revelator io44 connects using USB-C, it is fully compatible with USB 2.0 and 3.0 con- nections. Use the USB-C to A cable that came with your Revelator io44 if your com- puter has a USB-A connection rather than a USB-C connection. -
Page 19: Connection Diagram 连接图
2.1.3 Connection Diagram 连接图 2.1.3 Connection Diagram... -
Page 20: Setting The Input Level 输入电平设置
Standalone controls 独立运行的控制 While many of the features available for your Revelator io44 can be found in Universal Control, critical controls are available right at your fingertips. Most of these settings can be changed from Universal Con- trol to customize your Revelator io44 to your application and needs. -
Page 21: Setting Main Output Level 输出电平设置
真听起来很糟糕,而且如果录制的话,是无法恢复的。正因为如此,当你设置电平时,一定要注意这个指标。 查看资源部分,了解其他录音技巧。 2.1.5 Setting Main Output level 设置主输出电平 By default, the Encoder knob on your Revelator io44 controls the output level of your Main Outputs—the outputs you have your speakers connected to. From the home screen, press the Encoder repeatedly until the speaker icon appears below the Volume indicator. -
Page 22: Setting Headphone Level 耳机电平设置
在主屏幕上,反复按编码器,直到音量指示器下面出现耳机图 标。然后旋转编码器来设置所需的耳机输出电平。 2.1.7 Setting Monitor blend 设置监听混合 Revelator io44 provides an easy way to create a blend between your input signal and the playback from your com- puter. This lets you listen to your performance in real-time without any latency (delay). -
Page 23: Setting Monitor Blend
效果预置。这些预置的目的是为你提供良好的音效,而不需 要音频工程经验! The first two presets can be accessed right from the Preset buttons on your Revelator io44. To cycle through them, press the Mic/Inst or Headset Preset buttons repeatedly. The Mic/Inst default presets are “Broadcast” and “Vocal.” Headset default presets are “Broadcast HS” and “Vintage Channel”. “HS” denotes Headset. - Page 24 To bypass the presets, just press and hold the Preset button for the desired Channel. The Preset indicators on Revelator io44’s screen will go dark. 要绕过预置,只需按住所需Channel的预置按钮。Revelator io44 屏幕上的预置指示灯会变暗。 Power User Tip: Bypass the presets when you want a clean sound with no effects—great for processing your recording later, or when you want to monitor through plug-ins inside your favorite recording application.
-
Page 25: Universal Control
Universal Control The Revelator io44 is so much more than a great-sounding USB interface—and the secret to its advanced features and mixing capability is unlocked with Universal Control. Revelator io44 不仅仅是一个好听的USB音频接口--它的强大功能和混音能力的秘密,被 Universal Control 解锁。 Before proceeding, please make sure you have followed the instructions in the Overview sec- and have downloaded and installed Universal Control. - Page 26 8,192 samples. Lowering the buffer size will lower latency, which is the amount of time it takes for your audio to go from Revelator io44 to the computer and back to your ears; however, this will also increase performance demands on your computer. In general, you will want to set the buffer size as low as your system can safely support.
-
Page 27: Launch Window Menu Items 启动窗口的菜单项
Power User Tip (for Windows Users): On Windows, Revelator io44 is always in Single Mode. If you are using WDM for applications like Skype, your Web Browser, etc., look for the Revelator IO 44 name in respective applic- ations’ audio setup menus. If you are using ASIO for applications like Studio One and other DAWs, look for “PreSonus DSP USB”... - Page 28 Control。 在启动时运行。当你的计算机启动时,自动启动 Preferences. Sets language and appearance options (see below). 首选项。设置语言和外观选项(见下文)。 Rescan Network. Scans your computer’s connections for all supported PreSonus products. 重新扫描网络。为支持所有 PreSonus 产品扫描你计算机的连接。 Language. Sets the language (English, French, German, Korean, Simplified Chinese, or Spanish). ...
-
Page 29: Using Revelator Io44 For System Audio 系统音频的使用
3.3.1 Using Revelator io44 for System Audio 将Revelator io44用于系统音频 The easiest way to make your Revelator io44 seen by just about any application on your computer is to set it up as the default sound source for your computer. Not only will this prompt most video conferencing and streaming applications to look for Revelator io44, it will also set your default Internet browser to use Revelator io44 as well. - Page 30 3. Click on System. 单击“System” 4. Click on Sound. 点击“Sound” 3.3.2 Windows...
- Page 31 Your 6. Click on “Choose your input device” and choose Stream Mix A L/R (Revelator IO 44). Revelator io44 is ready to use! 点击 "选择你的输入设备",选择Stream Mix A L/R ( Revelator io44)。你的Revelator io44已经 可以使用了! 3.3.3 macOS 1. From the Apple Menu, go to System Preferences.
- Page 32 2. Click on Sound. 点击“Sound 声音” 3. Click on the Outputs tab and select Revelator IO44 from the device list. This will route all audio from your computer to the headphone output on your Revelator io44. 点击输出标签,从设备列表中选择 Revelator io44。这将把所有的音频从你的电脑路由到你的 Revelator io44的耳机输出。...
- Page 33 4. Click on the Inputs tab and select Revelator IO 44 Stream Mix A from the device list. This will set your Revelator io44 interface as the input source for your computer. Your Revelator io44 is ready to use! 点击输入标签,从设备列表中选择 Revelator io44 Stream Mix A。这将把你的 Revelator io44 接口设置为...
- Page 34 2. Under Microphones, select “Revelator IO 44 Stream Mix A.” This will route the audio from your Revel- ator io44 to your Skype call. . 在麦克风下,选择 "Revelator io44 Stream Mix A"。这将把你的Revelator io44的音频路由到你的Skype 通话中。 3. Under Speakers, select “Revelator IO 44.” This will route the audio from your Skype call to the head- phone output on your Revelator io44.
- Page 35 Mixing and Loopback Audio for more information on using loopback audio. 用户提示: 如果你想录制你的Skype 通话,从扬声器菜单中选择Revelator io44 Stream Mix A 或 Revelator io44 Stream Mix B。有关使用回环音频的更多信息,请参见混合和回环音频。 Using Revelator io44 for Zoom 使用 Revelator io44 进行缩放操作 1. Launch Zoom, and click the cog wheel icon to enter Zoom Preferences.
- Page 36 Power User Tip: When this option is selected, the sliders in Zoom will not have any effect on the Speaker out- put or Microphone Input gain, as these are controlled by the Revelator io44 itself—either by the on-board con- trols and/or through the Universal Control software.
- Page 37 Power User Tip: When this option is selected, the sliders in Zoom will not have any effect on the Speaker out- put or Microphone Input gain, as these are controlled by the Revelator io44 itself—either by the on-board con- trols and/or through the Universal Control software. Mac users will see that the sliders do not move and will snap back to the zero position indicating that these controls in Zoom are disabled.
- Page 38 In Zoom’s Advanced Audio settings menu, please ensure Echo Cancellation is set to Auto. If you need to switch your audio device to Revelator io44 while in a meeting, select the arrow next to the Mute Button to select your audio device list.
- Page 39 Speaker selections as follows: 在单一模式下运行Revelator io44的macOS用户,将看到Revelator io44出现在Zoom的微型麦克风和扬 声器选择中,如下所示。 All Windows users and Mac users running Revelator io44 in Multi Mode will see Revelator IO 44 appear in a list similar to this: 所有在多模式下运行Revelator io44 的 Windows 用户和 Mac 用户,将看到Revelator io44的列表中出...
- Page 40 Microphone and Speakers and click on “Revelator IO 44.” Google Meet 的音频菜单将被默认。如果还没有选择Revelator io44,点击麦克风和扬声器下的向下箭头, 然后点击 "Revelator io44"。 Mac Users running Revelator io44 in Single Mode will see one instance of Revelator IO 44 shown as fol- lows: 在单一模式下运行Revelator io44 的Mac用户将看到Revelator io44的一个实例,显示如下。...
-
Page 41: Using Revelator Io44On Chromebook 在Chromebook上使用Revelator Io44
There is a chance that the next time you open Google Meet that it may default to a different audio device without notifying you. Be sure to check your audio settings to make sure Revelator io44 is selected. PreSonus has no control over how this device selection works. - Page 42 Select the greater than symbol (>) to the right of the volume slider to enter Audio Settings and select your audio device. The green circle with the check mark indicates your preferred device. If Revelator io44 is not already selected, select it here for both Output and Input.
-
Page 43: Using Revelator Io44 With Zoom On Chromebook 在Chromebook上使用Revelator
5. Ensure that the box labeled “Automatically adjust microphone volume” is not checked. 确保标有 "自动调 整麦克风音量 " 的方框没有被选中。 You can adjust both Input gain and speaker playback volume on the Revelator io44 manually. There are no other advanced menu options as found in the Mac / Windows versions of Zoom. -
Page 44: Using Revelator Io44 With Google Meet On Chromebook 在Chromebook上使用
1. Click on the Settings Cog icon. 点击设置“齿轮”图标。 2. Google Meet’s Audio menu will be highlighted by default. If Revelator io44 is not already selected, click the down arrow under Microphone and Speakers and click on “Revelator IO 44: USB Audio1,0”. - Page 45 There is a chance that the next time you open Google Meet that it may choose a different audio device without notifying you. Be sure to check your audio settings to make sure Revelator io44 is selected. PreSonus has no control over how this device selection works.
-
Page 46: Using Revelator Io44 With Ios/Ipados Devices 在Ios/Ipados设备上使用Revelator Io44
Revelator io44在直接连接到iPad 等 iOS/iPadOS 设备时可以工作,不过你应该注意以下几点: When connected to iPad Pro tablets with USB-C ports, Revelator io44 will function as intended without additional power or direct connect. However, there’s no way to charge the iPad while Revelator io44 is connected. 当连接到带有USB-C端口的iPad Pro平板电脑时,Revelator io44 将按原定计划运行,无需额外的电... - Page 47 Using Revelator io44 with Android devices 在安卓设备上使用 Revelator io44 Revelator io44 works great when connected directly to Android devices. If you find your Android device doesn’t provide enough power, an externally-powered USB hub can be connected to your Android device to provide additional power to your Revelator io44.
-
Page 48: Presets And Scenes 预置和场景
Your Revelator io44's Mic/Inst and Headset channel can each access 2 presets using the Preset but- tons... but there are 6 more presets created by PreSonus for you to enjoy—plus another 6 preset slots for you to create custom presets. These presets are all available from Universal Control. -
Page 49: Factory Presets 出场预置
预置选择旋钮。使用你的鼠标滚轮来转动这个旋钮,实时试听预置。 4.1.1 Factory Presets 出厂时预置 Revelator io44 ships with several presets for both Channel 1 and the Headset Channel. Pick the Presets that work best with your use case and you'll sound great with just a couple clicks! Revelator io44 为Channel 1和耳机Channel 提供了几种预置。挑选最适合你的预置,只需点击几下,... -
Page 50: Changing Preset Button Slots 改变预置按钮位置
Telephone 电话 4.1.2 Changing Preset Button Slots 改变预置按钮槽 To change one of the presets available from Revelator io44: 改变Revelator io44提供的预置之一: Click to select the slot you would like to change. 点击选择你想改变的插槽。 Select the desired preset using either the Preset selection knob or selecting it from the dropdown ... - Page 51 From the Preset Slot list, select “Broadcast.” 从预置插槽列表中,选择 "Broadcast 广播"。 Click on the drop-down menu and select "Vintage Channel" from the list. 点击下拉菜单,从列表中选择 "Vintage Channel"。 4.1.2 Changing Preset Button Slots...
-
Page 52: Storing New Presets 存储新的预置
“Vintage Channel” is now the preset stored in this slot.You're done! "Vintage Channel " 现在是存储在这个槽中的预置。你已经完成了! 4.1.3 Storing New Presets 储存新的预置 We’re going to get into all the Fat Channel settings later (in the Fat Channel and Voice Effects section), but while we’re here, let’s talk about storing new Presets. To store a new preset to one of the 6 User Slots: 我们之后打算讨论... - Page 53 Click on the Save Preset button. 点击保存预置按钮 Select the user slot to which you want to store it. 选择你要存储的用户插槽。 Enter the name you’d like to use. 输入你想使用的名称。 Click Store. You're done! 点击储存。这样就做好了! 4.1.3 Storing New Presets...
-
Page 54: Exporting/Importing Presets 导出/导入预置文件
4.1.4 Exporting/Importing Presets 导出/导入预置 Revelator io44 can save two presets per channel on the hardware unit itself. This is useful for times when you want to use Revelator io44 with a device that doesn’t run Universal Control—for example, a Chrome- book, iPad, or a camera with an audio input. - Page 55 To Export a new preset to one of the 6 User Slots: 要把一个新的预置导出到 6个用户插槽中的其中一个插槽。 Click on the Save Preset button. 单击 "保存预置" 按钮。 Select the device preset that you want to Export. 选择你想导出的设备预置。 4.1.4 Exporting/Importing Presets...
- Page 56 点击右边的箭头,导出预设。该预设将出现在列表中。 To find where the exported Preset has been stored on your computer, right-click on it and choose Show in Finder (Mac) or Show in Explorer (Windows). Have fun sharing this file with other Revelator io44 users! 要找到导出的预置在你的电脑上的存储位置,右击它并选择在 Finder(Mac)的显示或在资源管理器 (Windows)的显示。祝你与其他Revelator io44用户分享这个文件的乐趣! To Import a new preset to one of the 6 User Slots: 要将一个新的预置导入到...
- Page 57 Click on the left arrow to load the Preset into the first Empty Device Preset slot. 点击左边的箭头,将预置值加载到第一个空设备预置槽。 That's it! Now, if you’d like that new Preset stored in one of the positions available from the Preset buttons on your Revelator io44, follow the instructions in and customize away! Presets and Scenes 这就是了! 现在,如果你想把新的预置储存在你的Revelator io44上的预置按钮中的一个位置,请按照预置和场景中的...
-
Page 58: Scenes - Save And Recall 场景-保存和调用
4.1.5 Scenes - Save and Recall 场景 - 保存和调用 Scenes allow you to store all of the Revelator io44’s settings for recall at a later time. This is useful for if you have various projects that require specific settings—you won’t have to set up every little detail of your Revelator io44 every time you change projects! For example, you might have a podcasting setup with a preset for your frequent guest, and also have a setup you like for recording acoustic guitar. - Page 59 To delete a Scene, right-click it in the Scene List and choose Delete. 点击存储并命名你的场景。点击“OK 确定”。 要调用(加载)一个场景,只需从场景列表中点击你想要的场景,然后点击调用。要删除一个场 景,在场景列表中右键单击它,然后选择删除。 4.1.5 Scenes - Save and Recall...
-
Page 60: Sharing Scenes And Presets分享场景和预置
To share Presets and Scenes with your friends, all you need to do is send the desired Scene or Preset file to your friend, either via e-mail or a PreSonus Sphere Workspace. If someone is kind enough to share a Preset or Scene with you, it can be imported to Universal Control simply by placing the file in the correct folder. -
Page 61: Fat Channel And Voice Effects Fat Channel 和音效
Fat Channel and Voice Effects Fat Channel和语音效果器 Fat Channel and Voice FX Fat Channel和语音效果器 The Fat Channel provides essential signal processing tools to sculpt your sound, as well as Voice FX sec- tion to warp, distort, and bounce it around. These are the effects that are stored with a preset. A ded- icated Reverb processor is also available, but it is important to note that Reverb is not stored with a Preset. - Page 62 High Pass Filter (HPF) 高通滤波器 Also known as a low-end roll-off filter, the High Pass Filter (HPF) lets you cut all frequencies below a specified point, letting the frequencies above that point pass through unchanged. This filter can be handy when you want to reduce the “boominess” or “muddiness”...
- Page 63 Power User Tip: When looking at frequency ranges in audio, it’s important to know that the smaller the number, the lower the frequency is. The 40 Hz and 80 Hz settings can be especially useful in reducing the “rumble” from a nearby road or any background electrical noise or hum. 用户提示:当查看音频的频率范围时,重要的是要知道数字越小,频率越低。...
- Page 64 Audio signals have very wide peak-to-average signal-level ratios (sometimes referred to as dynamic range) which is the difference between the loudest level and the softest level. This can create problems when you’re setting input levels because when enough gain (or volume) is applied to capture the softest level at its best, one cough, laugh, or excited moment can overload the input, resulting in distortion…...
- Page 65 For more advanced compression controls and to learn about the different compressor models onboard your Revelator io44,see Advanced Features and Customization. 关于更优先的压缩控制和了解Revelator io44上的不同压缩器型号, 5.1 Fat Channel and Voice FX...
- Page 66 用户提示:挑选最适合你的声音的 EQ 设置的最好方法是实验。每个人的声音都是独一无二的,由于 EQ 完全 取决于音源的频率,你的耳朵是你找到适合你声音的最好工具。 Like the Compressor, Revelator io44 offers advanced controls and several EQ models to choose from when you’re ready to dive deeper. See for more on Advanced EQ Advanced Features and Customization controls.
- Page 67 Limiter 限制器 True to its name, a Limiter sets the upper dynamic range of your signal and prevents the source from exceeding it by “limiting” it to that threshold. If you’re thinking that sounds a lot like what we just told you a compressor does, you’re catching on! A limiter is different from a compressor in a very crit- ical way: Unlike a compressor, which works gradu-...
- Page 68 Experiment with different sound sources! Note: Revelator io44’s Voice FX can only be used on one of the two Inputs at a time. You can select Channel 1 or 2 for use with Voice FX from the Set- tings menu.
- Page 69 The Reverb in Revelator io44 is independent of your presets, so you can use the same Reverb setting on any preset you like.
- Page 70 To adjust the amount of Reverb you hear in your mix, raise or lower the Reverb Fader in the mixer. section for more information on your Revelator io44 mixer. the Mixing and Loopback Audio 要调整你在混音中听到的混响量,可以提高或降低混音器中的混响衰减器。关于Revelator io44调音台 的更多信息,请参见混合和回放音频部分。 Preset. Choose between Small, Medium, and Large. These presets emulate room size. In general, ...
- Page 71 预置。在小、中、大之间进行选择。这些预置模拟了房间的大小。一般来说,房间尺寸越大,混响就越 大。 尺寸。这个设置可以调整每个反射声的长度,以及你听到它们的频率。 HPF(高通滤波器)。像 Fat Channel 中的High Pass Filter(高通滤波器)一样,这个设置将削减混响 输出中低于你在这里设置的阈值的频率。 Power User Tip: This is especially helpful for bass-rich sound sources (baritone voice, acoustic guitar) as adding too much reverb in low frequencies can muddy your sound. 用户提示:这对富含低音的音源(男中音、原声吉他)特别有帮助,因为在低频添加过多的混响会使...
-
Page 72: Mixing And Loopback Audio 混音和回环音频
However, when you’re ready to start adding call-in audio to your podcast or creating more elaborate streams, this mixer will solve a myriad of routing problems and headaches. Revelator io44’s Loopback streams will be listed as “Revelator IO 44 Stream Mix A” and “Revelator IO 44 Stream Mix B” in software configuration menus. - Page 73 Best of all, the Revelator io44’s mixer makes it easy to monitor any mix you create, so you can record and stream with confidence, knowing that what you’re hearing is exactly what your audience will be listening to as well.
-
Page 74: Mixer Controls 混音器控制
5. Clip Light. This light will illuminate red when the input signal is too loud and clipping. If your input signal clips, it will overload the Revelator io44’s analog-to-digital converters, causing digital dis- tortion. This sounds terrible. If you record a signal with digital dis- tortion, there is no undoing it or fixing it. - Page 75 Playback. This is the output channel for the Revelator io44 Playback Device in each stereo mix. Virtual A. This is the output channel for the Revelator io44 Virtual A Device in each stereo mix. Virtual B. This is the output channel for the Revelator io44 Virtual B Device in each stereo mix.
-
Page 76: Main Output Controls And Mix Selection 主输出控制和混音选择
Channel 名称。双击默认名称可以让你自定义Channel 的名称。 6.1.3 Main Output Controls and Mix Selection 主输出控制和混合选择 Revelator io44 gives you very fine, detailed control over the details of the different mixes that you can send to your Loopback streams and outputs. The Main Output Controls affect the physical outputs of your Revelator io44, including Main Outputs, Headphones, etc. - Page 77 Skype. You can create custom mixes for Main, Mix A, Mix B, or Mix C. 4. Main. Click on this tab to bring up the mix for the Revelator io44 Device. 5. Stream Mix A. Click on this tab to bring up the mix for the Revel- ator io44 Stream Mix A Output stream.
- Page 78 5. Stream Mix A。点击这个标签,可以调出Revelator io44 流混合 A 输出流的混音。 6. Stream Mix B。点击这个选项卡,调出 Revel-ator io44 流混合B 输出流的混音。 7. 电话聆听。你可以通过点击耳机图标来收听四个混音中的任何一个。这将把选定的混音路由到你的耳机, 而不是监听混音,所以你可以试听你的其他混音。 8. 单声道/立体声。每个混音可以在单声道和立体声之间切换。当把环回音频路由到只接受一个输入的应用程 序时,或者当你想用单声道监听时,请使用单声道控制。 9. 输出音量控制器。设置当前选择的混音的整体输出电平。 10. 混合剪辑。当这个灯亮起时,说明你的混音太响了,正在 "削波"。你可以通过降低整体输出电平或降低混 音中的每个通道来解决这个问题。 11. 混合仪表。显示当前混音的整体电平。 12. Mute(静音)。对当前选择的混音进行静音。 13. 混音名称。每个混音名称可以通过点击主输出音量控制器下面的默认名称进行自定义。 6.1.3 Main Output Controls and Mix Selection...
-
Page 79: Feedback Loops Are Bad 不适合的反馈回环
6.1.4 Feedback Loops are Bad 不合适的反馈环路 While loopback audio and the Revelator io44 mixer makes it really easy to mix and record the sound of one piece of software into another, there is also the potential to send the output of a software application back into itself and create what is known as a “feedback loop.”... -
Page 80: Advanced Features And Customization Tools 高级功能和定制工具
When One or Two Preset Button Mode is engaged, you will only see the respective number of pre- sets in the Revelator io44 mixer as well; the unused presets will be greyed out. Note that in single Pre- set slot mode, the Preset button on Revelator io44 will toggle between the loaded preset and bypass. - Page 81 Channel 预置。如果你想只录制未经处理的原始音频,但在录制时仍能听到预设,请禁用 "Fat Channel USB 流输出"。 3. 输出延时。如果你遇到音频和视频之间的同步问题,使用输出延迟来帮助同步音频和视频。使用下拉菜单 选择所需的输出,并使用延迟旋钮设置以毫秒为单位的延迟量。(类似的功能有时在一些电视上被称为 "唇语同 步")。 4. 预设按钮模式。默认情况下,你的 Revelator io44 通过界面上的预置按钮提供两个预置。如果你发现自己 只使用一个,你可以通过点击这里进行相应的简化。 当一个或两个预置按钮模式参与时,你将只看到Revelator io44混音器中相应数量的预置;未使用的预置将被 灰色显示出来。注意,在单预置槽模式下,Revelator io44上的预置按钮将在加载的预置和旁路之间切换。在 双预置槽模式下,旁路仍然是通过按住Revelator io44上的预置按钮实现的。 5. Channel 静音同步。当激活时,在Universal Control 中对一个通道进行静音,将在所有混音中对其进行静 音。 7. Advanced Features and Customization Tools...
-
Page 82: High Pass Filter 高通滤波器
Advanced Fat Channel and Voice Effects Controls 高级的Fat Channel 和声音效果控制 To open the advanced Fat Channel and Voice Effects Controls, click on the Fat Channel menu at the top right of Universal Control, or click “Fat Channel.” 要打开Fat Channel 和声音效果控制,请点击Universal Control 右上方的Fat Channel 菜单,或者点击 "Fat Channel”。... -
Page 83: Noise Gate 噪音门
7.2.2 Noise Gate 噪声门 1. On/Off. Turns the Noise Gate on or off in the signal chain. 2. Threshold. Sets the signal level that bisects the signals you wish to keep from the signals you want to attenuate. Signals below this level are attenuated according to the setting of the Range parameter. Signals above this level pass through unaffected. - Page 84 5. Attack. Sets the time it takes for the gate to “open” when a signal passes the threshold. 攻击。设置当信号通过阈值时,噪声门 "打开" 所需的时间。 Power User Tip: A fast attack rate is crucial for percussive instruments. Slow-rising signals such as vocals and bass guitar require a slower attack; with these signals, a faster attack can cause an audible click.
-
Page 85: Compressor 压缩器
As previously mentioned, a compressor is a dynamics processor that reduces the dynamic range of a sig- nal by attenuating it by a set ratio when it exceeds a defined threshold. Your Revelator io44 is equipped with three compressor models from which to choose: Standard, Tube, and FET. -
Page 86: Standard Compressor 标准压缩器
7.2.4 Standard Compressor 标准压缩器 1. On/Off. Turns the Compressor on or off in the signal chain. 2. Threshold. Sets the level above which the compressor begins to attenuate the signal. 3. Ratio. Sets the relationship between the amount a signal goes above the threshold, and the amount it is attenuated. - Page 87 Power User Tip: Very short compressor release times can produce a choppy or “jittery” sound, espe- cially when compressing instruments that have a lot of low-frequency components, such as a rich acous- tic guitar. Very long release times can result in an over-compressed, or “squashed,” sound. All ranges of release can be useful, however, and you should experiment to become familiar with different sonic pos- sibilities.
-
Page 88: Tube Leveling Amplifier Tube平衡放大器
7.2.5 Tube Leveling Amplifier 电子管调平放大器 1. On/Off. Turns the Compressor on or off in the signal chain. 2. Gain. Sets input gain to the compressor. Because this type of compressor operates in a different way than a standard compressor, much of the way that it affects signals is based on the input level. Try dif- ferent settings to see what suits your needs. -
Page 89: Class-A Fet Compressor A类效应管压缩机
7.2.6 Class-A FET Compressor A级 FET压缩器 1. On/Off. Turns the Compressor on or off in the signal chain. 2. Input Gain. Sets input gain to the compressor. This setting affects the action of the compressor, so feel free to try various settings to find the optimal effect for your needs. 3. -
Page 90: Changing The Signal Chain 改变信号链
You can boost or cut the level of ranges of frequencies, to make corrective or cre- ative changes to the signal. Like the compressor, your Revelator io44 is equipped with three EQ models from which to choose: Standard, Passive, and Vintage. -
Page 91: Standard Eq 标准均衡器
7.2.9 Standard EQ 标准 EQ 1. On/Off. Turns the EQ on or off in the signal chain. 2. Frequency. This control sets the center frequency at which signals are boosted or cut for the cur- rently selected band. 3. Gain. Sets the amount by which the selected frequency will be boosted or cut. 4. - Page 92 Power User Tip: A low shelving EQ is like a bass-control knob on a stereo. In this mode, the Center Fre- quency control selects the shelving frequency. 用户提示:低速搁架式均衡器就像立体声中的低音控制旋钮。在这种模式下,中心频率控制可以选择搁 置频率。 6. Low Band Select. Enables/Disables the Low Band and enables the Frequency, Gain, and Q for this band.
-
Page 93: Passive Program Eq 无缘程序均衡器
7.2.10 Passive Program EQ 无源程序均衡器 1. On/Off. Turns the EQ on or off in the signal chain. 2. Low Boost. Sets the level of boost applied around the chosen low frequency. This control interacts nicely with the Low Attenuation control, allowing for boosts in apparent bass energy while keeping overall bass energy within optimal limits. -
Page 94: Limiter 限制器
7.2.11 Vintage 1970s EQ 70年代复古 EQ 1. EQ On/Off. Enables/disables the EQ globally. Touch to toggle on or off. 2. Low Frequency. Sets the shelving frequency for the Low Band. 3. Low Gain. Sets the Gain for the Low Band. 4. -
Page 95: Voice Fx语音特效
7.2.13 Voice FX 语音特效 Your Revelator io44 is equipped with six Voice FX processors that can make your voice sound ethereal, otherworldly, or just plain weird… your choice! This section will go through each effect in detail. Note that while you can use any of these effects with the Fat Channel and Reverb, you can only use one effect at a time. -
Page 96: Doubler 加倍器
7.2.14 Doubler 加倍器 The Doubler will enhance your voice with a natural doubling effect that will add richness and depth with just a hint of reverb. 加倍器将以自然的加倍效果增强你的声音,只需一丝混响,就能增强丰富度。 Lows. Use this control to boost the low-frequency content. Width. This control adjusts the stereo image. ... -
Page 97: Vocoder 声码器
Tune. Sets the amount your voice will be lowered. Wet/Dry. Blends the affected sound with the dry sound of your voice. Set to 100% to only hear the pro- cessed sound. Set to 0% to only head the dry sound. 调音。设置你的声音将被降低的量。... -
Page 98: Ring Modulator 环形调制器
Wet/Dry. Blends the affected sound with the dry sound of your voice. Set to 100% to only hear the pro- cessed sound. Set to 0% to only head the dry sound. Wet/Dry模式。将受影响的声音与你的声音的干音混合模式。设置为100%,只听到受影响的声音。设为 0%,只听Dry声音模式。 7.2.17 Ring Modulator 环形调制器 A Ring Modulator basically takes two separate signals (your voice and an oscillator) and creates a new signal that is made up of the sum and differences of the original sources. -
Page 99: Delay 延迟
Tune: Adjusts the pitch of the affected signal from high to low. Damping: Adjusts the amount of high-frequency content sent through feedback (4.) in the affected signal. Wet/Dry: Blends the affected (“wet”) sound with the un-affected, (“dry”) sound of your voice. Set to ... - Page 100 延迟基本上是创造回声,尽管你经常可以用延迟来创造更复杂的基于时间的效果。源信号被延迟了,所 以听到的时间比实际发生的时间晚。 Time. This is the time (in milliseconds) between the source signal and its echo. The simplest delay effect is a single repeat. A short delay between 30 and 100 ms can be used to create slap-back echo, while longer delay times produce a more distant echo.
-
Page 101: Studio One Artist Quick Start 快速入门
无论你是准备录制你的第一张专辑,还是 第五十张专辑,Studio One Artist 都能为你提供所有的工具来创作你的表演。 Power User Tip: As a valued PreSonus customer, you are eligible for a discount upgrade to Studio One Pro- fessional. For more details on the Studio One upgrade program for PreSonus customers, please visit https://shop.presonus.com/products/software/studio-one-prods. - Page 102 程序时连接到互联网。 Power User Tip: You may be prompted to enter your My PreSonus user account information. Clicking “Remem- ber Credentials” will allow you to have immediate access to any content you purchase from the PreSonus Mar- ketplace. 用户提示:你可能会被提示输入你的 My PreSonus 用户帐户信息。点击 "Remember Credentials " 将使你能够...
-
Page 103: Setting Up Studio One Artist 设置 Studio One Artist
On this page, you will find document-management and device-configuration controls, as well as a cus- tomizable artist profile, a news feed, and links to demos and tutorials from PreSonus. If your computer is connected to the Internet, these links will be updated as new tutorials become available on the PreSonus Web site. -
Page 104: Configuring Audio Devices 配置音频设备
In the middle of the Start page, you will see the Setup area. Studio One Artist automatically scans your system for all available drivers and selects a driver. By default, it will choose a PreSonus driver if one is available. -
Page 105: Configuring Midi Devices 配置Midi设备
(if available) or other MIDI interface. If you are using a USB MIDI controller, connect it to your computer and power it on. 你可以在 "开始" 页面的 "设置" 区域设置你的外部 MIDI 设备。在设置一个新的歌曲进行录音之前,花点 时间配置外部设备。 确保你已经将外部 MIDI 控制器的 MIDI 输出连接到PreSonus 音频接口(如果有的话)或其他 MIDI 接口 的MIDI输入。如果你使用的是 USB MIDI 控制器,请将它连接到你的电脑上并接通电源。 8.3 Configuring MIDI Devices... - Page 106 Click on the Configure External Devices link in the Setup area on the Start page to launch the External Devices window. 点击 "开始 " 页面设置区的 "配置外部设备 "链接,启动 "外部设备 "窗口。 8.3 Configuring MIDI Devices...
- Page 107 Click the Add button. This will launch the Add Device window. 点击 "添加 " 按钮。这将启动 "添加设备 " 窗口。 From the menu on the left, select your MIDI controller from the list of manufacturers and models. If you do not see your MIDI controller listed, select New Keyboard. At this point, you can customize the name of your keyboard by entering the manufacturer and device names.
- Page 108 You must specify which MIDI channels will be used to communicate with this keyboard. For most pur- poses, you should select all MIDI channels. If you are unsure of which MIDI channels to choose, select all 16. Studio One allows you to filter out specific control functions. If you would like Studio One to ignore ...
- Page 109 Setting up an External MIDI Sound Module from the Start Page 从开始页,设置一个外部MIDI声音模块 MIDI instrument controllers (keyboards, MIDI guitars, etc.) send musical information, in the form of MIDI data, to tone modules and virtual instruments, which respond by generating sound as instructed. Tone modules can be standalone sound devices or can be integrated into a MIDI instrument, such as a key- board synthesizer.
-
Page 110: Creating A New Song 创建一首新歌
Select your device in the menu on the left. If your device is not listed, select New Instrument. At this point you can customize the name of your keyboard by entering the manufacturer and device names. Specify which MIDI channels will be used to communicate with this sound module. For most pur- ... - Page 111 In the New Song window, name your Song and choose the directory in which you’d like it saved. You’ll notice a list of templates on the left. These templates provide quick setups for a variety of devices and recording situations. The section will describe creating a Song from an empty session. 在...
-
Page 112: Configuring Your I/O 配置你的I/O
Stream Mix Inputs that you’d like to have available. We recommend you create a mono input using Input 1 of your Revelator io44 and two Stereo Inputs; one for Stream Mix A and another for Stream Mix B. - Page 113 Click on the Outputs tabs to enable any or all of the outputs on your Revelator io44. In the lower right corner, you will see the Audition Select menu. This allows you to choose the output from which you will audition audio files prior to importing them into Studio One Artist.
-
Page 114: Creating Audio And Instrument Tracks 创建音频和音轨
Creating Audio and Instrument Tracks 创建音频和音轨 In the upper left corner of the Arrange window, you will notice several buttons. The button furthest to the right is the Add Tracks button. Click on this button to open the Add Tracks window. 在编曲窗口的左上角,你会注意到几个按钮。最靠右的按钮是... -
Page 115: Recording An Audio Track 录制一个音轨
10.0.1 Recording an Audio Track 录制一个音轨 To begin recording, create an audio track from the Add Tracks window, set its input to Input 1 on yourRevelator io44, and connect a microphone to the same input. 要开始录音,从 "添加音轨" 窗口创建一个音轨,将其输入设置为Revelator io44的输入1,并将 一个麦克风连接到同一输入。 10.0.1 Recording an Audio Track... -
Page 116: Adding Virtual Instruments Andeffects 添加虚拟乐器和效果
Select Record Enable on the track. Turn up the Input 1 level on your audio interface while speak- ing/singing into the microphone. You should see the input meter in Studio One Artist react to the input. Adjust the gain so the input level is near its maximum without clipping (distorting). You are now ready to start recording. - Page 117 The Browse button opens the browser, which displays all of the available virtual instruments, plug-in effects, audio files, and MIDI files, as well as the pool of audio files loaded into the current session. 浏览按钮打开浏览器,显示所有可用的虚拟乐器、插件效果、音频文件和MIDI文件,以及加载到当 前会话的音频文件池。 Drag-and-Drop Virtual Instruments 拖放虚拟乐器 To add a virtual instrument to your session, open the browser and click on the Instrument button.
- Page 118 Drag-and-Drop Audio and MIDI Files 拖放音频和MIDI文件 Audio and MIDI files can be quickly located, auditioned, and imported into your Song by dragging them from the file browser into the Arrange view. If you drag the file to an empty space, a new track will be created with that file placed at the position to which you dragged it.
-
Page 119: Resources 资源
Resources 资源 11.1 Gain Staging 101: Begin at the Beginning 增益分期101:从头开始 It may seem counter-intuitive to boost the signal closest to its source and cut it later in the signal path if it is too loud, but this is precisely the best way to get a noise- and feedback-free recording. That said, you don’t want to gain it up too much at the beginning either. -
Page 120: Step 2: Setting The Eqand Dynamics第二步:设置均衡器和动态器
Watching for the signal/clip indicator to turn red, then back it down until the level indicator is green only. 观察信号/夹子指示灯变成红色,然后将其退回,直到指示灯仅有绿色。 11.1.2 Step 2: Setting the EQ and Dynamics 设置均衡器和动态器 After you have set the input gain, you can use your channel EQ to sculpt your source. The more bands your EQ offers, the more control you will have, but you’ll also add more potential for improper gain sta- ging, so use with caution. - Page 121 There is an unfortunate rumor that persists in the darker corners of the audio-nerd Internet. It states that all your faders should be set to unity (that bold line in the middle of the fader markings at 0 dB). But if you do this, you will limit the dynamic range of your signals—and not in a good way.
-
Page 122: Microphone Tips And Tricks 麦克风的技巧和窍门
Don’t worry, we’ve all been there, and PreSonus has put together this tutorial to help you mitigate the most common mistakes people make when getting started recording their voice with a microphone. -
Page 123: Putting It All Together 全部放在一起
参见Fat Channel 和声音效果部分。专业的DAW应用程序,如PreSonus Studio One,也配备了专门用于去 除“咝咝声”插件。 Power User Tip: If you are recording several speakers at once with your Revelator io44, using a de-esser can cause more problems than it solves, because over-using a de-esser or putting one where it is not needed can turn all your ‘S’... -
Page 124: Technical Specifications 技术规格
Select 硬件控制:直接监听,麦克风增益,耳机电平,静音,预置选择 Software Controls: Mic Gain, Monitor Mix, Preset Management 软件控制:麦克风增益,监听混合,预设管理 Onboard DSP 板载DSP PreSonus StudioLive Fat Channel: High Pass Filter, Noise Gate / Expander, 3 Compressor models, 3 EQ models, and Limiter; PreSonus StudioLive Fat Channel: 高通滤波器,噪音门/扩展器,3个压缩器 模型,3个均衡器模型,以及限制器。 Voice Effects: Doubler, Vocoder, Ring Modulator, Comb Filter, Detuner, Delay, Reverb 声音效果: 倍增器、声码器、环形调制器、梳状滤波器、失谐器、延时、... - Page 125 1.4 kΩ Input Impedance 输入阻抗 +48 VDC (10 mA total) Phantom Power 幻象电源 Instrument Input 仪器输入 +10 dBu (min gain) Maximum Level 最大电平 50 dB Gain Range 增益范围 20 Hz – 20 kHz (+0.1dB/-0.3 Frequency Response 频率响应 dB, unity gain, unwtd) THD + N 0.005% (1 kHz, min gain) 750K Ω...
- Page 126 THD + N 0.050 % (1 kHz, 0 dBFS, loaded) Impedance Working Range 阻抗工作范围 32 Ω to 300 Ω Physical 体积 Height 高度 2.3” (58.4 mm) Width 宽度 3.03” (77 mm) Depth 深度 5.35” (135.9 mm) 0.78 lbs (0.35 kg) Weight 重量...
- Page 127 Dinner is Served! 为您准备晚餐! Added bonus: PreSonus’ previously Top Secret recipe for… 经典保留:PreSonus 绝密食谱配方..Andouille & German Red Cabbage Po-Boys Ingredients: 1 small Onion 3 Tbsp. fresh Ginger 1 small head Red Cabbage 1 tsp Salt ...
- Page 128 克里奥尔或德国芥末酱来调味 1条法国面包 烹饪说明: 在大平底锅中加热2汤匙植物油。加入洋葱和姜,煮约3分钟,直到洋葱开始萎缩。加入卷心菜、醋 和蜂蜜,然后煮约5分钟。加入盐调味,放在一边。 在平底锅中将油加热至热。将香肠切面朝下放入锅中,直到变成棕色,再翻面,煮约5分钟,直到完 全煮熟。 将面包纵向切开,铺上卷心菜,然后是香肠,上面放奶酪。在烤炉下或热烤箱中烘烤,直到奶酪融 化,面包变脆。 在面包上涂抹芥末。三明治可以切成2-3块,然后分享(如果很饿就直接吃,不用切)。 额外:多余的卷心菜可以作为调味品与肉、鸡蛋、三明治等一起使用。 12. Dinner is Served!
-
Page 129: Legal 法律
EarMix, Eris, FaderPort, FireStudio, MixVerb, Notion, PreSonus, PreSonus AudioBox, QMix, RedLightDist, SampleOne, Sceptre, StudioLive, Temblor, Tricomp, WorxAudio, and the Wave Logo are registered trademarks of PreSonus Audio Electronics, Inc. Revelator is a trademark of PreSonus Audio Electronics, Inc. Studio One is a registered trademark of PreSonus Software Ltd. - Page 130 Revelator io44 USB-C Compatible Audio Interface with Integrated Loopback Mixer and Effects Owner’s Manual 用户手册 Part# : 70-12000181-A...
Need help?
Do you have a question about the Revelator io44 and is the answer not in the manual?
Questions and answers