Table of Contents
Advertisement
Advertisement
Table of Contents

Related Manuals for PRESONUS AudioBox 1818VSL


Summary of Contents for PRESONUS AudioBox 1818VSL
- Page 1 AudioBox™ 1818VSL Owner’s Manual ™ www.presonus.com...
- Page 2 Important Safety Instructions The exclamation point within an equilateral triangle is intended 12. Use only with the cart, stand, tripod, bracket, or table to alert the user to the presence of important operating and specified by the manufacturer or sold with maintenance (servicing) instructions in this manual.
-
Page 3: Table Of Contents
A Brief Tutorial on Dynamics Processing — 48 Installation for Mac OS X — 13 5.2.1 Common Questions Regarding Using the AudioBox 1818VSL with Dynamics Processing — 48 Popular Audio Applications — 14 5.2.2 Types of Dynamic 4.0 Software: Virtual StudioLive Processing —... - Page 4 PreSonus AudioBox 1818VSL ™ Aux Bus Mixing — 64 5.4.1 Monitor Mixing — 64 5.4.2 Effects Processing — 64 Digital Effects — 65 5.5.1 Reverb — 65 5.5.2 Delay — 66 6.0 Technical Information — 67 Specifications — 67 7.0 Troubleshooting and Warranty —...
- Page 5 Owner’s Manual...
- Page 6 PreSonus AudioBox 1818VSL ™ vi vi...
-
Page 7: Audiobox™ 1818Vsl
Throughout this manual you will find Power User Tips that can quickly make you an AudioBox 1818VSL expert. In addition to the Power User Tips, you will find an assortment of audio tutorials at the back of this manual. These tutorials cover everything from... -
Page 8: Summary Of Audiobox 1818Vsl Hardware Features
PreSonus AudioBox 1818VSL ™ Overview Summary of AudioBox 1818VSL Hardware Features Summary of AudioBox 1818VSL Hardware Features • 24-bit/96 kHz sampling rate • 8 Class A XMAX microphone preamplifiers • 2 Instrument inputs • 6 Line inputs • MIDI I/O •... -
Page 9: Summary Of Virtual Studiolive Software Features
Owner’s Manual Overview Summary of Virtual StudioLive Software Features Summary of Virtual StudioLive Software Features Virtual StudioLive is a powerful monitor-mixing application that allows you to add professional dynamics processing, EQ, and effects to your monitor mixes. • Easy drag-and-drop workflow •... -
Page 10: What Is In The Box
™ Overview What is in the Box What is in the Box In addition to this manual, your AudioBox 1818VSL package contains the following: PreSonus AudioBox 1818VSL USB 2.0 recording interface 6’ (1.8m) USB cable External power supply Software library containing: •... -
Page 11: Hookup
Active instruments should be plugged into a line input rather than into an instrument input. Plugging a line-level source into the instrument inputs on the front of the AudioBox 1818VSL not only risks damage to these inputs but also results in a very loud and often distorted audio signal. -
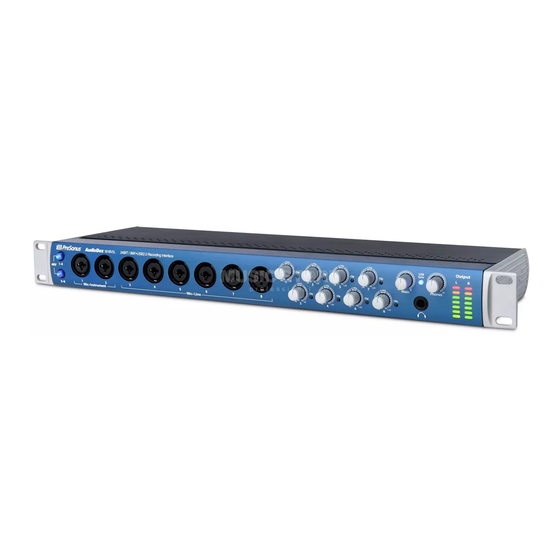
Page 12: Front-Panel Connections
Main. The Main knob controls the output level for the Main Outputs on the back of the AudioBox 1818VSL, with a range of -80 dB to 0 dB. USB Sync LED. This LED will illuminate blue when the AudioBox 1818VSL is properly powered and synced to a USB 2.0 connection. -
Page 13: Rear-Panel Connections
7 and 8 share their playback streams with the headphone output. Outputs 3 through 6 have independent playback streams. Main Out. These are the main outputs for the AudioBox 1818VSL. The output level of the Main Outs is controlled by the Main volume knob on the front of the unit. - Page 14 USB 2.0 port to work properly. Power Input. This is where you connect the power supply for your AudioBox 1818VSL. The AudioBox 1818VSL cannot be bus powered. Power Switch. This is the On/Off switch for your AudioBox 1818VSL.
-
Page 15: Typical Band Hookup Diagram
Owner’s Manual Hookup Typical Band Hookup Diagram Typical Band Hookup Diagram headphone amps drumset powered speakers bass guitar and amp... -
Page 16: Speaker-Switching Hookup Diagram
PreSonus AudioBox 1818VSL ™ Hookup Speaker-Switching Hookup Diagram Speaker-Switching Hookup Diagram studio monitors studio monitors monitor station 10 10... -
Page 17: Connecting To A Computer
Owner’s Manual Connecting to a Computer System Requirements Connecting to a Computer Your AudioBox 1818VSL is a rugged USB 2.0 audio interface with flexible monitoring control and professional audio tools. System Requirements Below are the minimum computer-system requirements for PreSonus Studio One Artist and Virtual StudioLive software.* Macintosh •... -
Page 18: Installation For Windows
Installation for Windows Installation for Windows After you insert the Installation CD into your CD-ROM drive, the AudioBox 1818VSL installer will take you through each step of the installation process. Please read each message carefully to ensure the AudioBox 1818VSL driver is properly installed. It... -
Page 19: Installation For Mac Os X
Installation for Mac OS X After inserting the Installation CD into your disc drive, browse the disc, and run the AudioBox 1818VSL installer, which will take you through each step of the installation process. Please read each message carefully, and be especially careful that you do not connect your AudioBox too soon. -
Page 20: Using The Audiobox 1818Vsl With Popular Audio Applications
6. You will be asked if you’d like to relaunch Logic. Click “try (re)launch. ” 7. Your AudioBox 1818VSL features custom I/O labels for faster workflow. To enable these labels for use in Logic, go to Options | Audio | I/O Labels. - Page 21 1. Launch Ableton Live 2. Go to Options | Preferences | Audio 3. Choose Driver Type: Asio | Audio Device: ASIO PreSonus AudioBox 1818VSL 4. Go to Input Config: Enable and select the desired Input channels. 5. Go to Output Config: Enable and select the desired Output channels.
-
Page 22: Software: Virtual Studiolive And Studio One Artist
Software: Virtual StudioLive and Studio One Artist Virtual StudioLive Software: Virtual StudioLive and Studio One Artist Your AudioBox 1818VSL comes with a powerful software bundle that provides everything you need to record, produce and mix an album. This software package, including Virtual StudioLive™ (VSL) and Studio One™... - Page 23 Owner’s Manual Software: Virtual StudioLive and Studio One Artist Virtual StudioLive Run at Startup (Window Only) Launches the Virtual StudioLive Application Automatically on Startup. When this is enabled, VSL will automatically launch each time you boot your Windows. On the Mac, you can set this up first by dragging VSL to your dock, then by right-clicking it and selecting Options>Open at Login.
- Page 24 Audio window doesn’t open when Audio MIDI Setup first opens, go to Window and select “Show Audio window. ” Select “AudioBox 1818VSL” from the audio device list on the left. To the left of the Sample Rate selection menu, you will find the ADAT Mode menu: 18ch -24bit: Channels 1-8 (44.1/48 kHz)
- Page 25 As a result, it may fail to sync to the clock source. If your AudioBox is not syncing to an external source, make sure that both your master device and the AudioBox 1818VSL are set to the same sample rate. Setting Clock Source Using Audio MIDI Setup to Set the Clock Source for the AudioBox 1818VSL.
-
Page 26: Virtual Studiolive: Browser
Channel presets, and FX presets that are saved on your computer. You can also create new settings from this window. Simply drag- and-drop a Scene or preset to load it on your AudioBox 1818VSL. Browser Tab Buttons Displays the Different Preset Categories. -
Page 27: Virtual Studiolive: Overview And Fat Channel Tab
Owner’s Manual Software: Virtual StudioLive and Studio One Artist Virtual StudioLive Remove Button Deletes a Stored Scene or Preset. Right next to the Add New button, you will find the Remove button. Clicking this button will delete the currently selected, stored Scenes or presets. Show/Hide Browser Displays/Hides the Browser Window. -
Page 28: Vsl Controls: Definitions And Uses
Please Note: From VSL, you can create and send mixes to all eight Line Outputs on your AudioBox 1818VSL. Outputs 1 and 2 share a mix with the Main Outputs, so the mix you create for your Main Outputs will be heard through both pairs of outputs. Outputs 7 and 8 share a mix with the headphone output, so creating a mix for Outputs 7 and 8 will send an identical mix stream to the headphone outputs on the front panel of the AudioBox 1818VSL. - Page 29 VSL On/Off Enables / Disables VSL Mixing. When the VSL On/Off button is disengaged, your AudioBox 1818VSL functions as a simple 18x18 audio interface with no monitor mix or DSP capability. If you plan on mixing exclusively in your DAW or do not need to create monitor mixes using your computer, disabling VSL can greatly simplify your work environment.
- Page 30 PreSonus AudioBox 1818VSL ™ Software: Virtual StudioLive and Studio One Artist Virtual StudioLive Fader Controls the Overall Level of the Channel or Bus. Each input channel features a fader for accurate level adjustment. Unity gain (0 dB) is denoted by a “U. ” Meter Displays the Pre-fader Level of Each Channel.
- Page 31 Owner’s Manual Software: Virtual StudioLive and Studio One Artist Software: Virtual StudioLive and Studio One Artist Virtual StudioLive Phase Reverse is accessible from the Main VSL Page and from the Gate Zoom. Phase Reverse is only available on the analog input channels. Post Button Engages Post Fat Channel Recording.
- Page 32 PreSonus AudioBox 1818VSL ™ Software: Virtual StudioLive and Studio One Artist Virtual StudioLive Auto Mode Button Enables Automatic Response Mode. When Auto mode is active, the Attack and Release controls become inoperative, and a preprogrammed attack and release curve is used. In this mode, the attack is set to 10 ms, and the release is set to 150 ms.
- Page 33 Owner’s Manual Software: Virtual StudioLive and Studio One Artist Virtual StudioLive Limiter On/Off Turns the Limiter for the Selected Channel or Bus On or Off. When the limiter is engaged, this button will illuminate. The threshold for the limiter is set to 0 dBFS. The ratio is ∞:1. The limiter is available for all input and output buses.
- Page 34 PreSonus AudioBox 1818VSL ™ Software: Virtual StudioLive and Studio One Artist Virtual StudioLive Mid EQ Gain Control Sets the Gain Attenuation or Boost of the Center Frequency of the Mid Band. This control sets the Gain cut or boost at the center frequency of the Mid band.
-
Page 35: Loading Scenes And Presets From Vsl
Owner’s Manual Software: Virtual StudioLive and Studio One Artist Virtual StudioLive Loading Scenes and Presets from VSL 4.1.5 To load a Scene or preset from the VSL Browser window, you simply select it and drag it over the mixer or channel on which you wish to load it. -
Page 36: Using Vsl To Create A Monitor Mix
To adjust the overall mix level, raise or lower the Main fader in VSL or use the Main knob on the front of your AudioBox 1818VSL. Power User Tip: Raising a channel’s volume is not always the best way to make it louder in the mix. - Page 37 Owner’s Manual Software: Virtual StudioLive and Studio One Artist Virtual StudioLive From the Fat Channel tab, you will see a zoomed in view of all the Fat Channel controls. STEP 4: Creating an Effects Mix Once you have your levels set and your Fat Channel processing dialed in for each input, you can add reverb and delay to your monitor mixes.
-
Page 38: Studio One Artist Quick Start
4.2.1 Once you have installed the AudioBox 1818VSL drivers and connected your AudioBox 1818VSL to your computer, you can use the included PreSonus Studio One Artist music-production software to begin recording, mixing, and producing your music. To install Studio One Artist, insert your installation disc into your computer’s DVD drive. - Page 39 Owner’s Manual Software: Virtual StudioLive and Studio One Artist Studio One Artist Creating a User Account • After installing Studio One Artist, launch the program, and the Activate Studio One menu will appear. If you are a new Studio One user, you will need to create a user account.
- Page 40 PreSonus AudioBox 1818VSL ™ Software: Virtual StudioLive and Studio One Artist Studio One Artist Installing Bundled Content for Studio One Artist Studio One Artist comes bundled with an array of demo and tutorial material, instruments, loops, samples, and other third-party content. The Studio One Artist bundle includes all that you need to begin producing music.
-
Page 41: Enabling The Audio Driver
4.2.2 Studio One Artist was designed with PreSonus interfaces in mind, so AudioBox 1818VSL setup is quick and easy. When Studio One Artist is launched, by default you will be taken to the Start page. On this page, you will find document-management and device- configuration controls, as well as a customizable artist profile, a news feed, and links to demos and tutorials from PreSonus. - Page 42 PreSonus AudioBox 1818VSL ™ Software: Virtual StudioLive and Studio One Artist Studio One Artist Setting Up an External MIDI Keyboard Controller from the Start Page A MIDI keyboard controller is a hardware device that is generally used for playing and controlling other MIDI devices, virtual instruments, and software parameters.
- Page 43 Owner’s Manual Software: Virtual StudioLive and Studio One Artist Studio One Artist In the Send To drop-down menu, select the MIDI interface output from which Studio One Artist will send MIDI data to your keyboard. If your keyboard controller does not need to receive MIDI data from Studio One, you can leave this unselected.
-
Page 44: Creating A New Song
You’ll notice a list of templates on the left. The AudioBox 1818VSL template will create a Song with a track for each of the AudioBox inputs. Every track is armed for recording, and no further setup is required. - Page 45 8. Click on the Inputs tab in the Audio I/O Setup window, and you will see all of the available inputs on your AudioBox 1818VSL. At this time, you can add the number and type of inputs you plan to use.
-
Page 46: Creating Audio Tracks
12. We recommend that you create stereo outputs for the Main outputs on your AudioBox 1818VSL and for Outputs 3/4, 5/6, 7/8. In the lower right corner, you will see the Audition select menu. -
Page 47: Creating Midi Tracks
5. To begin recording, create an audio track, assign it to Input 1, and connect a microphone to the first channel on the AudioBox 1818VSL. Select Record Enable on your track in Studio One Artist. Turn up the Channel 1 level while speaking/singing into the microphone. -
Page 48: Adding Virtual Instruments And Plug-In Effects To Your Song
PreSonus AudioBox 1818VSL ™ Software: Virtual StudioLive and Studio One Artist Studio One Artist 4. At the bottom of the Inspector menu, you will see your Bank and Program selections. From here, you can remotely change the patch on your sound module. MIDI data does not contain audio signals. - Page 49 Owner’s Manual Software: Virtual StudioLive and Studio One Artist Studio One Artist Drag-and-Drop Effects To add a plug-in effect to a track, click the Effects button and select the plug-in or one of its presets in the effects browser, then drag the selection over the track to which you would like to add it.
-
Page 50: Tutorials
The AudioBox 1818VSL sends 48 VDC phantom power from the XLR inputs only. 5.1.2... -
Page 51: Microphone Placement
Microphone Placement The following are a few recording applications to help you get started with your AudioBox 1818VSL. These are by no means the only ways to record these instruments. Microphone selection and placement is an art. For more information, visit your library or local bookstore, as there are many books and magazines about recording techniques. - Page 52 Place a dynamic microphone an inch or two away from the speaker and connect it to a AudioBox 1818VSL microphone input. Connect the line output from the passive direct box to the other microphone input on your AudioBox.
- Page 53 Owner’s Manual Tutorials Microphone Types Drum Overheads (XY example) Place two small-diaphragm condenser microphones on an XY stereo-microphone holder (bar). Position the microphones so that each one is at a 45-degree angle, pointed down at the drum kit, approximately 7 or 8 feet above the floor or drum riser.
-
Page 54: A Brief Tutorial On Dynamics Processing
A Brief Tutorial on Dynamics Processing A Brief Tutorial on Dynamics Processing Each channel in Virtual StudioLive (VSL) for AudioBox 1818VSL includes a Fat Channel dynamics-processing section. What follows is an excerpt from a brief tutorial on dynamics processing written by PreSonus president and founder Jim Odom. -
Page 55: Types Of Dynamic Processing
Owner’s Manual Tutorials A Brief Tutorial on Dynamics Processing Why do the best consoles in the world put compressors on every channel? The answer is simply that most instruments need some form of compression, often very subtle, to be properly heard in a mix. Why do we need noise gates? Consider the compressed-vocal example discussed earlier;... - Page 56 PreSonus AudioBox 1818VSL ™ Tutorials A Brief Tutorial on Dynamics Processing How severely the compressor reduces the signal is determined by the compression ratio and compression threshold. A ratio of 2:1 or less is considered mild compression, reducing the output by a factor of two for signals that exceed the compression threshold.
- Page 57 Owner’s Manual Tutorials A Brief Tutorial on Dynamics Processing compressor unprocessed, whereas a fast attack time immediately subjects the signal to the ratio and threshold settings of the compressor. Release. Release sets the length of time the compressor takes to return the gain reduction back to zero (no gain reduction) after the signal level drops below the compression threshold.
- Page 58 PreSonus AudioBox 1818VSL ™ Tutorials A Brief Tutorial on Dynamics Processing Commonly used for noise reduction, expansion is very effective as a simple noise gate. The major difference between expansion and noise gating is that expansion is dependent on the signal level after the level crosses the threshold, whereas a noise gate works independent of a signal’s level beyond the threshold.
- Page 59 Owner’s Manual Tutorials A Brief Tutorial on Dynamics Processing Noise Gating. Noise gating is the process of removing unwanted sounds from a signal by attenuating all signals below a set threshold. As described, the gate works independently of the audio signal after being “triggered” by the signal crossing the gate threshold.
-
Page 60: Compression Settings: Some Starting Points
PreSonus AudioBox 1818VSL ™ Tutorials A Brief Tutorial on Dynamics Processing Compression Settings: Some Starting Points 5.2.3 Vocals Soft. This is an easy compression with a low ratio setting for ballads, allowing a wider dynamic range. It’s good for live use. This setting helps the vocal “sit in the track. ” Thresholdhold RatRatioio AttAttackack... - Page 61 Owner’s Manual Tutorials A Brief Tutorial on Dynamics Processing Electric Guitar. This is a setting for “crunch” electric rhythm guitar. A slow attack helps to get the electric rhythm guitar “up close and personal” and gives punch to your crunch. Thresholdhold RatRatioio AttAttackack...
-
Page 62: Equalizers
Q is fixed. Some devices, such as the StudioLive 16.4.2 and 16.0.2 and the AudioBox 1818VSL, have quasi-parametric EQ, which is semi-parametric EQ with a simple, switchable Q setting (typically, High and Low Q). - Page 63 Owner’s Manual Tutorials Equalizers achieve a punchier kick drum without overpowering the rest of the mix. A broad bandwidth accentuates or attenuates a larger band of frequencies. The broad and narrow bandwidths (high and low Q) are usually used in conjunction with one another to achieve the desired effect.
-
Page 64: Equalization Settings: How To Find The Best And Leave The Rest
PreSonus AudioBox 1818VSL ™ Tutorials Equalizers High Mids (2 kHz to 4 kHz). The attack portion of percussive and rhythm instruments occurs in this range. High mids are also responsible for the projection of midrange instruments. Presence (4 kHz to 6 kHz). This frequency range is partly responsible for the clarity of a mix and provides a measure of control over the perception of distance. - Page 65 Owner’s Manual Tutorials Equalizers Table 1 Instrument What to Cut Why to Cut What to Boost Why to Boost Human Voice 7 kHz Sibilance 8 kHz Big sound 2 kHz Shrill 3 kHz and above Clarity 1 kHz Nasal 200-400 Hz Body 80 Hz and below Popping P’s...
- Page 66 PreSonus AudioBox 1818VSL ™ Tutorials Equalizers Table 2 60 60...
-
Page 67: General Eq Suggestions
Owner’s Manual Tutorials Equalizers General EQ Suggestions 5.3.3 Included with VSL is a library of Channel Strip presets. Section 4.1.5 discusses how to load these presets onto a channel or bus and how to create your own presets. For an idea of where to start, check out the following generic EQ settings for several different instruments. - Page 68 PreSonus AudioBox 1818VSL ™ Tutorials Equalizers Percussion Snare LOW MID LOW MID LOW MID LOW MID ON/OFF PEAK/SHELF FREQ (Hz) GAIN ON/OFF HI/LOW Q FREQ (Hz) GAIN PEAK HI MID HI MID HI MID HI MID ON/OFF LO/HI FREQ (kHz) GAIN ON/OFF PEAK/SHELF...
- Page 69 Owner’s Manual Tutorials Equalizer Distorted Electric Guitar LOW MID LOW MID LOW MID LOW MID ON/OFF PEAK/SHELF FREQ (Hz) GAIN ON/OFF HI/LOW Q FREQ (Hz) GAIN PEAK HI MID HI MID HI MID HI MID ON/OFF LO/HI FREQ (kHz) GAIN ON/OFF PEAK/SHELF FREQ (kHz)
-
Page 70: Aux Bus Mixing
The Aux bus provides outputs to create auxiliary mixes that are separate from the main mixes. VSL for AudioBox 1818VSL is equipped with 4 stereo aux buses to create a separate mix for Outputs 3/4, 5/6, and 7/8, as well as two more buses for internal effects buses FX A and B. -
Page 71: Digital Effects
Owner’s Manual Tutorials Digital Effects Digital Effects VSL includes two stereo effects processors that feature the two most common type of effects in use for live sound: reverb and delay. 5.5.1 Reverb Reverberation —or reverb, as it is more commonly known—is perhaps the most widely used effect. -
Page 72: Delay
PreSonus AudioBox 1818VSL ™ Tutorials Digital Effects Delay 5.5.2 A delay essentially creates an echo, although you can often use delays to create more complex time-based effects. The source signal is delayed so that it is heard later than it actually occurred. Delay Time. -
Page 73: Technical Information
Owner’s Manual Techincal Information Specifications Technical Information Specifications Microphone Preamp Connector Type Combo, XLR, female, balanced Mic Preamp EIN -133 dB, 20 kHz BW, max gain, Rs=40Ω, A-wtd Frequency Response 20 Hz - 22 kHz, +/- 0.25 dB, unity gain THD+N 0.002%, +4 dBu, 1 kHz, unity gain, 22 kHz BW, A-wtd S/N Ratio... -
Page 74: Headphone Output
PreSonus AudioBox 1818VSL ™ Technical Information Specifications HEADPHONE OUTPUT: Connector Type ¼” TRS, female, stereo Maximum Power 120 mW/ch @ 60Ω load Frequency Response 20 Hz - 20 kHz, +/- 0.5 dB, max gain THD+N 0.01%, 1 kHz, max gain, 20 kHz BW, A-wtd S/N Ratio 96 dB, 1 kHz, max gain, 20 kHz BW, A-wtd ANALOG OUTPUTS:... -
Page 75: Troubleshooting And Warranty
Distortion or Noise when using ADAT I/O Verify that you have the correct ADAT mode set for the sample rate being used. If you are clocking the AudioBox 1818VSL externally, verify that the AudioBox is set to the same sample rate as your external clock. -
Page 76: Presonus Limited Warranty
PreSonus Limited Warranty PreSonus Limited Warranty PreSonus Audio Electronics, Inc., warrants this product to be free of defects in materials and workmanship for a period of one year from the date of original retail purchase. This warranty is enforceable only by the original retail purchaser. To be protected by this warranty, the purchaser must complete and return the enclosed warranty card within 14 days of purchase. -
Page 77: Index
Owner’s Manual Index Index Ableton Live 15 Fader 24 Performance Modes 17 ADAT Mode Fader Locate. See Recalling Faders Phantom Power 5, 44 OS X 18 Fat Channel 21 Phase Reverse 24 Windows 18 Frequency Tables 59–60 Plugins 43 Attack 50, 52 FX Sends 23 Post Button 25 Audio Device... - Page 78 PreSonus AudioBox 1818VSL ™ Declaration of Conformity Responsible Party: PreSonus Audio Electronics 7257 Florida Blvd., Baton Rouge, LA Address: 70806 USA Phone: 1-225-216-7887 declares that AudioBox™ 1818VSL complies with Part 15 of the FCC rules. Operation is subject to the following two conditions: 1.
- Page 79 Serves 20 © 2011 PreSonus Audio Electronics, Inc. All Rights Reserved. PreSonus, StudioLive, XMAX, QMix, and AudioBox are trademarks of PreSonus Audio Electronics, Inc. Studio One and Capture are trademarks of PreSonus Software, Ltd. Macintosh is a trademark of Apple, Inc., in the U.S. and other countries. Windows is a registered trademark of Microsoft, Inc., in the U.S.
- Page 80 • Consult the dealer or an experienced radio/TV technician for help. CAUTION: Changes or modifications to this device not expressly approved by PreSonus Audio Electronics could void the user’s authority to operate the equipment under FCC rules. This apparatus does not exceed the Class A/Class B (whichever is applicable) limits for radio noise emissions from digital apparatus as set out in the radio interference regulations of the Canadian Department of Communications.
Need help?
Do you have a question about the AudioBox 1818VSL and is the answer not in the manual?
Questions and answers