PRESONUS REVELATOR IO24 Owner's Manual
2-channel audio interface for streamers, podcasters, and music creators
Hide thumbs
Also See for REVELATOR IO24:
- Owner's manual (83 pages) ,
- Quick start manual (4 pages) ,
- Owner's manual (136 pages)

Subscribe to Our Youtube Channel
Related Manuals for PRESONUS REVELATOR IO24


Summary of Contents for PRESONUS REVELATOR IO24
- Page 1 2-channel audio interface for streamers, pod- casters, and music creators Owner’s Manual...
-
Page 2: Table Of Contents
3.3 Using Revelator io24 with iOS/iPadOS devices 3.4 Using Revelator io24 with Android devices 3.5 Using Revelator io24 on Chromebook Using Revelator io24 with Zoom on Chromebook Using Revelator io24 with Google Meet on Chromebook Presets and Scenes 4.1 Preset Management 4.2 Changing Preset Button Slots... - Page 3 4.4 Exporting/Importing Presets 4.5 Scenes - Save and Recall 4.6 Sharing Scenes and Presets Fat Channel and Voice Effects 5.1 Fat Channel and Voice Effects Mixing and Loopback Audio 6.1 What is Loopback Audio? 6.2 Routing 6.3 Mixer Controls 6.4 Microphone Channel Controls 6.5 Mixer Channel Controls 6.6 Main Output Controls and Mix Selection 6.7 Feedback Loops are Bad...
- Page 4 Studio One Artist Quick Start 8.1 Installation and Authorization 8.2 Setting Up Studio One Artist 8.3 Configuring Audio Devices 8.4 Configuring MIDI Devices Setting up an External MIDI Keyboard Controller from the Start Page Setting up an External MIDI Sound Module from the Start Page 8.5 Creating a New Song Configuring Your I/O Creating Audio and Instrument Tracks...
-
Page 5: Overview
Throughout this manual you will find Power User Tips. These tips and tricks will help you to become a Revelator io24 expert—as well as help you to better understand audio terminology, so you can get the most from your purchase and get the best sound quality possible. -
Page 6: What Is In Your Mypresonus Account
Warranty/Registration Card. What is in your MyPreSonus account There’s more to your Revelator io24 than what comes in the box! Let’s take a moment to register your Revelator io24 and download the digital products that come with it. These include: Universal Control. - Page 7 2. Fill in the form with the required information. Make sure to verify that you are, in fact, human and agree to our PreSonus Terms of Use. If you’d like to receive occasional emails about promotions and new video content, check that box now as well.
- Page 8 6. In the pop-up menu, click on the Hardware tab. 7. Select your purchase date and enter your Revelator io24 Serial Number. You can find your serial number on the bottom of your interface as well as on your Quick Start Guide.
- Page 9 1. From the Revelator io24 product listing in MyPreSonus, locate Studio One Artist from the product list- ing. Quick links to every digital product that comes with your Revelator io24 will be listed here. Click the “Download Installer” button at the bottom of the Studio One Artist listing. MyPreSonus will scan your computer and present the correct installer for your operating system.
- Page 10 3. Locate Studio One in your Applications and launch it. When Studio One is launched for the first time on your computer, it will communicate with your My.PreSonus account and verify your registration. To ensure a seamless authorization process, make sure to download your installer to the computer on which you will be using it, and be sure that your computer is connected to the Internet when you launch the application for the first time.
- Page 11 Step 4: Download and Install Studio Magic (Optional) From the Revelator io24 product listing in MyPreSonus, you will also find a complete list with links to all the Studio Magic products that came with your Revelator io24 registration. Click on the “View More Details”...
- Page 12 Studio Magic software is developed by many different manufacturers, so MyPreSonus will send you to their respective websites for download and installation. 1.3 What is in your MyPreSonus account...
-
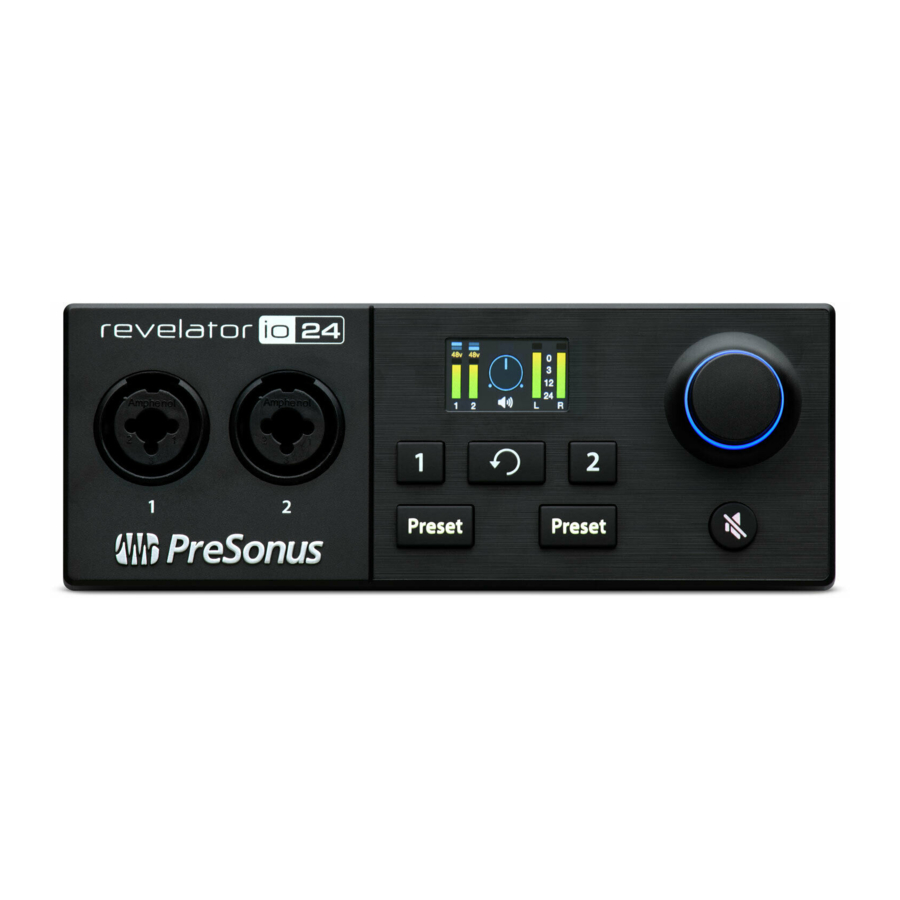
Page 13: Connections And Controls
The Revel- ator io24 features XMAX-L solid-state microphone preamps that are optimized for bus power. Both input channels on your Revelator io24 interface are equipped with combo jacks. This convenient connector accepts either a ¼-inch or an XLR con- nector. -
Page 14: The Screen
The Screen The screen displays metering, preset selection, and other important information. The following information is displayed on Revelator io24’s Home screen. This is the default screen you’ll see when you first use Revelator io24. 1. Input Meters. These meters... - Page 15 Other information on the Channel screen includes: 4. Input Meter. This meter indicates the input level of the selected channel on your Revelator io24, just like on the Home screen. 5. Gain reduction meter. If you’re running any compression or limiting via Revelator io24’s DSP (Digital Signal Processing), the amount of gain reduction being applied will be indicated by this blue meter.
-
Page 16: Back Panel
Revelator io24 connects using USB-C, it is fully compatible with USB 2.0 and 3.0 con- nections. Use the USB-C to A cable that came with your Revelator io24 if your com- puter has a USB-A connection rather than a USB-C connection. - Page 17 Main Outs. These are the Main outputs for the Revelator io24. The output level of the Main outputs is controlled by the Main level control on the front of the unit. Playback streams 1 and 2 are routed to these outputs.
-
Page 18: Connection Diagram
Connection Diagram Standalone controls While many of the features available for your Revelator io24 can be found in Universal Control, critical controls are available right at your fingertips. Most of these settings can be changed from Universal Con- trol to customize your Revelator io24 to your application and needs. -
Page 19: Setting The Microphone Level
Setting the Microphone Level To set your Revelator io24’s input level, press the Channel button for the Channel you would like to use. Next, press the encoder to cycle through the available options. A yellow underline will indicate the currently-selected option. Once you’ve selected the Gain setting—it’s shown below the Chan-... -
Page 20: Setting Main Output Level
Setting Main Output level By default, the Encoder knob on your Revelator io24 controls the output level of your Main Outputs—the outputs you have your speakers connected to. From the home screen, press the Encoder repeatedly until the speaker icon appears below the Volume indicator. -
Page 21: Setting Monitor Blend
Setting Monitor blend Revelator io24 provides an easy way to create a blend between your input signal and the playback from your com- puter. This lets you listen to your performance in real-time without any latency (delay). From the home screen, press the Encoder repeatedly until the XLR/speaker icon appears below the Volume indicator. - Page 22 Power User Tip: But wait! There’s more! No really, there are a lot more. Open up Universal Control to access the other presets. You’ll also find an additional 12 preset slots (6 per channel) to create your own. You can choose any two of these 12 total presets to be accessible directly from the Preset buttons on your Revelator io24.
-
Page 23: Universal Control
8,192 samples. Lowering the buffer size will lower latency, which is the amount of time it takes for your audio to go from Revelator io24 to the computer and back to your ears; however, this will also increase performance demands on your computer. In general, you will want to set the buffer size as low as your... - Page 24 (like the output of a Skype call to the audio input of your Facebook Live stream), that’s where Multi Mode comes in. In this mode, your Revelator io24 will show up as 3 different devices on your computer: Revelator IO 24, Revelator IO24 Virtual A, and Revelator IO 24 Virtual B.
-
Page 25: Launch Window Menu Items
Close All Devices. Closes all open control windows. Sign Out.Signs out of your My.PreSonus user account. Check for Updates Connects to your My.PreSonus user account to check for updates for Universal Control. Transfers. Displays recent downloads from your My.PreSonus user account. - Page 26 Using Revelator io24 for System Audio The easiest way to make your Revelator io24 seen by just about any application on your computer is to set it up as the default sound source for your computer. Not only will this prompt most video conferencing and streaming applications to look for Revelator io24, it will also set your default Internet browser to use Revelator io24 as well.
-
Page 27: Windows
Spotify and Apple Music to the headphone output on your new interface. If you do not want to use your interface this way, it is best to configure Revelator io24 as the audio I/O only for the applic- ations for which you want to use it. - Page 28 4. Click on Sound 5. Click on “Choose your Output Device” and choose Playback L/R (2-Revelator IO 24) 6. Click on “Choose your input device” and choose Stream Mix A L/R (Revelator IO 24) Your Revelator io24 is ready to use! Windows...
-
Page 29: Macos
1. From the Apple Menu, go to System Preferences. 2. Click on Sound. 3. Click on the Outputs tab and select Revelator IO 24 from the device list. This will route all audio from your computer to the Main Outs and Headphones on your Revelator io24. macOS... - Page 30 4. Click on the Inputs tab and select Revelator IO 2 Stream Mix A from the device list. This will set your Revelator io24 interface as the input source for your computer. Your Revelator io24 is ready to use! macOS...
-
Page 31: Using Revelator Io24 For Skype
3. Under Speakers, select “Revelator IO 24.” This will route the audio from your Skype call to the Main Outs and Headphone output on your Revelator io24. Power User Tip: If you would like to record your Skype call, select Revelator IO 24 Virtual A or Revelator IO 24 Virtual B from the Speaker menu. -
Page 32: Using Revelator Io24 For Zoom
Using Revelator io24 for Zoom Launch Zoom, and click the cog wheel icon to enter Zoom Preferences. Using Revelator io24 for Zoom... -
Page 33: Windows
Click the “Audio” tab. Windows: Set Speaker to Playback L/R (2-Revelator IO 24) Set Microphone to Stream Mix A L/R (2-Revelator IO 24) Uncheck the box marked “Automatically adjust microphone volume” Windows:... -
Page 34: Macos
Power User Tip: When this option is selected, the sliders in Zoom will not have any effect on the Speaker output or Microphone Input gain, as these are controlled by the Revelator io24 itself— either by the on-board controls and/or through the Universal Control software. - Page 35 In Zoom’s Advanced Audio settings menu, please ensure Echo Cancellation is set to Auto. If you need to switch your audio device to Revelator io24 while in a meeting, select the arrow next to the Mute Button to select your audio device list.
-
Page 36: Using Revelator Io24 For Google Meet
All Windows users and Mac users running Revelator io24 in Multi Mode will see Revelator IO 24 appear in a list similar to this: Using Revelator io24 for Google Meet Open Google Meet, and click on the vertical dots in the lower right corner of the Google Meet window. In the pop-up menu, choose “Settings”... - Page 37 Google Meet’s Audio menu will be highlighted by default. If Revelator io24 is not already selected, click the down arrow under Microphone and Speakers and click on “Revelator IO 24.” Mac Users running Revelator io24 in Single Mode will see one instance of Revelator IO 24 shown as fol- lows: Windows Users and Mac Users running Revelator io24 in Multi Mode will see multiple instances of Revel- ator IO 24.
-
Page 38: Using Revelator Io24 For Obs
There is a chance that the next time you open Google Meet that it may default to a different audio device without notifying you. Be sure to check your audio settings to make sure Revelator io24 is selected. PreSonus has no control over how this device selection works. -
Page 39: Using Revelator Io24 With Ios/Ipados Devices
5. Click Apply. 6. Click OK. Your Revelator io24 is now set-up for OBS! Using Revelator io24 with iOS/iPadOS devices Revelator io24 works when connected directly to iOS/iPadOS devices like iPads, though you should be 3.3 Using Revelator io24 with iOS/iPadOS devices... -
Page 40: Using Revelator Io24 With Android Devices
When connected to iPad Pro tablets with USB-C ports, Revelator io24 will function as intended without additional power or direct connect. However, there’s no way to charge the iPad while Revelator io24 is connected. All other iOS devices with Lightning connectors will require the use of the Apple Lightning to USB 3 Cam- era Adapter which features a pass-through for a power cable. -
Page 41: Using Revelator Io24 On Chromebook
That said, Audio setup in Google Chromebooks is very simple. 1. After connecting the Revelator io24 to your Chromebook, select the taskbar menu in the lower right corner (by the clock) to bring up the system menu. -
Page 42: Using Revelator Io24 With Zoom On Chromebook
Ensure that the box labeled “Automatically adjust microphone volume” is not checked. You can adjust both Input gain and speaker playback volume on the Revelator io24 manually. There are no other advanced menu options as found in the Mac / Windows versions of Zoom. - Page 43 There is a chance that the next time you open Google Meet that it may choose a different audio device without notifying you. Be sure to check your audio settings to make sure Revelator io24 is selected. PreSonus has no control over how this device selection works.
-
Page 44: Presets And Scenes
Presets and Scenes Preset Management Your Revelator io24 can access 2 presets using the Preset button... but there are 6 more presets created by PreSonus for you to enjoy—plus another 6 preset slots for you to create custom presets. These pre- sets are all available from Universal Control. -
Page 45: Changing Preset Button Slots
1. Note that the Hot Key works only with whichever channel Voice FX are assigned to—default is Chan- nel 1. 2. Preset Slots 1-2. This corresponds to the two Preset slots on your Revelator io24. These are the pre- sets that are available from the front panel Preset buttons. You can choose to keep the factory pre- sets, or change them as you see fit. - Page 46 Click to select the slot you would like to change. Select the desired preset using either the Preset selection knob or selecting it from the dropdown menu. Let’s try it! In our example, we’re going to change the “blue” preset from “Broadcast” to “Vintage Channel.” 4.2 Changing Preset Button Slots...
- Page 47 1. From the Preset Slot list, select “Broadcast” 2. Click on the dropdown menu and select “Vintage Channel” from the list. 3. “Vintage Channel” is now the preset stored in this slot. 4.2 Changing Preset Button Slots...
-
Page 48: Storing New Presets
That’s it! Storing New Presets We’re going to get into all the Fat Channel settings later (Section 5), but while we’re here, let’s talk about storing new Presets. To store a new preset to one of the 6 User Slots: 4.3 Storing New Presets... - Page 49 1. Click on the Save Preset button. 2. Select the user slot to which you want to store it. 3. Enter the name you’d like to use. 4.3 Storing New Presets...
- Page 50 4. Click Store. Done! 4.3 Storing New Presets...
-
Page 51: Exporting/Importing Presets
Exporting/Importing Presets Revelator io24 can save two presets per channel on the hardware unit itself. This is useful for times when you want to use Revelator io24 with a device that doesn’t run Universal Control—for example, a Chrome- book, iPad, or a camera with an audio input. - Page 52 3. Click on the right arrow to Export the Preset. The Preset will appear in the list. To find where the exported Preset has been stored on your computer, right-click on it and choose Show in Finder (Mac) or Show in Explorer (Windows). Have fun sharing this file with other Revel- ator io24 users! To Import a new preset to one of the 6 User Slots: 4.4 Exporting/Importing Presets...
-
Page 53: Scenes - Save And Recall
Scenes - Save and Recall Scenes allow you to store all of the Revelator io24’s settings for recall at a later time. This is useful for if you have various projects that require specific settings—you won’t have to set up every little detail of your Revelator io24 every time you change projects! For example, you might have a podcasting setup with a preset for your frequent guest, and also have a setup you like for recording acoustic guitar. -
Page 54: Sharing Scenes And Presets
To share Presets and Scenes with your friends, all you need to do is send the desired Scene or Preset file to your friend, either via e-mail or a PreSonus Sphere Workspace. If someone is kind enough to share a Preset or Scene with you, it can be imported to Universal Control simply by placing the file in the correct folder. -
Page 55: Fat Channel And Voice Effects
Fat Channel and Voice Effects Fat Channel and Voice Effects The Fat Channel provides essential signal processing tools to sculpt your sound, as well as Voice FX sec- tion to warp, distort, and bounce it around. These are the effects that are stored with a preset. A ded- icated Reverb processor is also available, but it is important to note that Reverb is not stored with a Preset. - Page 56 Power User Tip: When looking at frequency ranges in audio, it’s important to know that the smaller the number, the lower the frequency is. The 40 Hz and 80 Hz settings can be especially useful in reducing the “rumble” from a nearby road or any background electrical noise or hum.
- Page 57 Ready to build your own gate? See Section 7.2.2 for advanced Noise Gate controls. Compressor (Comp) Audio signals have very wide peak-to-average signal-level ratios (sometimes referred to as dynamic range) which is the difference between the loudest level and the softest level. This can create problems when you’re setting input levels because when enough gain (or volume) is applied to capture the softest level at its best, one cough, laugh, or excited moment can overload the input, resulting in distortion…...
- Page 58 EQs are entirely dependent on the frequency of the source, your ears are your best tool in finding the right sound for your voice. Like the Compressor, Revelator io24 offers advanced controls and several EQ models to choose from when you’re ready to dive deeper. See Section 7.2.5 for Advanced EQ Controls.
- Page 59 Limiter True to its name, a Limiter sets the upper dynamic range of your signal and prevents the source from exceeding it by “limiting” it to that threshold. If you’re thinking that sounds a lot like what we just told you a compressor does, you’re catching on! A limiter is different from a compressor in a very crit- ical way: Unlike a compressor, which works gradu- ally to reduce the signal, the limiter prevents...
- Page 60 The Reverb in Revelator io24 is independent of your presets, so you can use the same Reverb setting on any preset you like.
- Page 61 To adjust the amount of Reverb you hear in your mix, raise or lower the Reverb Fader in the mixer. See Section 6.2.2 for more information on your Revelator io24 mixer. Preset. Choose between Small, Medium, and Large. These presets emulate room size. In general, the bigger the room size, the more reverberant it will be.
- Page 62 Power User Tip: This is especially helpful for bass-rich sound sources (baritone voice, acoustic guitar) as adding too much reverb in low frequencies can muddy your sound. Pre-Delay. Pre-Delay is the time (in milliseconds) between the end of the initial sound and the moment when the first reflections become audible.
-
Page 63: Mixing And Loopback Audio
Create Professional Screencasts. Most screen-capture applications let you include your mic OR your system audio. With Revelator io24’s mixer and virtual loopback streams, you can create a mix of both your mic and your system sound, then use a Revelator io24 Stream Mix Output as the source for your screen-capture application. -
Page 64: Mixer Controls
11. Channel Link. Clicking this links Channels 1 and 2 to act as a single stereo Channel, suitable for ste- reo instruments like keyboards. 12. Channel Name. Double-clicking on “Channel 1” will let you customize the name of the channel. Mixer Channel Controls Your Revelator io24 mixer has four Channels: 6.3 Mixer Controls... -
Page 65: Main Output Controls And Mix Selection
1. Playback. This is the output channel for the Revelator io24 Playback Device in each stereo mix. 2. Virtual A. This is the output channel for the Revelator io24 Virtual A Device in each stereo mix. 3. Virtual B. This is the output channel for the Revelator io24 Virtual B Device in each stereo mix. - Page 66 Left = more direct, right = more from software. 1. Revelator io24’s Mix Selection Controls let you create four unique mixes to send to four different outputs. This is useful if, for example, you have backing music running during your pod- cast, but don’t want to send the backing music to a guest on...
-
Page 67: Feedback Loops Are Bad
Feedback Loops are Bad While loopback audio and the Revelator io24 mixer makes it really easy to mix and record the sound of one piece of software into another, there is also the potential to send the output of a software application back into itself and create what is known as a “feedback loop.”... -
Page 68: Advanced Features And Customization Tools
1. Reset All. Click this button to reset your Revelator io24 to its factory default state. 2. Fat Channel on USB Stream Outputs. By default, your Revelator io24 will record audio just as you hear it in your headphones, complete with the Fat Channel preset. If you would like to record only the raw unprocessed audio, but still listen to the presets while you record, disable “Fat Channel on USB... -
Page 69: Advanced Fat Channel And Voice Effects Controls
Main, Stream Mix A, and Stream Mix B. 6. Voice Effects. By default, your Revelator io24’s Voice FX are only available on Channel 1. Use this control to make them available on Channel 2. Only one channel can use Voice FX. -
Page 70: High Pass Filter
High Pass Filter Use this control to set the High-Pass Filter frequency threshold for the selected Chan- nel or Output Bus. The filter’s threshold can be set from 24 Hz to 1 kHz. When the threshold is set to its lowest point, the filter is off. The high-pass filter’s slope is -12 dB/8va. -
Page 71: Compressor
As previously mentioned, a compressor is a dynamics processor that reduces the dynamic range of a sig- nal by attenuating it by a set ratio when it exceeds a defined threshold. Your Revelator io24 is equipped with three compressor models from which to choose: Standard, Tube, and FET. -
Page 72: Standard Compressor
Standard Compressor 1. On/Off. Turns the Compressor on or off in the signal chain. 2. Threshold. Sets the level above which the compressor begins to attenuate the signal. 3. Ratio. Sets the relationship between the amount a signal goes above the threshold, and the amount it is attenuated. -
Page 73: Tube Leveling Amplifier
threshold. 6. Auto. Press to toggle Auto mode on or off. When Auto mode is active, the Attack and Release controls become inoperative, and a preprogrammed attack and release curve is used. In this mode, the attack is set to 10 ms, and the release is set to 150 ms. All other compressor parameters can still be adjusted manually. -
Page 74: Class-A Fet Compressor
Filter control (including the effects of the high-pass filter). Press again to switch back to the normal channel signal. Class-A FET Compressor 1. On/Off. Turns the Compressor on or off in the signal chain. 2. Input Gain. Sets input gain to the compressor. This setting affects the action of the compressor, so feel free to try various settings to find the optimal effect for your needs. -
Page 75: Equalizer
You can boost or cut the level of ranges of frequencies, to make corrective or cre- ative changes to the signal. Like the compressor, your Revelator io24 is equipped with three EQ models from which to choose: Standard, Passive, and Vintage. -
Page 76: Passive Program Eq
1. On/Off. Turns the EQ on or off in the signal chain. 2. Frequency. This control sets the center frequency at which signals are boosted or cut for the cur- rently selected band. 3. Gain. Sets the amount by which the selected frequency will be boosted or cut. 4. -
Page 77: Vintage 1970S Eq
interacts nicely with the Low Boost control, allowing for boosts in apparent bass energy while keeping overall bass energy within optimal limits. 4. Low Frequency Select. Sets the center frequency of the band covered by the Low Boost and Low Attenuation controls. -
Page 78: Limiter
7.15 Voice FX Your Revelator io24 is equipped with six Voice FX processors that can make your voice sound ethereal, otherworldly, or just plain weird… your choice! This section will go through each effect in detail. Note that while you can use any of these effects with the Fat Channel and Reverb, you can only use one effect at a time. -
Page 79: Detuner
Lows. Use this control to boost the low-frequency content. Width. This control adjusts the stereo image. Wet/Dry. Blends the affected sound with the dry sound of your voice. Set to 100% to only hear the processed sound. Set to 0% to only head the dry sound. 7.17 Detuner True to its name, the Detuner will artificially lower your voice. -
Page 80: Vocoder
7.18 Vocoder Think of a vocoder as a “talking synthesizer.” Your voice is sent through a filter and essentially removed so that only the synthesized sound after it was modulated by the filter remains. This results in a syn- thesized sound that pulses to the tempo of your voice with the same tonal characteristics. Freq. -
Page 81: Filters
Dist. Controls the amount of distortion from zero to over-the-top. Freq. Sets the frequency of the oscillation. SC Freq. Sets the frequency of the Sub Carrier. Sub Carrier. You can choose to add a low frequency oscillation to your signal or not by engaging or disengaging the Sub Carrier. -
Page 82: Delay
Tune: Adjusts the pitch of the affected signal from high to low. Damping: Adjusts the amount of high-frequency content sent through feedback (4.) in the affected signal. Wet/Dry: Blends the affected (“wet”) sound with the un-affected, (“dry”) sound of your voice. Set to 100% to only hear only the processed sound. -
Page 83: Studio One Artist Quick Start
Power User Tip: As a valued PreSonus customer, you are eligible for a discount upgrade to Studio One Pro- fessional. For more details on the Studio One upgrade program for PreSonus customers, please visit https://shop.presonus.com/products/software/studio-one-prods. - Page 84 Internet when you launch the application for the first time. Power User Tip: You may be prompted to enter your My PreSonus user account information. Clicking “Remem- ber Credentials” will allow you to have immediate access to any content you purchase from the PreSonus Mar- ketplace.
-
Page 85: Setting Up Studio One Artist
In the middle of the Start page, you will see the Setup area. Studio One Artist automatically scans your system for all available drivers and selects a driver. By default, it will choose a PreSonus driver if one is available. -
Page 86: Configuring Midi Devices
If you do not see your device listed on the Start page when you launch Studio One, click on the Configure Audio Devices link in the Setup area to open the Options window. In the Options window, click on the Audio Setup tab and select your device driver from the pull-down. Configuring MIDI Devices From the External Devices window in Studio One Artist, you can configure your MIDI keyboard controller, sound modules, and control surfaces. -
Page 87: Setting Up An External Midi Keyboard Controller From The Start Page
If you are using a third-party MIDI interface or USB MIDI-controller keyboard, you must install any required drivers for these devices before beginning this section. Please consult the documentation that came with your MIDI hardware for complete installation instructions. If you do not have any MIDI devices, please skip this section. Setting up an External MIDI Keyboard Controller from the Start Page A MIDI keyboard controller is a hardware device that is generally used for playing and controlling other MIDI devices, virtual instruments, and software parameters. - Page 88 Click the Add button. This will launch the Add Device window. From the menu on the left, select your MIDI controller from the list of manufacturers and models. If you do not see your MIDI controller listed, select New Keyboard. At this point, you can customize the name of your keyboard by entering the manufacturer and device names.
-
Page 89: Setting Up An External Midi Sound Module From The Start Page
You must specify which MIDI channels will be used to communicate with this keyboard. For most pur- poses, you should select all MIDI channels. If you are unsure of which MIDI channels to choose, select all 16. Studio One allows you to filter out specific control functions. If you would like Studio One to ignore Aftertouch, Pitch Bend, Program Change, or all CC messages, enable filtering for any or all of these messages. -
Page 90: Creating A New Song
Select your device in the menu on the left. If your device is not listed, select New Instrument. At this point you can customize the name of your keyboard by entering the manufacturer and device names. Specify which MIDI channels will be used to communicate with this sound module. For most pur- poses, you should select all MIDI channels. - Page 91 In the New Song window, name your Song and choose the directory in which you’d like it saved. You’ll notice a list of templates on the left. These templates provide quick setups for a variety of devices and recording situations. The section will describe creating a Song from an empty session. Power User Tip: If you plan to import loops into your Song, make sure that the Stretch Audio Files to Song Tempo option is selected.
-
Page 92: Configuring Your I/O
Configuring Your I/O Click on Song | Song Setup to set your sample rate and resolution and configure your audio I/O. Click on the Audio I/O Setup tab. 8. Configuring Your I/O... - Page 93 Revelator io24, including the Loopback Inputs that you’d like to have available. You can create a mono input using Input 1 of your Revelator io24, or a stereo pair using both inputs as shown here— plus two Stereo Inputs: one for Stream Mix A L/R and another for Stream Mix B L/R.
-
Page 94: Creating Audio And Instrument Tracks
Creating Audio and Instrument Tracks In the upper left corner of the Arrange window, you will notice several buttons. The button furthest to the right is the Add Tracks button. Click on this button to open the Add Tracks window. In the Add Tracks window, you can customize the track name and color, add a preset rack of effects, and set the physical source for the input and output of your audio tracks. -
Page 95: Recording An Audio Track
Note: Instrument tracks are nearly identical to audio tracks. The Input Source list for Instrument tracks lists available external MIDI devices as well as any virtual instruments that have been added to the Song. Recording an Audio Track To begin recording, create an audio track from the Add Tracks window, set its input to Input 1 on yourRevelator io24, and connect a microphone to the same input. - Page 96 The Browse button opens the browser, which displays all of the available virtual instruments, plug-in effects, audio files, and MIDI files, as well as the pool of audio files loaded into the current session. Drag-and-Drop Virtual Instruments To add a virtual instrument to your session, open the browser and click on the Instrument button. Select the instrument or one of its patches from the Instrument browser and drag it into the Arrange view.
- Page 97 created with that file placed at the position to which you dragged it. If you drag the file to an existing track, the file will be placed as a new part of the track. 8.2 Adding Virtual Instruments and Effects...
-
Page 98: Resources
Resources Gain Staging 101: Begin at the Beginning It may seem counter-intuitive to boost the signal closest to its source and cut it later in the signal path if it is too loud, but this is precisely the best way to get a noise- and feedback-free recording. That said, you don’t want to gain it up too much at the beginning either. -
Page 99: Step 2: Setting The Eq And Dynamics
Step 2: Setting the EQ and Dynamics After you have set the input gain, you can use your channel EQ to sculpt your source. The more bands your EQ offers, the more control you will have, but you’ll also add more potential for improper gain sta- ging, so use with caution. -
Page 100: Microphone Tips And Tricks
Don’t worry, we’ve all been there, and PreSonus has put together this tutorial to help you mitigate the most common mistakes people make when getting started recording their voice with a microphone. -
Page 101: Problematic Pronunciation
PreSonus Studio One, are also equipped with a de-esser plug-in especially for this purpose. Power User Tip: If you are recording a several speakers at once with your Revelator io24, using a de-esser can cause more problems than it solves, because over-using a de-esser or putting one where it is not needed can turn all your ‘S’... -
Page 102: Technical Specifications
Select Software Controls: Mic Gain, Monitor Mix, Preset Management Onboard DSP PreSonus StudioLive Fat Channel: High Pass Filter, Noise Gate / Expander, 3 Compressor models, 3 EQ models, and Limiter; Voice Effects: Doubler, Vocoder, Ring Modulator, Comb Filter, Detuner, Delay, Reverb... - Page 103 Input Impedance 1.4 kΩ Phantom Power "+48 VDC (10 mA total)" Instrument Inputs Maximum Level "+10 dBu (min gain) Gain Range 50 dB Frequency Response 20 Hz – 20 kHz (+0.1dB/-0.3 dB, unity gain, unwtd) THD + N 0.005% (1 kHz, min gain) Input Impedance 1M Ω...
- Page 104 Width 6.25” (158.8mm) Depth 6.25” (158.8mm) Weight 2lbs (0.9kg) 9.11 Technical Specifications...
-
Page 105: Legal
EarMix, Eris, FaderPort, FireStudio, MixVerb, Notion, PreSonus, PreSonus AudioBox, QMix, RedLightDist, SampleOne, Sceptre, StudioLive, Temblor, Tricomp, WorxAudio, and the Wave Logo are registered trademarks of PreSonus Audio Electronics, Inc. Studio One is a registered trademark of PreSonus Software Ltd. ASIO is a trademark and software of Steinberg Media Technologies GmbH. -
Page 106: Dinner Is Served
Dinner is Served! Added bonus: PreSonus’ previously Top Secret recipe for… Andouille & German Red Cabbage Po-Boys Ingredients: 1 small Onion 3 Tbsp. fresh Ginger 1 small head Red Cabbage 1 tsp Salt 3 Tbsp. Honey ¼ cup Red Vinegar 12 oz Andouille or Bratwurst Sausage sliced lengthwise ¼... - Page 107 2-channel audio interface for streamers, pod- casters, and music creators Owner’s Manual Part# 70-12000167-A 11. Dinner is Served!
Need help?
Do you have a question about the REVELATOR IO24 and is the answer not in the manual?
Questions and answers