Table of Contents
Advertisement
Quick Links
Manual Call Point
Pushbutton and Break Glass Stations for Use in
Hazardous Locations
25500424 Rev A2 0522
Limited Warranty: This product's limited warranty can be found at www.fedsig.com/SSG-Warranty
SAFETY MESSAGES TO INSTALLERS AND USERS
all safety instructions. Failure to do so may result in property damage, serious injury, or death.
•
Read and understand all instructions before installing or operating this equipment.
•
To avoid electrical shock hazards, do not connect wires when power is applied. Failure to observe this warning may
lead to serious injury or death.
•
Never alter the unit in any manner. Safety in hazardous locations may be endangered if additional openings or other
alterations are made in units specifically designed for use in these locations.
•
Do not connect this station to the system when power is on.
•
After installation, ensure that all threaded joints are properly tightened.
•
Keep the unit tightly closed when in operation.
•
After installation, test the station and the system to ensure that it is operating properly.
•
After testing is complete, provide a copy of this instruction sheet to all personnel.
•
Establish a procedure to routinely check the station and system for proper activation and operation.
Failure to follow all safety precautions and instructions may result in property damage, serious injury, or death.
Certifications
ATEX and IECEx Certification Information:
Certificate Nos.
ATEX Cert No.: DEMKO 19 ATEX 1939X
IECEx Cert No.: IECEx UL 19.0074X
ATEX coding
Protection
II 2 G Ex db eb mb IIC T4 Gb (Tamb= -40°C to +70°C)
CP-BG models: II 2 D Ex tb IIIC T100°C Db IP66
CP-PB models: II 2 D Ex tb IIIC T100°C Db IP65
EN60079-0, EN60079-1, EN60079-7, EN60079-18, EN60079-31, IEC60079-0, IEC 60079-1, IEC60079-7, IEC60079-18,
IEC60079-31
Refer to Certificates for specific standard versions.
Specific Conditions of Use
1.
The equipment has an optional protective non-metallic cover that may provide a potential electrostatic charging
hazard.
II 2 G D
: Products should be installed by a licensed electrician and follow
Advertisement
Table of Contents

Subscribe to Our Youtube Channel
Related Manuals for Federal Signal Corporation CP-PB Series


Summary of Contents for Federal Signal Corporation CP-PB Series
- Page 1 Manual Call Point Pushbutton and Break Glass Stations for Use in Hazardous Locations 25500424 Rev A2 0522 Limited Warranty: This product’s limited warranty can be found at www.fedsig.com/SSG-Warranty SAFETY MESSAGES TO INSTALLERS AND USERS : Products should be installed by a licensed electrician and follow all safety instructions.
- Page 2 UL-C-UL Signaling Certification Information (Model CP-PB Series) UL Certification applies to push button models series CP-PB Series only. CP-BG models are not UL/C-UL Listed. For use in Non Monitoring (NM) and Self Monitoring (SM) Emergency Signaling Applications.
- Page 3 Class and Division Hazardous (classified) Location Ratings: Class I, Division 2, Groups A, B, C and D (T4). UL Certification applies to push button models CP-PB Series only. CP-BG models are not UL/C-UL Listed. Input Ratings: 48 Vdc, 3A (max).
- Page 4 • Special applications (e.g., language, specific artwork, site location, etc.): The faceplate’s labeling surface will accept user-supplied Uline 1.75-inch by 1/2-inch weather resistant labels for laser printers, Uline part # S-19297. • Custom stainless steel Duty Label (separate service part # for field installation): Side mounted on either PB or BG units (except BG units that have a break glass hammer bar already installed).
- Page 5 Tools needed to access both chambers: • #2 Philips screwdriver • 2.0 mm hexagon key • 3.0 mm hexagon key Call Point Front Chamber Access The model CP-PB pushbutton station’s front chamber is easily accessed for cover flap attachment and/or maintenance or replacement of parts.
- Page 6 Figure 2 Reinstalling the faceplate GLASS PANEL RETENTION SPRINGS REPLACEABLE BREAK GLASS PANEL WITH PROTECTIVE LABEL UNLOOSEN TWO M4 CLEAR CAPTIVATED SCREWS ACTUATOR CYLINDER ACTUATOR SPRING PIVOT BOSSES UNLOOSEN M4 SET SCREW TO REMOVE RESET KEYWAY AND BEARING WASHER IF PRESENT Figure 4 Model CP-BG break glass station’s front chamber is easily accessed by the following actions: a.
- Page 7 Figure 3 Common Internal View REMOVABLE MOUNTING PLATE MODEL CP-BG WITH WIRING HARNESS (2 X M4 SCREWS) 9 - POSITION WIRING BLOCK HOUSING GROUND UNLOOSEN FOUR CAPTIVATED M4 SOCKET HEAD CAP SCREWS MODEL CP-PB UNLOOSEN FOUR CAPTIVATED M4 SOCKET HEAD CAP SCREWS Mounting the Call Point Station ATTACH THE STATION SECURELY: To prevent injury, this apparatus must be securely attached to the mounting surface in accordance with the installation instructions and local jurisdictions and codes.
- Page 8 To avoid electrical shock hazards, do not connect wires when power is applied. Failure to observe this warning may lead to serious injury or death. • Painting and surface finishes, other than those applied by Federal Signal Corporation, are not permitted. • Wiring terminations should be in accordance with specifications within this manual and required by national and local requirements, depending on the application.
- Page 9 Figure 6 Block wiring option FACTORY INSTALLED TERMINAL BLOCK WIRING • Wire gauge range is 0.5 to 4.0 mm, (12-22 AWG) for either solid or stranded conductors. • Strip length of 8 mm (0.315 inch) For both available wiring configurations: •...
- Page 10 Route/tuck in the wiring into the rear housing of the unit and carefully reassemble the unit’s front and rear housings so that both fully seat to each other when the four M4 screws are tightened. Alternate between tightening the diagonal pairs of screws to ensure that the station’s housings are tightened evenly. Standard SPDT and DPDT Devices Switch Wiring For the standard-issue SPDT and optional DPDT models, please note the following applicable requirements for these specific models:...
- Page 11 Figure 10 Snap fit clips FLEX TABS OUTWARD TO INSTALL IN PLATE FLEX TABS TO SECURE MODULE(S) TO REAR MOUNTING RESISTOR AND DIODE MODULE PLATE MOUNTING LOCATIONS (2) Optional Bi-Color LED Module Wiring For the SPDT and DPDT models with an optional factory wired, voltage dependent (6, 12, 24, 48 Vdc), bi-color LED module and series resistor module added to the front housing (having green illumination in the standby “Normal”...
-
Page 12: Electrical Specifications
Failure to conduct a compatibility check per the guidelines listed below may lead to property damage, serious injury, or death. Models with no LED • Standby Mode Impedance: Equal to the EOL Resistor value (no EOL Resistor equals infinite Ω). •... - Page 13 Manual Test and Reset Operation of the Station The CP-PB and the CP-BG stations have separate activation techniques for placing the internal switch into the alarm state and resetting the stations to normal after the alarm state. Follow the instructions according to your station type. CP-PB Stations Activation Test For the manual pushbutton stations, activation is accomplished by a front force directly inward towards the station...
-
Page 14: Alarm State
Figure 15 CP-BG States MODEL CP-BG: NORMAL STATE MODEL CP-BG: ALARM STATE VISUAL ACTIVATION INDICATOR WITH RESET KEYWAY APPLIED FORCE ACTIVATION INDICATOR ALARM STATE STATUS POSITIONS ACTIVATED Using the reset keyway (factory attached on Figure 16 CP-BG alarm state non- CP-BG-x-x-x-xxx-xx-2 stations) mated to the MODEL CP-BG: faceplate’s activation indicator, rotate the indicator ALARM STATE... - Page 15 Figure 17 CP-PB states without reset keyway MODEL CP-PB: NORMAL STATE MODEL CP-PB: ALARM STATE RESET KEYWAY REMOVED RESET KEYWAY REMOVED REMOVABLE RESET KEYWAY VISUAL (FACTORY INSTALLED ON ACTIVATION NON-CP-BG-x-x-x-xxx-xx-2 INDICATOR EN54-11 MODELS; SUPPLIED SEPARATELY ON CP-BG-x-x-x-xxx-xx-2 MODELS) ACTIVATION INDICATOR STATUS APPLIED ALARM STATE POSITIONS...
-
Page 16: Cleaning The Enclosure
Maintaining/Modifying the Call Point Station During the working life of the station, it should require little or no maintenance. The non-metallic front and rear glass reinforced polyester (GRP) housings will resist attack by most acids, alkalis, and chemicals and is as resistant to concentrated acids and alkalis. - Page 17 Figure 21 Replacing the glass REPLACEMENT APPLY PRESSURE ON PANEL HELD IN BOTTOM EDGE AT PLACE BY TWO TRIANGLES AND CORNER ANGLE IN BOSSES REPLACEMENT PANEL AGAINST 3 TOWARDS 3 RETURN COMPRESSION ACTIVATION INDICATOR IN SPRINGS SPRINGS ALARM STATUS MODE Reattach the front faceplate.
- Page 18 Removal/attachment of the reset keyway is easily done by use of a M2 hex wrench mated to the M4 set screw below the triangular directional status indicator. The set screw need not be fully removed from the keyway, only loosened enough to lift the keyway along with the bearing washer from the unit’s status indicator.
-
Page 19: Rear Housing
Servicing the LED Module NOTE: The bi-color LED service kit option is provided only for factory-LED-installed stations in either 6, 12, 24, or 48 Vdc applications noted as such on their model # : CP-BG-x-x-x-xxx-XX-x or CP-PB-x-x-x-xxx-XX-xx where XX = 06, 12, 24, or 48 Vdc on stations where the LED is present. - Page 20 Figure 28 Resistor module removal LED SERIES RESISTOR MODULE PLACEMENT CUTOUTS LED MODULE PLACEMENT RELIEF AREA In reverse order, begin the replacements process: a. Replace the series resistor with the one provided within the kit, running the two leads to terminals #8 and #9. Snap the resistor module in place where the previous one was located.
- Page 21 Assembly with two mounting screws Figure 30 Attaching the bracket The hammer bar can be pulled directly out from its retaining bracket for access to the two mounting holes that are for the attachment of the two supplied #4 screws. Carefully screw the bracket onto the rear housing.
-
Page 22: Maintenance And Service
Figure 32 Installing the custom duty plate PEEL OFF LABEL LINER FOR ADHESIVE BACKED APPLICATION TO THE REAR HOUSING SIDE WITH TWO MOUNTING HOLES ATTACH TWO MOUNTING SCREWS Lubricating the Threaded Joints A silicone-based, non-hardening, chemically compatible grease may be applied if required only on the rear housing’s three threaded inlet ports. - Page 23 Table 3 Call Points Field Installed Service/Accessory Kits Part Description Federal Signal Part # Break Glass Panel, 5-Pack K859902275A CP-BG stations Cover Flap K859901982A CP-BG and CP-PB stations " " w/Label (IN CASE OF FIRE / BREAK GLASS) K859901982A-01 CP-BG stations "...
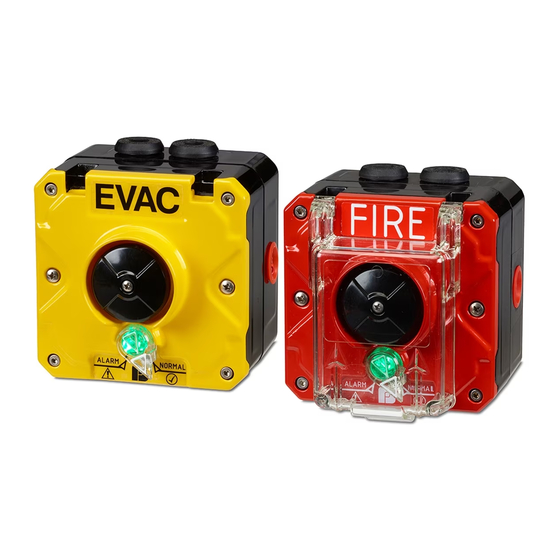
- Page 24 Part Description Federal Signal Part # Faceplate Label EN54-11 K71400701A CP-BG-x-x-x-xxx-xx-2 EN54-11 stations CP-BG and CP-PB Faceplate Label, Stainless Steel, FIRE K71400976A-01 stations, (Non EN54-11) " " " " EVAC " -02 " " " " (Non EN54-11) " " " " BIOHAZARD ALARM "...
Need help?
Do you have a question about the CP-PB Series and is the answer not in the manual?
Questions and answers