Stihl RE 100 PLUS CONTROL Instruction Manual
Hide thumbs
Also See for RE 100 PLUS CONTROL:
- Instruction manual (56 pages) ,
- Owner's instruction manual (84 pages)
Table of Contents
Advertisement
Quick Links
Advertisement
Table of Contents

Subscribe to Our Youtube Channel
Related Manuals for Stihl RE 100 PLUS CONTROL


Summary of Contents for Stihl RE 100 PLUS CONTROL
- Page 1 STIHL RE 100 PLUS CONTROL Instruction Manual...
-
Page 3: Table Of Contents
English Contents 7.1 Connecting the high-pressure washer to the Introduction ......... 2 mains water supply. -
Page 4: Introduction
Disposal ......... . . 31 is intended to help you use your STIHL product safely and in 20.1 Disposing of the pressure washer . -
Page 5: Warning Notices In Text
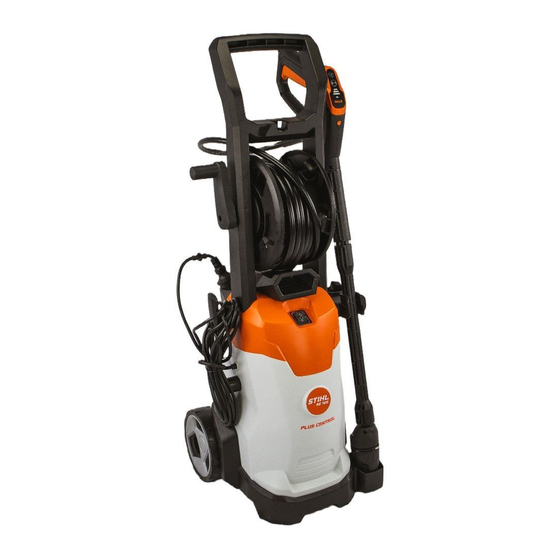
English 3 Overview Warning Notices in Text 3 Overview DANGER This notice refers to risks which result in serious or fatal Pressure washer injury. ► Serious or fatal injuries can be avoided by taking the precautions mentioned. WARNING This notice refers to risks which can result in serious or fatal injury. -
Page 6: Spray Attachment
English 3 Overview 2 Holders 15 High-pressure hose The holder is used for storing the spray gun. The high-pressure hose transports the water from the high-pressure pump to the spray gun. 3 Holders 16 Hose reel The holder is used for storing the spray attachment. The hose reel is used to roll up the high-pressure hose. -
Page 7: Symbols
The 3-in 1 nozzle consists of a fan-jet nozzle, a rotary products. nozzle and a spray nozzle to which cleaning agent can These symbols indicate original STIHL spare be added. parts and original STIHL accessories. Symbols... -
Page 8: Intended Use
► Always use the high-pressure washer as described in and animals. this user manual. – Do not direct the water jet at electrical The pressure washer STIHL RE 100 PLUS CONTROL is not systems, electrical connections, designed to be used for: sockets and live cables. -
Page 9: Clothing And Equipment
► Do not leave the pressure washer unattended. ► If in any doubt: Contact a STIHL servicing dealer. ► Ensure that children cannot play with the Clothing and equipment pressure washer. WARNING ■... -
Page 10: Safe Condition
– The high-pressure washer is clean and dry. ► Replace worn or damaged labels. – The spray attachment is clean. ► If you have any doubts, be sure to consult a STIHL – The controls function properly and have not been dealer. - Page 11 Damage to property may occur. ► Stop working, unplug the mains plug from the socket ► Do not use the high-pressure washer at temperatures and consult a STIHL dealer. below 0° C. ► The high-pressure washer must always be operated in ■...
- Page 12 English 4 Safety Precautions ■ The water jet may detach asbestos fibers from surfaces. ■ Easily combustible and explosive liquids that are sucked Asbestos fibers may spread through the air after drying in can cause fires and explosions. Persons may be and be breathed in.
-
Page 13: Detergents
► Protect the high-pressure hose from heat, oil and ► Observe the user manual for the detergent. chemicals. ► If you have any doubts, be sure to consult a STIHL ■ An incorrectly routed water hose may suffer damage and dealer. -
Page 14: Connecting To The Power Supply
English 4 Safety Precautions ■ Dirty or sandy water can damage components of the leakage circuit breaker, which interrupts the power pressure washer. supply as soon as the leakage current to earth exceeds 30 mA for 30 ms, or has an earth tester. ►... -
Page 15: Transport
English 4 Safety Precautions ► Route the connecting cord and extension cord so that they are not under tension or tangled. 4.12 Storage ► Route the connecting cord and extension cord so that WARNING they will not be damaged, kinked or crushed and will not be chafed. -
Page 16: Cleaning, Maintenance And Repair
► Always close the cover of the control panel tightly. If it is not possible to close the cover, remove the battery and have the control panel by a STIHL servicing dealer replaced. ► If the battery is swallowed: do not induce vomiting. This could result in the battery lodging in the esophagus. -
Page 17: Preparing The Pressure Washer For Operation
► Connect pressure washer to power supply, @ 8. ► If it is not possible to carry out these steps: Do not use the pressure washer. Consult a STIHL servicing dealer. ► Fit the connecting piece (1) into the coupling (2). -
Page 18: Installing The Batteries
English 6 Assembling the pressure washer Inserting nozzles ► Insert the batteries (5) into the control panel (2) according to the polarity- (+/-). ► Insert 3-in1 nozzle (1). ► Close cover (4). ► Insert the control panel into the spray gun. Installing the Batteries The control panel engages with an audible click. -
Page 19: Attaching And Removing The Spray Lance
English 6 Assembling the pressure washer 6.3.2 Removing the spray gun 6.4.2 Removing the spray lance ► Press and hold the locking lever (1). ► Squeeze spray lance (1) and spray gun (2) together and twist as far as they will go. ►... -
Page 20: Connecting To A Water Source
English 7 Connecting to a water source 6.5.2 Removing the nozzle ► Screw the water filter (1) onto the water supply and tighten by hand. ► Press nozzle (1) and spray lance (2) together and turn until stop. Connecting the water hose ►... -
Page 21: Connecting The High-Pressure Washer To Another
(a), @ 18.1. The appropriate STIHL suction set must be used. The suction set includes a water hose with a special coupling. Depending on the market, the appropriate STIHL suction set may be included with the high-pressure washer. -
Page 22: Connecting The Pressure Washer To The Power
English 8 Connecting the pressure washer to the power supply ► Insert water intake screen (2) into the coupling of the 8 Connecting the pressure washer to the water hose (3). power supply Connecting the water hose Connecting the pressure washer to an electric power supply ►... -
Page 23: Switching Off The Pressure Washer
English 10 Operating the pressure washer 10 Operating the pressure washer 10.1 Holding and controlling the spray gun ► Set the rocker switch to position I. Switching off the pressure washer. ► Hold the spray gun by the handle with one hand, wrapping your thumb around the handle. -
Page 24: Squeezing And Locking The Spray Gun Trigger
English 10 Operating the pressure washer Locking the spray gun trigger WARNING When the lever of the spray gun is released, a recoil occurs in the high-pressure hose. A recoil expands the high- pressure hose. If the high-pressure hose is not completely unwound from the hose reel, there is no room for the high- pressure hose to expand and the high-pressure hose may be damaged. -
Page 25: Cleaning
► Move forward slowly in a controlled manner. 10.6 Working with Detergent Detergents can increase the cleaning effect of the water. STIHL recommends the use of genuine STIHL detergents. The 3-in 1 nozzle can be set according to the application: – The fan-jet nozzle is suitable for cleaning light and medium soiling. -
Page 26: After Finishing Work
English 11 After Finishing Work ► Dose and use detergent as described in the instructions ► Wind up the high-pressure hose (1) evenly distributed for use of the detergent. over the reel. ► Screw the cover onto the detergent bottle (3) and tighten ►... -
Page 27: Transporting
English 12 Transporting ► Hold down spray gun trigger until an even jet of antifreeze Transporting the high-pressure washer in a vehicle is delivered from the spray gun and point the spray gun ► Secure the high-pressure washer so that it cannot turn into the container. -
Page 28: Cleaning Nozzle And Spray Lance
English 14 Cleaning 14.2 Cleaning nozzle and spray lance 14.3 Cleaning the water intake screen ► Rinse the nozzle and spray lance under running water and ► Unscrew the connector (1) of the water connection. dry with a cloth. ► Remove water intake screen (2) from the connector. ►... -
Page 29: Maintenance
16 Repairing 16.1 Repairing the pressure washer The user cannot personally repair the pressure washer and accessory. ► If the pressure washer or accessory is damaged: Do not use the pressure washer or accessory. Consult a STIHL servicing dealer. 0458-004-0121-A... -
Page 30: Troubleshooting
English 17 Troubleshooting 17 Troubleshooting 17.1 Correcting faults in the pressure washer Fault Cause Remedy The pressure washer does The mains plug of the connecting cable or ► Plug in mains plug of connecting cord or not start although the extension cord is not plugged in. - Page 31 5 minutes. ► Clean the nozzle. The high-pressure pump There is a leak in the high-pressure pump, high- ► Ask a STIHL servicing dealer to inspect the repeatedly switches on pressure hose or spray attachment. pressure washer. and off without squeezing the spray gun trigger.
-
Page 32: Lubricating The Seals
18 Specifications an inlet pressure of 0.3 MPa (3 bar). 18.2 Extension Cords 18.1 Pressure washer STIHL If an extension cord is used, it must have a ground wire and RE 100.0 PLUS CONTROL the wire gage of its conductors must meet the following minimum requirements –... -
Page 33: Sound Values And Vibration Values
20.1 Disposing of the pressure washer – Sound pressure level L measured according to Contact the local authorities or your STIHL dealer for EN 60335-2-79: 80 dB(A) information on disposal. Improper disposal can be harmful to health and pollute the –... -
Page 34: Ukca Declaration Of Conformity
UK regulations The technical documents are stored at The Restriction of the Use of Certain Hazardous Substances ANDREAS STIHL AG & Co. KG Produktzulassung. in Electrical and Electronic Equipment Regulations 2012, The year of construction, country of manufacture and the Supply of Machinery (Safety) Regulations 2008, serial number are shown on the high-pressure washer. - Page 36 0458-004-0121-A englisch www.stihl.com *04580040121A* 0458-004-0121-A...
Need help?
Do you have a question about the RE 100 PLUS CONTROL and is the answer not in the manual?
Questions and answers