
Related Manuals for SPORTSPOWER PERSONALISED WOODEN PLAYHOUSE


Summary of Contents for SPORTSPOWER PERSONALISED WOODEN PLAYHOUSE
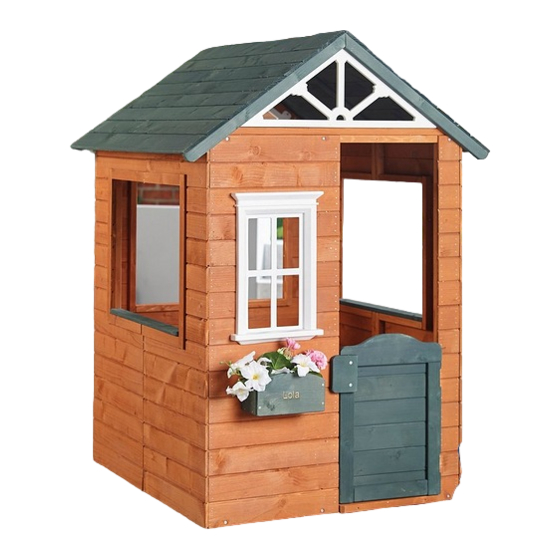
- Page 1 PERSONALISED WOODEN PLAYHOUSE Important Limit: Age:3 - 10 years Tips: It will take 2 adults Maximum user: 2 around 60 minutes to Warning: Only for domestic use assemble. Warning: Only for outdoor use (+44) 0330 0904 420...
- Page 2 Safety Information Parts Assembly Instructions 7-11 Care and Maintenance...
- Page 3 Safety Information IMPORTANTWARNINGS AND INSTRUCTIONS portant –Please read these instructions thoroughly before assembly or use. BEFORE YOU BEGIN: Carefully read all instructions in this manual before assembling and using this product.The unit must be assembled by adults. Heavy duty working gloves should be worn to avoid injuries during assembly.
-
Page 4: Before You Begin Assembly
Safety Information IMPORTANTWARNINGS AND INSTRUCTIONS Important –Please read these instructions thoroughly before assembly or use. BEFORE YOU BEGIN ASSEMBLY: Take a complete inventory of components using the parts list. Sort and lay out the wood pieces. Label each piece of wood for easy reference. For easy ... - Page 5 (+44) 0330 0904 420 Please check you have all the parts listed below PICTURE...
- Page 6 (+44) 0330 0904 420 Please check you have all the parts listed below PICTURE AZ10 AZ11 AZ12 AZ13 AZ14...
- Page 7 (+44) 0330 0904 420 Please check you have all the parts listed below Note: The quantities below are the correct amount to complete the assembly. In some cases more ×6 (M3.8×25mm) ×12 (M3.8×28mm) ×6 (M3.8×35mm) ×29 (M3.8×40mm) ×4 (M3.0×18mm ) Allen Wrench REQUIRED ASSEMBLY TOOLS (NOT INCLUDED) Electric Drill...
- Page 8 Assembly Instructions Step 1 ● Connect AZ6 to AZ5 using L11(6pcs) as shown in Figure 1. Part No Quantity Hardware No Quantity FIGURE 1 Step 2 ● Connect AZ3 to AZ4 using L11(3pcs) as shown in Figure 2. Part No Quantity Hardware No Quantity...
- Page 9 Assembly Instructions Step 3 ● Connect AZ6 to AZ4 using L11(4pcs) from inside. ● Connect AZ5 to AZ3 using L11(4pcs) from inside as shown in Figure 3. Hardware No Quantity FIGURE 3 Step 4 hole face upwards ● Connect AZ13 to AZ1 and AZ13 AZ2 using L4(3pcs).
- Page 10 Assembly Instructions Step 5 ● Connect AZ14 to AZ12 using L6 (2pcs). ● Connect AZ12 to AZ2 using L15 (4pcs) as shown in Figure 5. Note: Make sure AZ12 and AZ14 AZ2 are properly aligned. AZ14 AZ12 AZ12 Part No Quantity AZ12 AZ14...
- Page 11 Assembly Instructions Step 7 ● Connect AZ7 to AZ4 and AZ3 using L11 (2pcs). ● Connect AZ7 to AZ13 using L11(2pcs) as shown in AZ13 Figure 7. AZ13 Part No Quantity Hardware No Quantity FIGURE 7 Step 8 ● Connect AZ9 to AZ5 and AZ6 using L5 (4pcs) as shown in Figure 8.
- Page 12 Assembly Instructions Step 9 Inside view ● Connect AZ8 to AZ7 using L5(8pcs) as shown in Figure 9. Part No Quantity Hardware No Quantity FIGURE 9 Step 10 Congratulations! You have completed installing the playhouse. Please go over the entire unit to tighten all the screws.
- Page 13 Care and Maintenance If correct care and maintenance is provided, This Wooden Playhouse was designed and it will provide users with years of exercise, manufactured with quality materials and fun and enjoyment. craftsmanship. What to Inspect: Hardware: Inspect all screws and tighten if required. Hardware should be firmly against, but not crushing the wood.
Need help?
Do you have a question about the PERSONALISED WOODEN PLAYHOUSE and is the answer not in the manual?
Questions and answers