Table of Contents
Advertisement
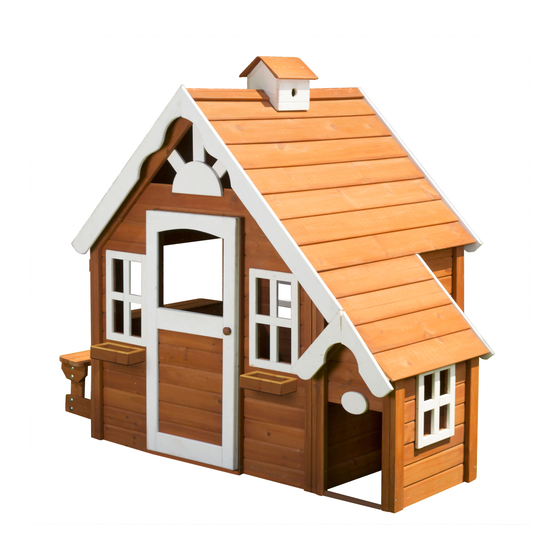
ME AND MY PUPPY PLAYHOUSE
CAUTION
PLEASE RETAIN THESE INSTRUCTIONS FOR FUTURE REFERENCE. KEEP THEM IN A SAFE PLACE
WHERE YOU CAN REFER TO THEM AS NEEDED.
Model# WP-379
OWNER'S MANUAL
ASSEMBLY INSTRUCTION
CARE MAINTENANCE AND USER'S GUIDE
This product is intended for use by children from ages 3 to 8.
FOR RESIDENTIAL USE ONLY
This unit is designed for the use of 4 occupants, with a maximum weight of
100 pounds (45.4kgs) for each. Combined weight is not to exceed 400
pounds (181.8kgs). Assembly requires at least TWO adults.
Customer Service
Do not return to the store,
For customer service, please visit
FLAT M, 3/FLOOR, KAISER ESTATE PHASE 3,
11 HOK YUEN STREET, HUNGHOM, KOWLOON, HK
www.sportspowerltd.net
SPORTSPOWER LTD
0
Advertisement
Table of Contents

Related Manuals for SPORTSPOWER Me and My Puppy Playhouse WP-379


Summary of Contents for SPORTSPOWER Me and My Puppy Playhouse WP-379
- Page 1 PLEASE RETAIN THESE INSTRUCTIONS FOR FUTURE REFERENCE. KEEP THEM IN A SAFE PLACE WHERE YOU CAN REFER TO THEM AS NEEDED. Customer Service Do not return to the store, For customer service, please visit www.sportspowerltd.net SPORTSPOWER LTD FLAT M, 3/FLOOR, KAISER ESTATE PHASE 3, 11 HOK YUEN STREET, HUNGHOM, KOWLOON, HK...
-
Page 2: Before You Begin Assembly
Dear Valued Customer, Congratulations on your Wood Play Set purchase! To assure the safety of your children while they enjoy many great moments of outdoor fun, please assure you thoroughly read and follow this important manual. It contains specific safety instructions that will assure a safe play experience. -
Page 3: Assembly Tips
o Find a location where the equipment can be placed more than 6 feet from any structure or obstruction (ex: electrical wires, branches, house, fence, garage) The safe play area refers to a zone extending 6’ beyond the gym set on all sides, including the space above the gym set. o The safe play area must be free of all structures, landscaping, tress and branches, rocks, wires and other obstacles to safe play. - Page 4 What to Inspect: Hardware: Inspect all nuts and bolts and tighten if required. Hardware should be firmly against, but not crushing the wood. Over-tightening hardware crushes wood fibers and can split wooden components resulting in the bolt thread extending beyond the wood. This poses a severe safety hazard. If bolt threads protrude beyond the wood surface, replace the bolt with a shorter one that will not protrude.
-
Page 5: General Instruction
CHECK METAL PARTS FOR RUST. IF FOUND, SAND AND REPAINT USING A NONLEAD-BASED PAINT MEETING THE REQUIREMENTS OF 16 CFR 1303. CHECK ALLWOOD MEMBERS FOR DETERIORATION AND SPLINTERS. SAND DOWN SPLINTERS AND REPLACE DETERIORATING WOOD MEMBERS. REINSTALL ANY PLASTIC PARTS, SUCH AS SWING SEATS OR ANY OTHER ITEMS THAT WERE REMOVED FOR THE COLD SEASON. - Page 6 WARNING Lawn swings is designed for use by children over two years of age. Use by Children under the age of two can result in entrapment between the seat and back areas. NEVER place children in rearward facing position or with legs between the seat and backrest because the child’s body may pass through the opening causing entrapment of the child’s head.
- Page 7 If the swing set is set up on grounds with sandy soil condition, it must be anchored with concrete footing (Concrete not included). On-site adult supervision for children of all ages is recommended. Instruct children not to walk close to, in front of, behind, or between moving items. ...
-
Page 8: Disposal Instructions
WARNING ON-SITE ADULT SUPERVISION IS REQUIRED AT ALL TIMES FOR CHILDREN OF ALL AGES. ENSURE THAT SUSPENDED CLIMBING ROPES, CHAINS OR CABLES ARE KETP TIGHT ENOUGH SO THE CHILDREN CAN NOT BE LOOPED BACK ON THEMSELVES AND ARE KEPT SECURE AT BOTH ENDS. Disposal Instructions * When it is time to dispose of the playground equipment, please use care when disassembling the playground equipment. - Page 9 IMPORTANT CONSUMER INFORMATION SHEET The Consumer Product Safety Commission estimates that about 100,000 Playground equipments. Related injuries resulting from falls to the ground equipment treated annually In U.S. hospital emergency rooms. Injuries involving this hazard pattern tend to be among the most serious of all playground injuries, and have the potential to be fatal, particularly when the injury is to the head.
- Page 10 SAFETY AND ASSEMBLY INFORMATION SELECTING THE CORRECT LOCATION FOR YOUR PLAY PRODUCT IS IMPORTANT FOR YOUR CHILDREN’S SAFETY AND THE PRODUCT’S LONGEVITY Dimensions: General Information: • The Playhouse has one layout option. Your set has been designed and engineered for Layout Ground Dimension Safe Play Area...
-
Page 11: Exploded Diagram
EXPLODED DIAGRAM... -
Page 12: Tools Required For Assembly
Tools Required for Assembly These are the tools that are generally required for installation. These tools are not included in the purchased packaging unless stated below. Electric Drill Phillips Head Screw Drive ⁄ ” bit Ladder or Step Tool Phillips Head Screwdriver Tape Measure Working Gloves... -
Page 13: Hardware/Parts List
HARDWARE/PARTS LIST S5 M4x28mm Deck Screw x 47 pcs S8 M4x60mm Deck Screw x 17 pcs S6 M4x35mm Deck Screw x 12 pcs S10 M4x25mm Deck Screw x 12 pcs S7 M4x45mm Deck Screw x 45 pcs U32 x 2 pcs NOTE: EXTRA HARDWARE MAY BE INCLUDED Measuring Hardware It is very important that you get the right hardware in the correct place when assembling the unit. -
Page 14: Wood Parts List
WOOD PARTS LIST KP1 x 1pc KP2 x 1pc KP3 x 1pc... - Page 15 KP4 x 1pc KP5 x 1pc KP6 x 1pc...
- Page 16 KP7 x 1pc KP8 x 1pc KP10 x 1pc KP9 x 2pcs KP11 x 1pc KP12 x 1pc KP13 x 1pc...
- Page 17 KP14 x 1pc KP15 x 1pc KP16 x 2pcs...
- Page 18 K17 x 1pc K18 x 2pcs KP19 x 2pcs KP20 x 1pc KP21 x 2pcs KP22 x 1pc...
- Page 19 KP23 x 1pc KP24 x 1pc KP25 x 1pc KP26 x 1pc KP27 x 1pc SA48 x 1pc SA50 x 1pc SA49 x 2pcs SB33 x 1pc SB32 x 1pc SB35 x 2pcs SB36 x 2pcs SB34 x 2pcs...
-
Page 20: Important Note
STEP 1 Wood boards needed: Hardware needed: * 1pc KP1 * 1pc KP2 * S7 x 8 pcs * 1pc KP3 Connect KP1 and KP2 together using S7 as shown in FIGURE 1. IMPORTANT NOTE! Please make sure the wall pieces are attached together CORRECTLY as shown in the Enlarged Diagram. - Page 21 Connect KP2 and KP3 together using S7 as shown in FIGURE 2. FIGURE 2...
- Page 22 STEP 2 Wood boards needed: Hardware needed: * 1pc KP4 * S7 x 14 pcs * 1pc KP5 * 1pc KP6 Connect KP3 and KP4 together from the inside using S7 as shown in FIGURE 3. Please make sure there is no gap in between KP3 and KP4 as shown in the Enlarged Diagram. IMPORTANT NOTE! Please make sure the wall pieces are attached together...
- Page 23 Connect KP4 and KP5 together using S7 as shown in FIGURE 4. FIGURE 4 Connect KP5 and KP6 together using S7 as shown in FIGURE 5. FIGURE 5...
- Page 24 STEP 3 Wood boards needed: Hardware needed: * 1pc KP7 * 1pc KP8 * S5 x * S8 x 4 pcs With someone holding, connect KP7 to KP3 and KP4 together using S5 and S8 as shown in FIGURE 6. Enlarged Diagram FIGURE 6...
- Page 25 With someone holding, connect KP8 to KP1 and KP6 together using S5 and S8 as shown in FIGURE 7. Enlarged Diagram IMPORTANT NOTE! FIGURE 7 Please make sure the wall pieces are attached together CORRECTLY as shown in the Enlarged Diagram.
- Page 26 STEP 4 Wood boards needed: Hardware needed: * 1pc SA48 * 2pcs KP9 * S8 x 4 pcs * S6 x 8 pcs Connect SA48 to the bottom of KP1 and KP6 by using S8 as shown in FIGURE 8. FIGURE 8...
- Page 27 Having someone holding KP9 to KP1 and KP6 from the outside, secure KP9 with KP1 and KP6 from the inside using S6 as shown in FIGURE 9. FIGURE 9...
- Page 28 STEP 5 Wood boards needed: Hardware needed: * 2pcs SA49 * 1pc SA50 * S6 x 4 pcs * S5 x 4 pcs * 1pc SB32 * 1pc SB33 * S7 x 1 pc * S8 x 1 pc Having someone holding SA49 to KP5 from the outside, secure SA49 with KP5 from the inside using S6 as shown in FIGURE 10.
- Page 29 Connect SB32 and SB33 to SA49 using S5 as shown in FIGURE 11. FIGURE 11...
- Page 30 Connect SA50 to SB33 using S7 as shown in FIGURE 12. Then, connect SA50 to KP5 using S8 as shown in FIGURE 12. FIGURE 12...
- Page 31 STEP 6 Wood boards needed: Hardware needed: * 1pc KP10 * 1pc KP11 * S7x 4 pcs * S8 x 4 pcs * 1pc KP12 * S10 x 4 pcs * U32 x 2 pcs Having someone holding KP10 and KP11 to KP5 from the outside, secure KP10 and KP11 with KP5 from the inside using S8 as shown in FIGURE 13.
- Page 32 Connect KP10 and KP11 to KP5 with U32 by using S10 as shown in FIGURE 14. FIGURE 14...
- Page 33 Connect KP12 to KP10 and KP11 by using as shown in FIGURE 15. FIGURE 15...
- Page 34 STEP 7 Wood boards needed: Hardware needed: * 1pc KP13 * 1pc KP14 * S7 x 4 pcs * S8 x 4 pcs * 1pc KP15 Hold up KP13 and KP14 against to KP2. Secure KP15 to KP13 and KP14 by using S7 as shown in FIGURE FIGURE 16...
- Page 35 Connect KP13 to KP2 by using S8 as shown in FIGURE 17. Please make sure there is no gap in between KP2 and KP13 as shown in the Enlarged Diagram. Enlarged Diagram FIGURE 17...
- Page 36 Connect KP14 to KP2 by using S8 as shown in FIGURE 18. Please make sure there is no gap in between KP2 and KP14 as shown in the Enlarged Diagram. Enlarged Diagram FIGURE 18...
- Page 37 STEP 8 Wood boards needed: Hardware needed: * 2pcs KP16 * 1pc KP17 * S7 x 14 pcs * S10 x * 1pc KP27 From the interior of the playhouse, attach KP16 to KP7 and KP8 together by using S7 as shown in FIGURE FIGURE 19...
- Page 38 Then, attach KP16 to KP7 and KP8 at the other side together by using S7 as shown in FIGURE 20. Please make sure there is no gap in between KP16 as shown in the Enlarged Diagram. Enlarged Diagram FIGURE 20...
- Page 39 Attach KP17 to KP13 and KP14 from the side by using S7 as shown in FIGURE 21. Please make sure there is no gap in between KP16 and KP17 as shown in the Enlarged Diagram. Enlarged Diagram FIGURE 21 Enlarged Attach the hinge on Diagram KP27 to the edge of...
- Page 40 STEP 9 Hardware needed: Wood boards needed: *S5 x 16pcs * KP18 x 2pcs * SB34 x 2pcs * SB35 x 2pcs * SB36 x 2pcs Attach 1pc SB35 and SB36 with 2pcs KP18 by using S5. Then, attach 1pc SB35 and SB36 to the other side of KP18 by using S5 as shown in FIGURE 22.
- Page 41 STEP 10 Hardware needed: Wood boards needed: *S5 x 4pcs *S10 x 4pcs * KP19 x 2pcs Place “Bird house” and KP19 on top of KP16 as shown in FIGURE 24. Make sure the edge of KP19 and KP16 is aligned as shown in the Enlarged Diagram. From the inside of the playhouse, secure KP16 with ”Bird House”...
- Page 42 STEP 11 Hardware needed: Wood boards needed: *S5 x 12pcs * KP20 x 1pc * KP21 x 2pcs * KP22 x 1pc Enlarged Place KP20 and KP21 to KP16 Diagram as shown in FIGURE 25. Please make sure the tip point is aligned with no gap in between as shown in Enlarged Diagram.
- Page 43 STEP 12 Wood boards needed: Hardware needed: * KP23 x 1pc * KP24 x 1pc *S5 x 5pcs * KP25 x 1pc * KP26 x 1pc Attach KP24 to KP13 using S5 as shown in FIGURE 27. FIGURE 27 Place KP25 and KP26 to Enlarged KP13 as shown in FIGURE Diagram...
- Page 44 Place KP23 to KP14 as shown in FIGURE 29. From beneath, attach KP23 with KP14 using S5 as shown in FIGURE 29. FIGURE 29...
- Page 45 CONSUMER PRODUCT SAFETY COMMISSION’S OUTDOOR HOME PLAYGROUND SAFETY HANDBOOK * Select Protective Surfacing—One of the most important things you can do to reduce the likelihood of serious head injuries is to install shock-absorbing protective surfacing under and around your play equipment.
- Page 46 * Placement—Proper placement and maintenance of protective surfacing is essential. Be sure to: * Extend surfacing at least 6 feet from the equipment in all directions. * For to-fro swings, extend protective surfacing in front of and behind the swing to a distance equal to twice the height of the top bar from which the swing is suspended.
-
Page 47: Product Warranty
PRODUCT WARRANTY Sportspower Ltd warrants its products to be free from defects in material and workmanship under normal use and service conditions for 180 days after the date of purchase. Extended warranty for an extra 90 days will be offered to those customers registering their products at www.sportspowerltd.net within 14 days from the date of purchase. - Page 48 SPORTSPOWER IS NOT RESPONSIBLE OR LIABLE FOR INDIRECT, SPECIAL OR CONSEQUENTIAL DAMAGES ARISING OUT OF OR IN CONNECTION WITH THE USE OR PERFORMANCE OF THE PRODUCT OR OTHER DAMAGES WITH RESPECT TO ANY ECONOMIC LOSS, LOSS OF PROPERTY, LOSS OF REVENUE OR PROFITS, LOSS OF ENJOYMENT OR USE, COST OF REMOVAL, INSTALLATION OR OTHER CONSEQUENTIAL DAMAGES.
-
Page 49: Warranty Registration
WARRANTY REGISTRATION Please register on-line at www.sportspowerltd.net to tell us more about yourself. This is not required for validation of the normal product warranty, but when you register on-line, we will offer to you extended warranty of 90 days subject to proof of your purchase.
Need help?
Do you have a question about the Me and My Puppy Playhouse WP-379 and is the answer not in the manual?
Questions and answers