Page 1
English English Automazione Porte e Cancelli 
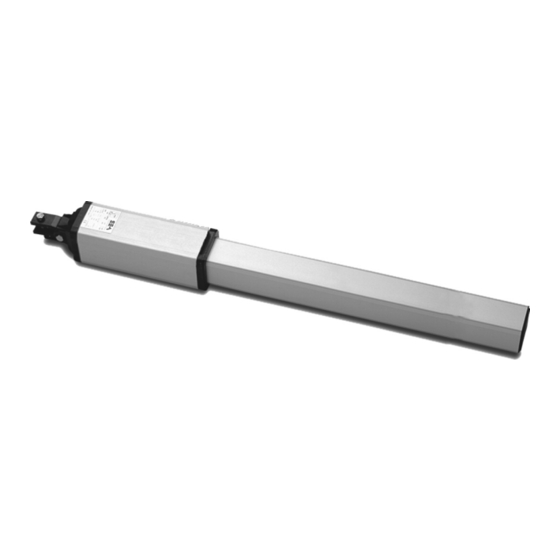
HYDRAULIC OPERATOR FOR SWING GATE MINI TANK MARK TANK INSTALLATION MANUAL and Security Information SEA S.r.l. Zona Ind. S.Atto 64020 TERAMO Italy Tel. +39.0861.588341 - Fax+39.0861.588344 e-mail: seacom@seateam.com WEB SITE : www.seateam.com REV 01 - 07/2006...
Page 2
The Mini Tank and the Mark Tank are supplied with by-pass valves for the power regulation in both opening and closing. Electronic adjustable slow down in opening and closing with control board GATE 2. For the European laws and directives actually in force it is strongly recommended to use the Safety Gate (device for the reading of the gate position), for reverse in case of obstacle.
Page 3
MINI TANK MARK TANK Automazione Porte e Cancelli Fig. 3 REV 01 - 07/2006...
Antenna 10. Column for photocells 11. Warning notice 12. Safety Gate TYPE OF INSTALLATION It is possible to install the Libra Mini Tank with opening inside (Fig.14) or opening outside (Fig.15). Inward installation Outward installation Outside Outside Install the operator always...
Page 5
MINI TANK MARK TANK Automazione Porte e Cancelli INWARD INSTALLATION Total stroke 270 mm - max suggested stroke 250 mm outside Max stroke Stroke Opening (mm) (mm) for 90° (mm) (mm) (mm) Angle 110° 90° 110° 90° 105° 90° 90°...
Page 6
MINI TANK MARK TANK Automazione Porte e Cancelli INSTALLATION OF THE OSCILLATING REAR BRACKET Open carefully the package, making sure not to loose parts which are listed in fig. 3 Attach the rear oscillating bracket as shown in fig. 9 Attention: Do not use a hammer for the insertion of the short brass pin;...
Page 7
MINI TANK MARK TANK Automazione Porte e Cancelli POSITIONING OF THE FRONT BRACKET Once the operator is attached to the post and the leaf set in the closed position execute the following operations: Release the operator (as in fig. 23 pag.11) Pull-out completely the chromate shaft and push it back in 1cm Attach the shaft to the front bracket (Fig.
Page 8
(Fig.16) Fix the positive stops with the provided screws Only Mini Tank : Put the provided bush (A) into the shaft at this point couple the shaft to the front bracket To adjust the positive stops in opening act on disk 1 and in closing act on disk 2.
Page 9
MINI TANK MARK TANK Automazione Porte e Cancelli TORQUE ADJUSTMENT (by pass valves) Acting on the by-pas Fig. 20 valves, it is possible to a d j u s t t h e o p e r a t o r...
1) Check the solidity and the stability of the gate, especially the points of support and/or rotation of Annual the gate (pivots). 2) Check the oil level of the hydraulic/in oil bath operators (cap on rear cover of the Mini Tank) Annual 3) Change the hydraulic oil with the one recommended from the head company...
INITIAL TEST AND STARTING OF THE AUTOMATION After having completed the necessary operations for a correct installation of the Mini Tank or Mark Tank product, as described in this manual, and after having valuated all resting risks which could arise in any installation, it is necessary to test the automation to guaranty the maximum security and, in particular way, to guaranty that the laws and norms of this sector are fully respected.
Page 12
The Mini Tank and Mark Tank operators are guaranteed for a period of 36 months. The guarantee period starts from the date stamp printed on the unit. The Mini Tank and Mark Tank guarantee will be void if the unit has been incorrectly installed, not used for the purpose intended, tampered with or modified in any way.
Need help?
Do you have a question about the MINI TANK and is the answer not in the manual?
Questions and answers