
Subscribe to Our Youtube Channel
Related Manuals for Gorenje WCIU2090A1


Summary of Contents for Gorenje WCIU2090A1
- Page 1 DETAILED INSTRUCTIONS FOR USE OF WINE COOLER 酒柜使用说明书 WCIU2090A1 WCIU3090A1 WCIU609BA2 www.gorenje.com www.gorenje.com...
- Page 2 Please visit our website where you can enter your appliance model number, indicated on the rating plate or the warranty sheet, to find detailed description of your appliance, tips on use, troubleshooting, service information, instructions for use etc. http://www.gorenje.com Important safety warning General warnings and tips Protecting the environment...
-
Page 3: Table Of Contents
CONTENTS INTRODUCTION 4 IMPORTANT NOTES AND PRECAUTIONS 4 BEFORE USING THE APPLIANCE FOR THE FIRST TIME 5 IMPORTANT SAFETY INSTRUCTIONS 8 IMPORTANT INFORMATION ON THE USE OF APPLIANCE 9 ENVIRONMENT PROTECTION 10 ADVICE FOR SAVING POWER WITH REFRIGERATION APPLIANCES APPLIANCE 11 INSTALLATION AND CONNECTION DESCRIPTION 13 APPLIANCE DESCRIPTION... -
Page 4: Important Notes And Precautions
IMPORTANT NOTES AND PRECAUTIONS BEFORE USING THE APPLIANCE FOR THE FIRST TIME Before connecting the appliance to the power mains, please read carefully the instructions for use which describe the appliance and its correct and safe use. The instructions apply to several appliance types/models; thus, settings or equipment may be described herein which is not available in your appliance. -
Page 5: Important Safety Instructions
IMPORTANT SAFETY INSTRUCTIONS WARNING! Risk of fire/flammable materials. The appliance must be connected to the power mains and grounded in compliance with the effective standards and regulations. WARNING! Do not locate multiple portable socket-outlets or portable power supplies at the rear of the appliance. Before cleaning the appliance, unplug it from the power mains (unplug the power cord from the wall outlet). - Page 6 Under no circumstances should any external covers be removed for servicing or maintenance except by suitably qualified personnel. WARNING: Do not damage the refrigerant circuit. Safety of children and vulnerable persons The appliance is not intended for use by persons (including children) with reduced physical, sensory or mental capabilities, or lack of experience and knowledge, unless they have been given supervision or instruction concerning...
- Page 7 For European markets only This appliance can be used by children aged from 8 years and above and persons with reduced physical, sensory or mental capabilities or lack of experience and knowledge if they have been given supervision or instruction concerning use of the appliance in a safe way and understand the hazards involved.
-
Page 8: Important Information On The Use Of Appliance
IMPORTANT INFORMATION ON THE USE OF APPLIANCE WARNING! This appliance is intended to be used in household and similar applications such as: – staff kitchen areas in shops, offices and other working environments; - farm houses and by clients in hotels, motels and other residential type environments;... -
Page 9: Environment Protection
Technical information on the appliance Rating plate can be found in the back of appliance. It indicates data on voltage, gross and net volume, type and amount of refrigerant, and information on the climate classes. ENVIRONMENT PROTECTION Packaging is made of environmentally friendly materials that can be recycled, disposed of, or destroyed without any hazard to the environment. -
Page 10: Advice For Saving Power With Refrigeration Appliances
ADVICE FOR SAVING POWER WITH REFRIGERATION APPLIANCES • Install the appliance as specified in the instruction manual. • Occasionally make sure air circulation underneath the appliance is unobstructed. • If the gasket is damaged or does not provide a perfect seal for any reason, have it replaced as soon as possible. -
Page 11: Installation And Connection
INSTALLATION AND CONNECTION SELECTING THE ROOM • Install the appliance in a dry and well ventilated room. The appliance will operate correctly if the environment temperature is in the interval specified in the table. The appliance class is indicated on the rating plate / label with the basic information on the appliance. - Page 12 CONNECTING THE APPLIANCE WARNING! This appliance must be earthed. The mains lead of this appliance has been fitted with a BS 1363A 13 amp fused plug. To change a fuse in this type of plug, follow the steps below: 1. Remove the fuse cover and fuse. 2.
-
Page 13: Appliance Description
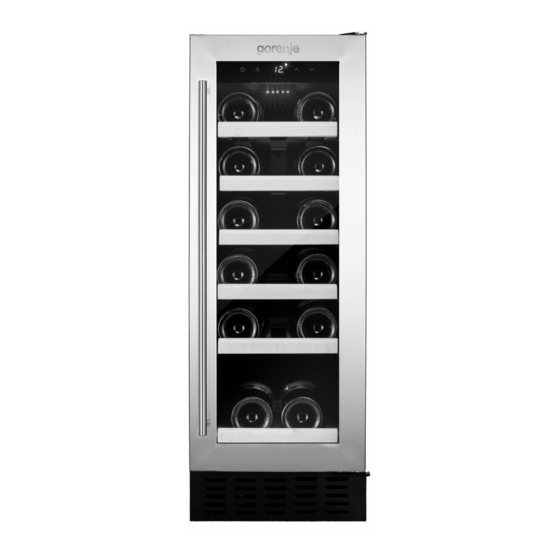
APPLIANCE DESCRIPTION Appliance interior equipment may change according to the appliance model. 1 Control unit 2 LED lighting 3 Pull-out shelves (max capacity: see page 19) 4 Adjustable- height feet... -
Page 14: Operating The Appliance
OPERATING THE APPLIANCE WCIU2090A1 A Power button B Light button C »+« button D »-« button WCIU3090A1 A Power button B Light button C »+« button D »-« button WCIU609BA2 A Power button B Light button C »+« button D »-« button... - Page 15 TO SWITCH THE POWER ON/OFF - ALL MODELS • Press and hold the power button A for approximately 4 seconds to switch the wine cooler on. • Press and hold the power button A for approximately 4 seconds to switch the wine cooler off. TO CHANGE THE TEMPERATURE - ALL MODELS •...
- Page 16 TO CHANGE THE TEMPERATURE READING - WCIU2090A1, WCIU3090A1 You can change the temperature display reading from Fahrenheit to Celsius, or Celsius to Fahrenheit. • The control panel must be locked (see page 14). • Press and hold the C or D buttons for approximately 4 seconds.
- Page 17 TEMPERATURE DISPLAY This appliance has two options for the temperature display. One option shows the set or target temperature in the wine cooler. The other option shows the real temperature within the wine cooler, and can be useful for actively monitoring the wine cooler's behaviour.
- Page 18 QUIET MODE This appliance has a quiet mode. Whilst active, and once the set temperature is reached, the appliance slows down the internal fan(s) to reduce the running noise. To deactivate quiet mode The control panel must be locked (see page 14). Press and hold the light button B for approximately 3 seconds.
-
Page 19: Appliance Interior Equipment
(as shown in Fig). Then lift the shelf up and pull forwards. • To replace the shelves, follow the steps above in reverse order. STORAGE DIAGRAM Number of bottles WCIU3090A1 WCIU609BA2 WCIU2090A1 Total number of bottles... -
Page 20: Cleaning The Appliance
CLEANING THE APPLIANCE Before cleaning, unplug the appliance from the power mains – switch off the appliance (see chapter Switching the Appliance On/Off) and unplug the power cord from the wall outlet. • Use a soft cloth to clean all surfaces. Cleaners that contain abrasive substances, acids, or solvents are not suitable for cleaning as they may damage the surface. -
Page 21: Troubleshooting
• The light button is not set to off (unlock the panel The light does not work, first as per page 14). check Please note: The LED lighting cannot be replaced without a service call. If the light fails, contact Gorenje Customer Care. - Page 22 • The temperature sensor has failed. Please contact or “HH” Gorenje Customer Care. If the above tips do not resolve your problem, call the nearest authorized service centre and state the type, model, and serial number indicated on the appliance...
-
Page 23: Installing The Wine Cooler
The minimum space required is: WCIU2090A1 – 150mm W x 570mm D x 830/890mm H WCIU3090A1 – 300mm W x 570mm D x 830/890mm H WCIU609BA2 – 600mm W x 570mm D x 830/890mm H... - Page 24 To install the handle IMPORTANT: DO NOT REMOVE THE SCREWS FROM THEIR POSITION IN THE DOOR (Fig. 4) PRIOR TO FITTING THE HANDLE AS FIXINGS MAY DROP INTO THE DOOR. The door seal holds the screws in place during transit. Do not overtighten the screws, and do not use power tools to install the handle.
- Page 25 Do not tilt the appliance backwards further than an angle of 60° (Fig.5). M in. Fig. 5 1. With the help of another, open the door and support it. Loosen and remove the two screws from the pivot plate of the lower right hinge, as per Fig. 6. Pivot plate Screw Fig.
- Page 26 3. Remove the three screws from both the upper hinge and the lower hinge, taking care not to let them fall, as per Fig. 8. Remove the hinges and place them somewhere safe in case they are needed in the future. Upper Right Hinge Bottom Right Hinge Fig.
- Page 27 5. Fit the supplied upper left hinge and lower left hinge to the appliance as per Fig. 10. These are mirror opposites of their right-handed counterparts. Upper Left Hinge Bottom Left Hinge Fig. 10 6. Turn the door around by 180° (upside down) so that the handle is now on the right (Fig.
- Page 28 7. Guide the door onto the upper hinge pivot and manoeuvre the lower part of the door and pivot plate onto the lower hinge. Align the pivot plate holes with the hinge plate holes. 8. Reinsert the two screws that you removed in step 1 and tighten them. Check that the door sits level with the appliance.
- Page 29 Fig. 14 Fig. Fig. 16...
- Page 30 1. Loosen the two screws on each side of the plinth trim (four altogether - Fig. 17). 2. Carefully guide the front trim down until the desired height is achieved. Tighten the screws. Fig. 17 Gorenje, d.o.o. Partizanska 12 SI - 3320 Velenje, Slovenija info@gorenje.com www.gorenje.com...
- Page 31 我們感謝您購買我們的產品。為了便於使用,我們提供了詳細的使用說明。這些說明能使 您能夠盡快了解您的新設備。 我們希望您能從中得到很多樂趣。 此電器僅供家庭使用。 請訪問我們的網站,在那裡您可以輸入您的設備型號,設備型號會顯示在銘牌或保修單 上,以查找您的設備的詳細說明,使用提示,故障排除,服務信息,使用說明等。 http://www.gorenje.com 重要安全警示 一般警告和提示 保護環境 請勿在洗碗機裡清洗...
- Page 32 内容 介紹 重 重 要 要 提 示 及 注 意 事 項 在 第 一 次 使 用 設 備 之 前 重 要 的 安 全 指 引 使 用 器 具 的 重 要 信 息 環 境...
- Page 33 重要提示及注意事項 在第一次使用設備之前 在將設備連接到電源之前,請仔細閱讀描述設備及其正確和安全使 用的使用說明。本說明適用於幾種設備類型/型號;因此,此處可能 描述的設置或設備在您的設備中不可用。我們建議保存本使用手冊 以備將來參考,如果將來出售,請將其附在設備上。 檢查您的設備是否有任何損壞或異常。如果您發現您的設備損壞, 請通知您購買設備的零售商。 在將設備連接到電源之前,讓設備在垂直位置放置至少24小時。這 將減少由於運輸對冷卻系統的影響而導致操作故障的可能性。...
- Page 34 重要的安全指引 警告!火災/易燃材料風險。 設備必須連接到電源並按照有效的標準和規定接地。 警告!請勿在設備後部放置多位元可擕式插座或可擕式電源。 清潔設備前,請將其從電源線上拔下(從牆上的電源插座上拔下電 源線)。 警告!如果電源線損壞,必須由製造商、其服務代理或類似的合格 人員更換,以避免危險。 警告!放置設備時,請確保電源線沒有被夾住或損壞。 如果LED燈不亮,請致電維修技師。不要試圖自己修理LED燈,因為 有接觸高壓的危險! 警告!請勿在設備內部使用任何電氣設備,除非該製冷設備的 製造商允許。 警告!除製造商推薦的設備外,不要使用機械設備或其他方式 加速除霜過程。 警告!為避免設備穩定性差造成的任何危險,請確保按照說明 安裝。 在任何情況下,均不得拆除任何外部蓋進行維修或維護,除非由適 當的合格人員進行。 警告:不要損壞製冷劑回路。 兒童和弱勢群體的安全 除非由負責其安全的人監督或指導身體、感官或精神能力下降或缺 乏經驗和知識的人(包括兒童)使用本器具,否則本器具不供其使 用。...
- Page 35 應監督兒童,確保他們不玩電器。 未經監督,兒童不得進行清潔和使用維護。 未經監督,兒童不得進行清潔和使用維護。 在運輸過程中,移除用於保護設備或特定部件的包裝,並將其放在 兒童夠不著的地方。 有受傷或窒息的危險。 如果對8歲及以上兒童和身體、感官或精神能力下降或缺乏經驗和知 識的人進行了安全使用設備的監督或指導,並瞭解所涉及的危險, 則他們可以使用本設備。 兒童不得玩該器具。 未經監督,兒童不得進行清潔和使用維護。 有關製冷劑的警告 該設備含有少量環保但易燃的R600A氣體。請確保冷卻系統的任何 部件都沒有損壞。氣體洩漏對環境無害,但可能導致眼睛受傷或導 致起火。 如果發生氣體洩漏,請徹底通風,斷開設備與電源的連接,並致電 維修技師。 在處理電器之前,請使產品遠離火或類似的發光物質。全球變暖潛 能值:R600A=3...
- Page 36 使用器具的重要資訊 警告!本設備擬用於家用和類似用途,例如: - 商店、辦公室和其他工作環境中的員工廚房區域; - 酒店、汽車旅館和其他居住環境中的農舍和客戶; - 床和早餐型環境; - 餐飲和類似的非零售應用。 本設備僅供家用,僅用於儲存密封瓶裝葡萄酒和飲料。 警告!保持設備外殼或內置結構中的通風孔沒有障礙物。 設備不得在室外使用,也不得在雨中使用。 請勿將爆炸性物質(如裝有易燃推進劑的氣霧罐)儲存在本設備 中。 如果設備將長時間停用,請使用相關按鈕將其關閉,並將其從電源 上拔下。把電器倒空,解凍,清洗,然後把門半開著。 設備技術資訊 銘牌可在電器背面找到。它顯示有關電壓、總容積和淨容積、製冷 劑類型和數量以及氣候等級資訊的資料。...
- Page 37 環境保護 包裝材料為環保材料,可回收、處理或銷毀,不會對環境造成任何 危害。 報廢過時的設備 為了保護環境,請將廢棄的家電送到授權的家電收集中心。 執行此操作之前,請執行以下操作: • 斷開設備與電源的連接; • 不要讓孩子們玩這個設備。 警告!不要損壞製冷劑回路。這也可以防止污染。 產品或其包裝上的符號表明,產品不應作為正常的生活垃圾處理。產品應送 至授權的廢電器和電子設備處理收集中心。正確處理產品有助於防止不正確 的產品移除可能對環境和人的健康產生的任何負面影響。如需瞭解有關產品 移除和處理的詳細資訊,請聯繫負責廢物管理的相關市政機構、您的廢物處 理服務機構或您購買產品的商店。...
- Page 38 製冷設備節能建議 • 按照說明書的規定安裝設備。 • 偶爾檢查確保設備下方的空氣流通暢通無阻。 • 如果墊圈損壞或因任何原因無法提供完美的密封,請儘快更換。 • 在有風扇的電器中,不要阻塞風扇槽或通風口。 • 只能將葡萄酒儲存在密封容器中。 • 不要使機櫃過載。 • 僅在必要時打開門。長時間打開門會導致設備隔間的溫度顯著升高。 • 不要用鋁箔或其他任何能阻止空氣在機櫃周圍迴圈的東西覆蓋貨架。 • 為防止損壞門密封,在拆卸架子之前,確保門完全打開。 • 滿載時,不要將貨架拉到防停位置以外(大約三分之一伸出)。 • 本設備僅用於儲存葡萄酒。 • 如果停電,盡可能保持車門關閉,以保持內部工作溫度。如果電源故障持續很長一段 您應該採取措施保護酒櫃的內容物不受溫度上升的影響。酒櫃將記住所選的溫度設置, 並在電源恢復後恢復這些設置。...
- Page 39 安裝與連接 選擇房間 • 將設備安裝在乾燥通風的房間內。如果環境溫度在表中指定的時間間隔內,設備將正常 工作。設備類別顯示在銘牌/標籤上,上面有設備的基本信息。 氣候類型 環境溫度 相對濕度 SN (亞溫帶) +10 °C - +32 °C N (溫帶) +16 °C - +32 °C ≤75% ST (亞熱帶) +16 °C - +38 °C T (熱帶) +16 °C - +43 °C • 請勿將設備放置在溫度可能降至5°C以下的房間內,否則可能導致設備異常運行或 故障! •...
- Page 40 設備說明 電器內部設備可根據電器型號進行更換。 1 控制單元 2 LED照明 3 拉出式層架(最大容量:見第 46頁) 4 可調高度箱腳...
- Page 41 操作設備 WCIU2090A1 A 電源開關 B 燈開關 C 升溫開關 D 降溫開關 WCIU3090A1 A 電源開關 B 燈開關 C 升溫開關 D 降溫開關 WCIU609BA2 A 電源開關 B 燈開關 C 升溫開關 D 降溫開關 E 攝氏華氏切換開關 F 溫區選擇 鎖定/解鎖控制面板-所有型號 • 按住電源按鈕A和燈按鈕B約4秒鐘。 • 大約15秒不活動後,控制面板自動鎖定。...
- Page 42 打開/關閉電源-所有型號 • 按住電源按鈕A約4秒鐘,打開酒櫃。 • 按住電源按鈕A約4秒鐘,關閉酒櫃。 改變溫度-所有型號 • 如有必要,根據第14頁打開控制面板。 • 按下C或D按鈕,知道顯示屏上顯示所需溫度。 • 當溫度調節激活或設置不同溫度時,顯示屏閃爍。 • 設備將持續工作,直到達到正確的溫度。壓縮機和製冷系統的持續噪聲正常。 • 如果設備已關閉,應在再次打開前留出5分鐘,以防止對壓縮機造成不必要的損壞。 • 當設備首先達到正確溫度時,LED顯示屏可能不會顯示所選溫度。這是正常的, 設備運行幾個小時後,將自動更正顯示。 更改區域控制 - WCIU609BA2 • 如有必要,根據第14頁打開控制面板。 • 按下按鈕F。“激活”顯示將閃爍。 • 上部區域的溫度範圍為5°C至12°C(左顯示),下部區域的溫度範圍為 12°C至22°C(右顯示)。 注意! 上下艙室的調節溫度相互連接。某些組合設置不可用。...
- Page 43 改變溫度讀數 - WCIU2090A1, WCIU3090A1 您可以將溫度顯示讀數從華氏度更改為攝氏度,或從攝氏度更改為華氏 度。 • 控制面板必須鎖定(見第14页)。 • 按住C或D按鈕約4秒鐘。 改變溫度讀數 - WCIU609BA2 您可以將溫度顯示讀數從華氏度更改為攝氏度,或從攝氏度更改為華氏度。 • 如有必要,根據第14頁打開控制面板。 • 按E按鈕。 最佳溫度選擇 下表列出了不同類型葡萄酒的建議儲存溫度。對於大多數類型的人來說,這也是理想的飲 用溫度。 酒的種類 建議溫度 紅葡萄酒 15 - 18°C (59°F-64°F) 乾白葡萄酒 9 - 14°C (48°F-57°F) 桃紅葡萄酒 10 - 11°C (50°F-52°F) 起泡酒 5 - 8°C (41°F-46°F) 使用内部光纖...
- Page 44 溫度顯示 這個設備有兩個溫度顯示選項。一個選項顯示酒櫃中的設定或目標溫度。另一個選線顯示 酒櫃内的真實溫度,可用於主動監測酒櫃的活動情況。有關這些顯示選項的說明和進一步 信息如下所示。 顯示設定溫度 • 溫度顯示將顯示設定溫度(酒櫃正在工作以達到的溫度)。 • 溫度旁邊的小數點“.”表示酒櫃正在工作以達到設定溫度。當小數點消失或不存在時, 酒櫃的傳感器檢測到已達到設定溫度。當冷卻系統啟動以保持溫度時,小數點可能會定 期重新出現。 • 當溫度調節激活或設置不同溫度時,顯示屏閃爍。 顯示實際溫度 • 溫度顯示器將顯示酒櫃内的真實或實際溫度。 • 溫度旁邊的小數點“.”表示酒櫃正在工作以達到設定溫度。當小數點消失或不存在時, 酒櫃的傳感器檢測到已達到設定溫度。當冷却系统啟動以保持溫度時,小數點可能會定 期重新出現。 • 當溫度調節激活或設置不同溫度時,顯示屏閃爍。 更改溫度顯示 • 控制面板必須鎖定(見第14页)。 • 按住燈按鈕B和D約2秒鐘。 • 顯示器將顯示“02”或“01”,具體取決於激活的顯示設備。 • 使用按鈕D在“02”和“01”之間交換。02'為設定溫度顯示模式,01'为實際溫度顯示 模式。一旦您所需的模式顯示在顯示屏上,無需觸摸大約5秒鐘。設備應發出嗶嗶聲並切換到 新的顯示模式。...
- Page 45 靜音模式 這個設備有靜音模式。當處於活動狀態時,壹旦達到設定溫度,設備將減慢內部風扇的速 度,以降低運行噪音。 關閉靜音模式 必須鎖定控制面板(見第14頁)。按住燈按鈕B約3秒鐘。根據您是否將顯示設 置為華氏度或攝氏度,°C或°F符號將長亮,以指示該模式處於非活動狀態。 啟動靜音模式 必須鎖定控制面板(見第14頁)。按住燈按鈕B約10秒鐘。取決於您是否將顯示 設置為華氏度或攝氏度,°C或°F符號將開始閃爍,以指示模式處於活動狀態。 溫度報警器 如果溫度上升或下降超出設定溫度範圍,將發出警報,顯示屏可能顯示故障。這可能是 因為: • 葡 萄 酒 冷 卻 器 尚 未 達 到 設 定 溫 度 ( 首 次 打 開 時 ) , 或 需 要 很 長 時 間 才 能 達 到 。 • 停電。...
- Page 46 電器内部設備 層架 (只適用於型號 WCIU3090A1, WCIU609BA2) • 要移除架子,首先移除架子上的所有瓶 子,然後向前拉動架子,直到架子兩邊的 凹槽与櫥櫃兩邊的塑料釘齊平(如圖所 示)。然后抬起架子並向前拉。 • 要更換擱板,請按相反順序執行上述步 骤。 裝酒示意圖 每層裝酒數量 WCIU609BA2 WCIU2090A1 WCIU3090A1 總裝酒數量...
- Page 47 清潔用具 清潔前,從電源上拔下設備-關閉設備(請參閱“打開/關閉設備”一章)並從墻上 的插座上拔下電源線。 • 用軟布清潔所有表面。含有研磨性物質、酸或溶劑的清潔劑不適合清潔,因為它們可能 會損壞表面。 用水或溫和的肥皂水清洗設備外部。 用海綿和小蘇打溶液擦拭內表面。溶液應該是大約2湯匙的小蘇打和1夸脫(约1升)的溫 水。用溫和的洗滌劑溶液清洗架子。在放回酒櫃之前,讓木架子晾乾。 不要在不鏽鋼上使用鋼絲絨或鋼刷。這些會用鋼顆粒划傷不鏽鋼,並可能發生生鏽。 電器内部可以用溫水清洗,可以加些醋。 不要在洗碗機中清洗電器内部設備的零件,因為它們可能會損壞。...
- Page 48 • 側壁和後壁有足够的通風。 • 環境溫度在16°C到38°C之間。 • 設備水平穩定。 電器有噪音,檢查一下 • 即使壓縮機不運行,冷卻氣體也會發出一些噪音。 • 在運行過程中,風扇運轉正常,即使壓縮機不運轉。 • 這是一種在高溫高濕環境中無法完全避免的瞬態現象。當 架子上的冷凝水(露水) 溫度和濕度正常化時,它就會消退。 設備經常打開和關閉冷卻 • 内部溫度波動,導致系統啟動冷卻。. • 設備有電源。 • 房屋保險絲或斷路器完好無損,插頭中的保險絲未熔斷。 燈不亮,檢查一下 燈按鈕未設置為關閉(根據第14頁先解鎖面板)。請注 意:如果没有服務電話,則無法更換LED燈。如果指示燈 出現故障,請聯繫Gorenje客户服務中心。 • 設備水平穩定。 • 如果已拆下車門,則可能未正確重新安裝。 門關不好,檢查一下 • 門封條是否髒。 • 架子擺放正確。 顯示屏顯示“LL” • 溫度傳感器出現故障。請聯繫Gorenje客户服務部。 或“HH”” 如果上述提示不能解决您的問題,請致電最近的授權服務中心,並說明設備内部設備銘牌或 標籤上顯示的類型、型號和序列號。...
- Page 49 該設備應安裝在兩個物體之間的空間中。如果要在開放空間中獨立放置,請確保其不會造 成傷害或損壞。 所需的最小空間是: WCIU2090A1 – 150mm 寬度 x 570mm 深度 x 830 / 890mm 高度 WCIU3090A1 – 300mm 寬度 x 570mm 深度 x 830 / 890mm 高度 WCIU609BA2 – 600mm 寬度 x 570mm 深度 x 830 / 890mm 高度 請注意:安裝產品時,設備頂部和工作台底部之間應有一個小的通風間隙(6 毫米或...
- Page 50 安裝把手 重要提示:安裝把手之前,請勿從其原來的位置上卸下螺釘,門把手墊片(圖 4)可能會 掉進去門中。在運輸過程中,門封將螺絲固定在適當的位置。請勿過度擰緊螺釘,也不要 使用電動工具安裝把手 。 門玻璃 圖 4 螺絲孔+螺絲 Screw hole + screw 1. 如圖 4 所示,從玻璃測拉下門密封條,露出螺絲孔。將螺絲刀放在螺絲上,並將其固定 到位。 2. 小心地將手柄放在固定螺釘上。 3. 用螺絲刀擰緊固定螺釘以固定把手。重複使用剩餘的手柄固定螺絲。 重要說明:安裝把手時,請注意不要損壞門。設備所提供的保修可能不涵蓋所造成的損 壞。 左右換門時 以下說明基於帶門鉸的酒櫃右邊。 我們强烈建議在此過程中尋求至少另一個人的幫助。 在開始換門之前,請確保您具有左測的上下門鉸。這些是隨您的產品一起提供。...
- Page 51 請勿將設備向後傾斜超過 60°的角度(圖 5)。 至少 圖 5 Fig. 5 1. 在另一個人的幫助下,打開門並提供支撐。如圖 6 所示,從右下門鉸的樞軸板上松開並 卸下兩顆螺釘。 樞軸 Pivot plate 擰 Screw 圖 6 Fig. 6 2. 如圖 7 所示,將門從價格稍微移開,然後從門的底部卸下樞軸板。從上門鉸放下門體, 並將其放在安全的地方,既不會造成損壞,也不會被損壞。 門 Door 圖 7 樞軸 Pivot plate Fig. 7...
- Page 52 3. 如圖 8 所示,從上門鉸和下門鉸上卸下三顆螺釘,注意不要讓它們掉落。卸下門鉸,並 將它們放在安全的地方,以防將來需要它們。 4. 如圖 9 所示,從左測門鉸位置取下塑料蓋,然後將它們安裝到現在空的右測門鉸孔中。...
- Page 53 5. 按照圖 10 將隨附的左上門鉸和左下門鉸安裝到產品上。這是它們右手對應的反面。 樞軸 圖 10 6. 將门旋轉 180°(上下顛倒),以使把手現在位于右測(圖 11)。如圖 12 所示,將樞軸 板插入門的底部。 圖 11 圖 12 Fig. 11 Fig. 12...
- Page 54 7. 將門引導到上門鉸樞軸上,並將門的下部和樞軸板操縱到下門鉸上。將樞軸孔对准門鉸 孔。 8. 重新插入在步驟 1 中卸下的兩顆螺釘,然後擰緊它們。檢查門是否与設備齊平。如果没 有,則樞軸板會進行一些調整-鬆開刚擰緊的螺釘,並根據需要調整門。 左下鉸鏈 Bottom left hinge 樞軸板 Pivot plate 螺絲(2个) Screws (2pcs) 圖 13 Fig. 13 安裝底座 本產品的可拆百頁/格柵包裝在内部,可以在以下情况下安裝想要的。請按照以下步驟操 作: 1. 找到可拆百頁(包裝在設備内部) 2. 卸下底座部分(每測兩個)上的四顆螺釘,但請小心支撐兩個部分,以防止可調節部分 掉落。拆下可調節的前部並將其放在安全的地方。 3. 在另一個人的幫助下,確保酒櫃牢固並向后傾斜以完全進入門下方區域。 確保在此過程 中始終保持門關閉,以免損壞門和設備。 4. 如果存在,請卸下箭頭所示並在圖 14 中標記為“ A”的兩個螺釘。 然後,找到四顆黑色的固定螺釘。這些及閘翻轉門鉸包裝在產品內部。 5.
- Page 55 圖 14 Fig. 14 圖 15 Fig. 圖 16 Fig. 16...
- Page 56 8. 調整酒櫃箱腳,使酒櫃達到您所需的高度。如有必要,用步驟2中拆下的四個螺釘重新連 接可調百頁擋板部分。穩穩地將酒櫃豎起-如果可延伸部分會弄髒地板或類似物,請將其 拆下。讓酒櫃靜置24小時,然後將其插入櫥櫃。這將有助於防止損壞系統。 調節可調百頁擋板 該產品的百頁/格柵帶有可調節的部分。調整可拆百頁擋板的過程很簡單,可以通過以下步 驟實現。當產品全部四腳站立並且不承重於可拆百頁的情況下,請執行以下步驟。 1. 鬆開可拆百頁擋板兩側的兩個螺釘(總共四個-圖 17)。 2.小心地向下引導前飾板,直到達到所需的高度。擰緊螺絲。 圖 Fig. 17...
Need help?
Do you have a question about the WCIU2090A1 and is the answer not in the manual?
Questions and answers