
Related Manuals for Metos BRATT PAN


Summary of Contents for Metos BRATT PAN
- Page 1 BRATT PAN VIKING MIXPAN Type (litres): 150, 250 Installation and Operation Manual Translation of the original manual in Finnish Rev. 1.0 (2.2.2022) From 4.1.2022 4224258, 4224260...
-
Page 2: Table Of Contents
4.1.1. Preparing the use ............................14 4.2. Operation ..............................14 4.2.1. Connecting the main power to the bratt pan .....................14 4.2.2. Setting the frying temperature ........................15 4.2.3. Frying temperature ............................15 4.2.4. Mixer operation ............................16 4.2.5. Tilting the bratt pan............................18 4.2.6. Water fi lling (option) ..........................19 4.3. - Page 3 VIKING MIXPAN Rev. 1.0 (8.2.2022) 5.7. Electrical connections ..........................34 5.8. Water connection ............................37 5.8.1. Water connection and quality requirements .....................38 5.9. Ventilation ..............................39 5.10. Other installations .............................39 5.10.1. Adjusting the tilting ...........................39 5.10.2. Earth leakage circuit breaker test (option) ....................40 5.11.
-
Page 4: General
VIKING MIXPAN General Rev. 1.0 (8.2.2022) General Carefully read the instructions in this manual as they contain important information regarding proper, ef- fi cient and safe installation, use and maintenance of the appliance. Keep this manual in a safe place for eventual use by other operators of the appliance. The installation of this appliance must be carried out in accordance with the manufacturer’s instructions and following local regulations. -
Page 5: Safety
Children should be watched to ensure that they do not play with the appliance. 2.2. Safe use of the appliance Because the bratt pan is a heated appliance that has hot surfaces during normal use, the following warn- ings and instructions must be followed to avoid burns: •... -
Page 6: Changing The Settings And Adjustments
VIKING MIXPAN Safety Rev. 1.0 (8.2.2022) 2.3. Changing the settings and adjustments Technical adjustments to the appliance must be performed by a qualifi ed and well trained person. 2.4. Safety instructions in the event of malfunction In case of a serious emergency, all functions of can be stopped by peshing the emergency/stop button. In case the reason for using the stop switch is a serious malfunction jeopardizing safety at work, contact an authorized service provider immediately 2.5. -
Page 7: Warnings
• It is under all circumstances absolutely forbidden to use the mixer without the safety lid. • To prevent stress injuries do not lift the mixing tool from the bratt pan when it is in a vertical position. Tilt the bratt pan in a horizontal position and remove the mixing tool. -
Page 8: Functional Description
The material of the metal scrapers available as an accessory for the bratt pan has been carefully selected and is safe to use in the bratt pan. 3.1.1. Use for other purposes The manufacturer does not take responsibility for functional troubles or damages caused by misuse or use for other purposes than stated above. -
Page 9: Accessories
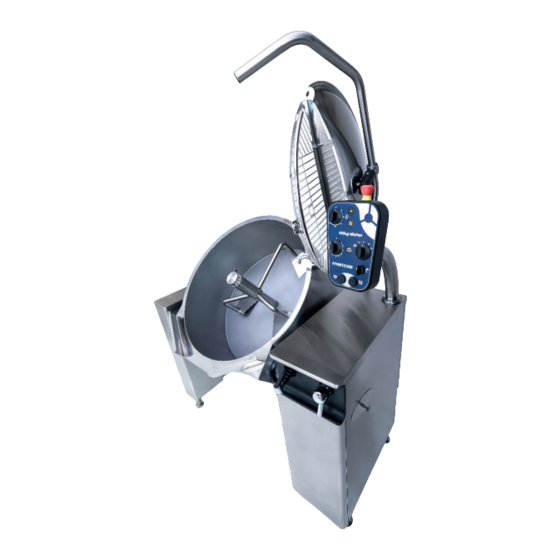
Rev. 1.0 (8.2.2022) 3.4. Accessories Each model of bratt pan may have the following optional accessories (refer to the below picture): - Cold water fi lling, manual / automat - Cold water from network is poured into the bowl through the spout built into the lid. The cold water connection G1/2 ”is located on the rear wall of the control pillar. - Page 10 VIKING MIXPAN Functional description Rev. 1.0 (8.2.2022) 1. Safety lid 2. Lifting arm 3. Locking lever of the lid 4. Safety grid for fi ll opening 5. Safety switch 6. Cover for fi ll opening (not shown in picture) Mains switch 1.
-
Page 11: Control Panel
Rev. 1.0 (8.2.2022) 3.6. Control panel The control panel and the available functions on the bratt pan are different depending on what options are available. This manual covers all options. The functions and controls depends on selected features: The functions of the different versions are:... - Page 12 VIKING MIXPAN Functional description Rev. 1.0 (8.2.2022) Viking MixPan with manual water fi lling Viking 1. Power regulator 2. Heating on indicator 3. Mixing speed regulator 4. ”Mixer ON” indicator 5. Manual water fi lling 6. Pan tilting 7. Return pan to upright position 8.
- Page 13 VIKING MIXPAN Functional description Rev. 1.0 (8.2.2022) Viking MixPan with automatic water fi lling Viking 1. Power regulator 2. Heating on indicator 3. Mixing speed regulator 4. ”Mixer ON” indicator 5. Automatic water fi lling 6. Pan tilting 7. Return pan to upright position 8.
-
Page 14: Operating Instructions
Due to the very short preheating time of the bratt pan, energy can be saved by not switching the pan on until the frying is started. If there is a longer pause during the frying, the bratt pan can be switched off or the temperature can be set to a lower value. -
Page 15: Setting The Frying Temperature
VIKING MIXPAN Operation instructions Rev. 1.0 (8.2.2022) 4.2.2. Setting the frying temperature The frying temperature can be changed by turning the thermostat knob to the desired temperature. When lowering the temperature, some time will be needed for the frying surface to cool down. Increas- ing of the temperature turns on the white pilot light. -
Page 16: Mixer Operation
It is easiest to attach the mixing tool to the mixer axle when the bratt pan is in a tilted position. Push the ring on the mixing tool into the bratt pan’s mixer axle and fi t the mixing tool in place,... - Page 17 VIKING MIXPAN Operation instructions Rev. 1.0 (8.2.2022) Manual operation of the mixer 1. Make sure that the emergency/stop button is not pressed down. If pressed, release it by turning it clockwise until it jumps up. 2. Choose mixing in one direction by turning the mixing program selector switch (1) from position 0 to position or choose auto-reverse mixing by turning this switch from position 0 to position .
-
Page 18: Tilting The Bratt Pan
The turning force and mixing features of the mixer are designed to mix most food ingredients. There might although be food ingredients with a consistency that requires decreasing the bratt pan contents or adding liquid to improve the mixing result. -
Page 19: Water Fi Lling (Option)
5. Setting is decreasing Basic mode • Whan the bratt pan is switched on 0 appears in the last digit’s position. • The decimal point is illuminating. • The values for the set amount of water and acheived amount of water are 0. -
Page 20: After Use
STOP Switch off the appliance with the mains switch before starting to wash the bratt pan. Burned deposits on the frying surface of the pan form an isolating layer which slows up the frying and creates poor frying results. - Page 21 Detaching the lid parts • Make sure the pan is in an upright position. • Place the lid on the bratt pan. • Remove the cover of the safety grid and detach the safety grid. • Detach the solid lid from the lifting arm by holding the lifting arm with one hand and pulling the locking lever of the lid and then lifting the arm.
-
Page 22: Service
VIKING MIXPAN Operation instructions Rev. 1.0 (8.2.2022) Press the lid arm against the lid so that the fi xing cone is guided into the fi xing part and the locking lever snaps in the locked position. Make sure that the lid is locked on the arm. Put the safety grid and its cover in place. -
Page 23: Installaion
After removing from the transport pallet, the bratt pan is not stable until it has been bolted down to the installation frame. It is strictly forbidden to operate or tilt the bratt pan before it has been fi xed to the fl oor or to the free standing frame according to the installation instructions. -
Page 24: Disposal Of The Package
Also check the location of the fl oor drain. The bratt pan is designed for installation in a place with a fl oor drain in front of the bratt pan. The arrangement with a pouring channel and fl oor drain behind the bratt pan is not suitable for use with the bratt pan. -
Page 25: Installation Frames
VIKING MIXPAN Installation Rev. 1.0 (8.2.2022) 5.4. Installation frames 5.4.1. Positioning of installation frames Single bratt pan SINGLE SINGLE Bratt pan group GROUP SINGLE SINGLE GROUP Model Installation frames (mm) MG4224000 Surface installation 150L MG4224002 Sub-surface installation MG4224004 Group installation, surface... -
Page 26: Subsurface Frame Cast Into The Fl Oor
Place the bratt pan on the installation frame and adjust to a horizontal position with the adjusting bolts. When the bratt pan is in a horizontal position, it must be fi xed to the installation frames with the help of the fi xing bolts. The control pillar has 4 bolts and the support pillar has 2 bolts. Tighten the adjusting nuts carefully. -
Page 27: Surface Installation Frame Fi Xed To The Fl Oor
Place the bratt pan on the surface installation frame and adjust to a horizontal position with 4 adjusting bolts. When the bratt pan is in a horizontal position it must be fi xed to the surface frame with the help of the fi... -
Page 28: Installation On Frames
Furthermore, it is recommended to place e.g. plywood strips between the fork-lift trolley and the bratt pan bottom. It should be observed that the bratt pan pillars also move. It is advisable to put a piece of foamed plastic or a rolled cellular board between the bratt pan and the pillars so that they do not hit each other. - Page 29 When the control pillar (1) is in position, it is fi xed to the installation frame (2) with four fi xing bolts (4). Check that the space between the bratt pan section and the support and control pillars is the same, both at the top and at the bottom.
-
Page 30: Free Standing Bratt Pans
Furthermore, it is recommended to place e.g. plywood strips between the fork-lift trolley and the bratt pan bottom. It should be observed that the bratt pan pillars also move. It is advisable to put a piece of foamed plastic or a rolled cellular board between the bratt pan and the pillars so that they do not hit each other. - Page 31 • If lifting the bratt pan from the fl oor, lift it one side at the time and place planks under the feet of the free standing frames feet in order to lift the bratt pan enough to make the fork-lift trolley to fi t under the bratt pan as described below.
- Page 32 • Push the axle into the bearing. Apply grease. • Make sure the bratt pan is in position and the holes in the free standing frames of the bratt pans align. • Fix the bratt pans together with four M12x20 bolts using the 19 mm spanner.
- Page 33 The fl anges are glued to the fl oor. • Lift one side at a time with a forklift trolley and place the fl ange around the legs in the corner. Lower the bratt pan and glue the fl ange to the fl oor.
-
Page 34: Electrical Connections
Rev. 1.0 (8.2.2022) 5.7. Electrical connections The electrical connections of the bratt pan can only be carried out by a qualifi ed electrician having the STOP necessary competence for the installation and service of electrical appliances. The control pillar cover plate is a fi xed component, not intended for detaching. Do not force it upwards when removing the front and rear cover plates. - Page 35 After that, check phase order to make sure that the mixer and tilting motors rotate in the correct direction. • Close the lid and safety grid of the bratt pan, but do not put the cover of the safety grid on.
- Page 36 VIKING MIXPAN Installation Rev. 1.0 (8.2.2022) Electrical connections A. Connections from the rear B. Connections from below Electrical power supply cable, PG21/PG36/PG42 gland Detailed electrical connection data available in bratt pans electrical diagram.
-
Page 37: Water Connection
Installation Rev. 1.0 (8.2.2022) 5.8. Water connection Water connections of the bratt pan can only be carried out by a person with professional competence in STOP the installation and service of heating, plumbing and air conditioning equipment.. The location of the water connection points appears from the installation drawing. Both cold and hot water connections must be fi... -
Page 38: Water Connection And Quality Requirements
VIKING MIXPAN Installation Rev. 1.0 (8.2.2022) 5.8.1. Water connection and quality requirements • Depending on the accessories, the frying pan must be connected to a hot and cold water supply. • Depending on the accessories, the frying pan must be connected to a hot and cold water supply. •... -
Page 39: Ventilation
• Tighten both the fi xing nut (6) and the locking nut (5), if the bratt pan is horizontal in its cooking posi- tion. -
Page 40: Earth Leakage Circuit Breaker Test (Option)
5.10.2. Earth leakage circuit breaker test (option) If the bratt pan is equipped with the optional socket in the back of the control panel the earth leakage circuit breaker have to be tested after the installation and every six months by pressing the test button. -
Page 41: Technical Specifi Cations
6.1. Dimensions The minimum free distance to any structure behind the bratt pan needed for tilting of the bratt pan is dimension L depending on model. However service access to the components under the pan requires the bigger dimension M. -
Page 42: Floor Drain Positioning
VIKING MIXPAN Tekniset tiedot Rev. 1.0 (8.2.2022) 6.2. Floor drain positioning 150L 1284 250L 1264 1124 1000 6.3. Water connection Cold water connection R1/2” ( ø15 ). Must be fi tted with a one way valve and shut off valve (option). Hot water connection R1/2”... - Page 43 VIKING MIXPAN Tekniset tiedot Rev. 1.0 (8.2.2022)
- Page 44 www.metos.com...
Need help?
Do you have a question about the BRATT PAN and is the answer not in the manual?
Questions and answers