
Related Manuals for Struers Labotom-20


Summary of Contents for Struers Labotom-20
- Page 1 Labotom-20 Instruction Manual Original Instructions Doc. no.: 16937025-01_B_en Date of release: 2022.01.28...
- Page 2 Copyright The contents of this manual are the property of Struers ApS. Reproduction of any part of this manual without the written permission of Struers ApS is not allowed. All rights reserved. © Struers ApS 2022.02.18. Labotom-20...
-
Page 3: Table Of Contents
Table of Contents 1 About this manual 2 Safety 2.1 Intended use 2.2 Safety devices 2.2.1 Labotom-20 safety precautions 2.3 Safety messages 2.4 Safety messages in this manual 3 Getting started 3.1 Device description 3.2 Overview 3.3 Struers knowledge 3.4 Accessories and consumables 4 Transport and storage 4.1 Transport... - Page 4 6.4 Basic operation 6.4.1 Control panel functions 6.4.2 Clamping the workpiece 6.4.3 Starting and stopping the cutting process 7 Maintenance and service - Labotom-20 7.1 Daily 7.1.1 Using the flushing gun 7.1.2 Cleaning the cutting chamber using AxioWash 7.1.3 Cleaning the cooling system 7.1.4 Checking the safety guard...
- Page 5 7.6.3 Safety guard switch 7.6.4 Safety guard lock 7.6.5 Testing the flushing function 8 Spare parts 9 Service and repair 10 Disposal 11 Troubleshooting - Labotom-20 11.1 The machine 11.2 Cutting problems 12 Technical data 12.1 Technical data 12.2 Safety Circuit Categories/Performance Level 12.3 Noise and vibration levels...
-
Page 6: About This Manual
1 About this manual About this manual Instruction Manuals Struers equipment must only be used in connection with and as described in the instruction manual supplied with the equipment. Note Read the instruction manual carefully before use. Note If you wish to view specific information in detail, see the online version of this manual. -
Page 7: Labotom-20 Safety Precautions
In case of fire, alert bystanders and the fire brigade. Cut off the power. Use a powder fire extinguisher. Do not use water. Struers equipment must only be used in connection with and as described in the instruction manual supplied with the equipment. -
Page 8: Safety Messages
(electromechanical, electronic, mechanical, pneumatic, etc.). Safety messages Signs used in safety messages Struers uses the following signs to indicate potential hazards. ELECTRICAL HAZARD This sign indicates an electrical hazard which, if not avoided, will result in death or serious injury. -
Page 9: Safety Messages In This Manual
Incorrect voltage can damage the electrical circuit. ELECTRICAL HAZARD For electrical installations with Residual Current Circuit Breakers For Labotom-20 a residual current circuit breaker Type A, 30 mA is required (EN 50178/5.2.11.1). For electrical installations without Residual Current Circuit Breakers The equipment must be protected by an insulation transformer (double-wound transformer). - Page 10 HEAT HAZARD Wear suitable gloves to protect fingers from abrasives and warm/sharp specimens. CAUTION Struers equipment must only be used in connection with and as described in the instruction manual supplied with the equipment. CAUTION Do not use Labotom-20 if it is damaged.
-
Page 11: Getting Started
It must be equipped with a recirculation system for cooling liquid. Labotom-20 for tunnels can be fitted with tunnels on each side or both sides in case the operator needs to cut long workpieces. -
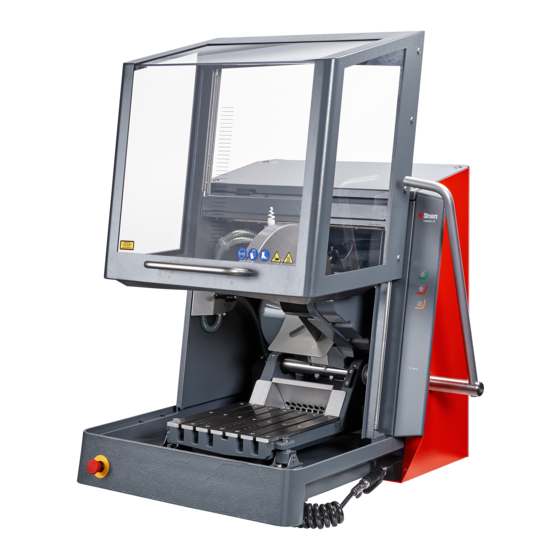
Page 12: Overview
3 Getting started Overview Front view A Safety guard B Handle for safety guard C Emergency stop D Control panel E Cut-off wheel handle F Cutting guiding lines Labotom-20... - Page 13 B Flushing gun Left side A Safety lock release B Main switch Rear view A Motor turn-on counter B Power socket C Compartment for service technician D Water connection E Socket for cooling sytem connection F Connection for exhaust G Drain Labotom-20...
-
Page 14: Struers Knowledge
The Struers Website (http://www.struers.com) Consumables The equipment is designed to be used only with Struers consumables specifically designed for this purpose and this type of machine. Other products may contain aggressive solvents, which dissolve e.g. rubber seals. The warranty may not cover damaged machine parts (e.g. -
Page 15: Transport And Storage
Insufficient packaging could cause damage to the unit and will void the warranty. Contact Struers Service. • Struers recommends that all original packaging and fittings are kept for future use. Transport ELECTRICAL HAZARD Disconnecting the unit from the electrical power supply must only be done by a qualified technician. -
Page 16: Storage
• Place the machine and accessories in their original packaging. Installation WARNING Struers equipment must only be used in connection with and as described in the instruction manual supplied with the equipment. Unpacking Note Struers recommends that all original packaging and fittings are kept for future use. -
Page 17: Checking The Packing List
Optional accessories may be included in the packing box. The packing box contains the following items: Pcs. Description Labotom-20 Open-end wrench, 300 mm, for changing the cut-off wheel Triangular key, for opening the safety guard when the power is off. Elbow pipe for water outlet Drain hose, 2 m (79") - Page 18 Be careful when placing the lifting straps, as these can damage the safety guard. Make sure that the straps are parallel to each other and position the lifting bar so that both straps are kept apart below the lifting points. Labotom-20...
- Page 19 5 Installation Center of gravity 37.5 cm (14.7") 40 cm (15.6") 73.5 cm (29") 90 cm (35.5") 38 cm (15") 31.5 cm (12.4") 86.5 cm (34") Labotom-20...
- Page 20 (B). Unlock the safety guard by turning the triangular key clockwise. Checking the packing list ►17. Open the safety guard. To reset the lock on the safety guard, turn the triangular key counter-clockwise. Labotom-20...
-
Page 21: Power Supply
ELECTRICAL HAZARD Switch off the electrical power supply before installing electrical equipment. Make sure that the actual electrical power supply voltage corresponds to the voltage stated on the type plate of the machine. Incorrect voltage can damage the electrical circuit. Labotom-20... -
Page 22: Connection To The Machine
Voltage/frequency: 3 x 220-230 V/50 Hz Min. fuse: Minimum cable size at minimum fuse: 3 x 50 A 5 x 4 mm + PE Max. fuse: Minimum cable size at maximum fuse: 3 x 50 A 5 x 4 mm + PE Labotom-20... - Page 23 The other end of the cable can be fitted with an approved plug or hard-wired into the power supply according to the electrical specifications and local regulations. ELECTRICAL HAZARD Labotom-20 must be protected with external fuses. See the table below for the fuse size required. Labotom-20...
- Page 24 Voltage/frequency: 3 x 220-240 V/60 Hz Power, nominal load S3 60%: 6.6 kW (8.8 hp) S3 15%: 8.5 kW (11.4 hp) Number of phases 3 (3L + PE) Power, nominal load 22.5 A Power, Max. load 45 A Ampere rating, largest motor 21.5 A Labotom-20...
-
Page 25: External Short Circuit Protection
If needed, contact a qualified electrician to verify which option is suitable for the local installation setup. Requirements for electrical installations With Residual Current Circuit Breakers Type A, 30 mA (EN 50178/5.2.11.1) or (RCCB) - Required better Labotom-20... -
Page 26: Connecting The Cooling System
Before you connect the recirculation unit to the machine, you must prepare it for use. See the Instruction Manual for this unit. Note Struers recommends that the flushing gun is operated at a pressure of max. 3 bar. Note Consumables •... -
Page 27: Connecting The Drain Outlet To The Cooling System
Connect the opposite end of the flex hose to the cooling system. 5.5.2 Connecting the water inlet from the cooling system Connect the hose with quick coupling to the cooling system water pump. Note The cooling water pressure must not exceed 9.9 bar (143 psi) Labotom-20... -
Page 28: Connecting The Communication Cable To The Cooling System
Struers recommends that the machine is connected to an exhaust system. You can connect Labotom-20 to an exhaust system via a hole on the rear of the cabinet. If you are not using an exhaust system, use the red plug supplied to cover the hole on the rear of the cabinet. -
Page 29: Extension Tunnels (Option)
Manual cutting may cause vibrations in hand and arm. To lower the vibration, decrease the pressure or use a vibration-reducing glove. Always use recommended Struers clamping solutions to reduce the source of vibration. Extension tunnels (option) Extension tunnels (option) can be useful if you are working with large workpieces. - Page 30 Mount the 2 washers and 2 M6x34 screws in the part of the extension tunnel that is inside the cutting chamber. Use a 5 mm (0.19") hexagonal bit. Tighten the screws loosely. Labotom-20...
-
Page 31: Operating The Device
A 90° Tighten all 3 screws applying a 10 Nm force. Operating the device Cut-off wheels 6.1.1 Selecting a cut-off wheel For information on how to select the correct cut-off wheel, see the section on Cutting on the Struers website. Labotom-20... -
Page 32: Mounting And Dismounting A Cut-Off Wheel
Lines on the table help you place the workpiece in the correct position. You obtain the best results when the lower quadrant of the cut-off wheel enters the workpiece (the shaded area on the illustration). Labotom-20... -
Page 33: Vertical Quick Clamping Devices
Use the spanner to tighten the screws. The illustration shows a cylindrical workpiece secured with a quick clamping device. Line laser WARNING Do not look directly into the laser beam. For more information on the line laser, see: Technical data ►1 Labotom-20... -
Page 34: Basic Operation
Basic operation CAUTION Always close the safety guard carefully to avoid injuries. CAUTION Always wear safety shoes when handling workpieces. HEAT HAZARD Wear suitable gloves to protect fingers from abrasives and warm/sharp specimens. 6.4.1 Control panel functions Labotom-20... -
Page 35: Clamping The Workpiece
►33. Note Make sure that the workpiece is firmly and securely fixed in the clamping device. If it is not, the workpiece can loosen and cause the cut-off wheel to break and/or unintended deformations to the workpiece and accessories. Labotom-20... -
Page 36: Starting And Stopping The Cutting Process
11. Press Stop to stop the cut-off wheel and the cooling water. 12. Wait until the safety lock is released before you open the safety guard. Note If you are working with large or very hard workpieces, you will need a certain amount of strength to cut through. Labotom-20... -
Page 37: Maintenance And Service - Labotom-20
7 Maintenance and service - Labotom-20 Note The safety guard on Labotom-20 has a safety guard lock. The motor will not start as long as the safety guard is open. Leave the safety guard open when the machine is not in use to let the cutting chamber dry completely. -
Page 38: Using The Flushing Gun
7 Maintenance and service - Labotom-20 7.1.1 Using the flushing gun CAUTION Avoid skin contact with the cooling fluid additive. Do not start flushing until the flushing gun points into the cutting chamber. Only use the flushing gun for cleaning inside the cutting chamber. -
Page 39: Cleaning The Cooling System
Note If the safety guard screen is damaged or if there are visible signs of deterioration, it must be replaced immediately. Contact Struers Service. 7.1.5 Checking the cut-off wheel guard Visually inspect that the cut-off wheel guard is intact. -
Page 40: Weekly
7 Maintenance and service - Labotom-20 Weekly 7.2.1 Weekly cleaning Clean the machine regularly to avoid damaging effects to the machine and the specimens from abrasive grains or metal particles. Clean all painted surfaces and the control panel with a soft damp cloth and common household detergents. -
Page 41: Maintaining Cutting Tables
7 Maintenance and service - Labotom-20 7.3.2 Maintaining cutting tables • Replace the stainless steel bands if they are damaged or worn. Annually 7.4.1 Inspecting the safety guard WARNING Do not use the machine with defective safety devices. Contact Struers Service. -
Page 42: Storing Conventional Cut-Off Wheels
7 Maintenance and service - Labotom-20 Testing a diamond/CBN cut-off wheel for damage Let the cut-off wheel hang over your index finger. With a pencil (not metal), gently tap the cut-off wheel around the edge. The cut-off wheel passes the test if it gives a clear metallic tone when tapped. If the cut-off wheel sounds dull or muted, it is cracked and unsafe to use and must be replaced. -
Page 43: Safety Guard
7 Maintenance and service - Labotom-20 The cutting process and cooling water stop. The Emergency stop is working correctly. If the cutting process and cooling water do not stop, press the Stop button. Do NOT use the machine. Contact Struers Service. -
Page 44: Safety Guard Switch
7 Maintenance and service - Labotom-20 7.6.3 Safety guard switch WARNING The safety guard must be replaced every 5 years to ensure its intended safety. A label on the screen indicates when the safety guard is due to be replaced. -
Page 45: Testing The Flushing Function
7 Maintenance and service - Labotom-20 Test 2 Close the safety guard. Press Start to start a cutting process. The machine starts the cutting process and cooling water. Press the Stop button. The safety guard must remain locked for minimum 4 seconds after pressing the Stop button. -
Page 46: Spare Parts
For further information, or to check the availability of spare parts, contact Struers Service. Contact information is available on Struers.com. Service and repair Struers recommends that a service check be carried out after 6600 cuts. You can see how many cuts have been performed on the motor turn-on counter. See also Overview ►12. -
Page 47: Troubleshooting - Labotom-20
11 Troubleshooting - Labotom-20 11 Troubleshooting - Labotom-20 11.1 The machine Error Cause Action The cut-off wheel does not The safety guard is open. Close the safety guard. If rotate. the error remains, contact Struers Service. The safety lock has been Reactivate the safety lock deactivated. -
Page 48: Cutting Problems
11 Troubleshooting - Labotom-20 Error Cause Action Safety guard blurred Insufficient cleaning. Clean with soapy water. Note The soapy water must not run into recirculation water, as this will cause the water to foam. Quick clamping device cannot The clamping device is not... - Page 49 11 Troubleshooting - Labotom-20 Error Cause Action Unwanted burrs Cut-off wheel too hard Select another type of cut-off wheel. Too high force on the cut-off Reduce the cutting force near the wheel near the end of the end of the operation.
- Page 50 11 Troubleshooting - Labotom-20 Error Cause Action The cut-off wheel wears down The force on the cut-off-wheel Apply a lower force on the cut-off too quickly is too high. wheel. The cut-off wheel is too soft Select a harder cut-off wheel.
-
Page 51: 12 Technical Data
Feed speed Manual control Laser Class 2M Software and electronics Controls Touch pad Display Safety standards See the Declaration of Conformity Operating environment Surrounding temperature 5 - 40 °C (41 - 104 °F) Humidity 35 - 85 % RH non-condensing Labotom-20... - Page 52 3 x 220 - 230 V (50 Hz) Power supply 3 (3L + PE) Power S1 Power S3 60% 5.5 kW (7.4 hp) Power S3 15 % 7.5 kW (10 hp) Current, nominal load 20.1 A Current, max. 40.2 A Current, max. largest motor 19.1 A Labotom-20...
- Page 53 3 x 380 - 415V (60 Hz) Power supply 3 (3L + PE) Power S1 Power S3 60% 6.6 kW (8.8 hp) Power S3 15 % 8.5 kW (11.4 hp) Current, nominal load 13.4 A Current, max. 26.8 A Current, max. largest motor 12.4 A Labotom-20...
- Page 54 Type A, 30 mA (or better) is Breaker (RCCB) required Noise level A-weighted sound emission LpA = 72 dB(A) (measured pressure level at workstations value). Uncertainty K = 4 dB Vibration level Declared vibration emission = 0.5 m/s (measured value). Uncertainty K = 0.2 Labotom-20...
-
Page 55: Safety Circuit Categories/Performance Level
Also, the permissible exposure level can vary from country to country. This information, however, will enable the user of the machine to make a better evaluation of the hazard and risk. Labotom-20... -
Page 56: Safety Related Parts Of The Control System (Srp/Cs)
SRP/CS (safety-related parts of a control system) are parts that have an influence on safe operation of the machine. Note Replacement of safety critical components must only be performed by a Struers engineer or a qualified technician (electromechanical, electronic, mechanical, pneumatic, etc.). -
Page 57: Diagrams
16930037 tunnel Left side 12.5 Diagrams If you wish to view specific information in detail, see the online version of this manual. 12.5.1 Diagrams Labotom-20 Title Block diagram 16933050 B ►58 Circuit diagram, 3 pages 16933100 C ►59 Water diagram 16931002 A ►62... - Page 58 12 Technical data 16933050 B Labotom-20...
- Page 59 12 Technical data 16933100 C Labotom-20...
- Page 60 12 Technical data Labotom-20...
- Page 61 12 Technical data Labotom-20...
- Page 62 12 Technical data 16931002 A Labotom-20...
-
Page 63: Legal And Regulatory Information
110 cm (43.3") 110 cm (43.3") 103 cm (40.6") Weight 274 kg (604 lbs). The weight is stated on the crate. 13.2 Location Place the machine on a stable and level surface, which can support the weight of the machine. Labotom-20... - Page 64 90 cm (35.4") The table must be able to carry at least: 350 kg (772 lbs) A workbench designed for Struers cut-off machines is available as an accessory. The recirculation cooling unit fits into a compartment in the table unit.
-
Page 65: Dimensions
13 Pre-installation checklist 13.3 Dimensions Front view 89 cm (35") 170 cm (67") 141 cm (55.5") Labotom-20... - Page 66 13 Pre-installation checklist Front view 134 cm (53") Side view 86 cm (34") 94 cm (37") 54 cm (21.3") 90 cm (35.5") 72 cm (28.3") 121 cm (47.6") 114 cm (45") Labotom-20...
- Page 67 13 Pre-installation checklist Footprint - Front view 51 cm (20") Labotom-20...
-
Page 68: Recommended Space
Space in front of the machine • Make sure that there is enough room in front of the 100 cm (40”) machine. Space at the sides of the machine • Recommended space at the sides of the machine. 100 cm (40") Labotom-20... -
Page 69: Transport And Storage
Package the unit securely before transportation. Insufficient packaging could cause damage to the unit and will void the warranty. Contact Struers Service. • Struers recommends that all original packaging and fittings are kept for future use. 13.5.1 Long-term storage or shipping Note Struers recommends that all original packaging and fittings are kept for future use. -
Page 70: Lifting
(B). Remove the transport brackets. 13.7 Lifting CRUSHING HAZARD Take care of your fingers when handling the machine. Wear safety shoes when handling heavy machinery. CAUTION The machine is heavy. Always use a crane and lifting strap. Labotom-20... - Page 71 Be careful when placing the lifting straps, as these can damage the safety guard. Make sure that the straps are parallel to each other and position the lifting bar so that both straps are kept apart below the lifting points. Labotom-20...
- Page 72 13 Pre-installation checklist Center of gravity 37.5 cm (14.7") 40 cm (15.6") 73.5 cm (29") 90 cm (35.5") 38 cm (15") 31.5 cm (12.4") 86.5 cm (34") Labotom-20...
- Page 73 (B). Unlock the safety guard by turning the triangular key clockwise. Checking the packing list ►17. Open the safety guard. To reset the lock on the safety guard, turn the triangular key counter-clockwise. Labotom-20...
-
Page 74: Power Supply
ELECTRICAL HAZARD Switch off the electrical power supply before installing electrical equipment. Make sure that the actual electrical power supply voltage corresponds to the voltage stated on the type plate of the machine. Incorrect voltage can damage the electrical circuit. Labotom-20... -
Page 75: Connection To The Machine
Voltage/frequency: 3 x 220-230 V/50 Hz Min. fuse: Minimum cable size at minimum fuse: 3 x 50 A 5 x 4 mm + PE Max. fuse: Minimum cable size at maximum fuse: 3 x 50 A 5 x 4 mm + PE Labotom-20... - Page 76 The other end of the cable can be fitted with an approved plug or hard-wired into the power supply according to the electrical specifications and local regulations. ELECTRICAL HAZARD Labotom-20 must be protected with external fuses. See the table below for the fuse size required. Labotom-20...
- Page 77 Voltage/frequency: 3 x 220-240 V/60 Hz Power, nominal load S3 60%: 6.6 kW (8.8 hp) S3 15%: 8.5 kW (11.4 hp) Number of phases 3 (3L + PE) Power, nominal load 22.5 A Power, Max. load 45 A Ampere rating, largest motor 21.5 A Labotom-20...
-
Page 78: External Short Circuit Protection
If needed, contact a qualified electrician to verify which option is suitable for the local installation setup. Requirements for electrical installations With Residual Current Circuit Breakers (RCCB) Type A, 30 mA (EN 50178/5.2.11.1) or - Required better Labotom-20... -
Page 79: Safety Specifications
Water outlet - drain Water outlet specifications Hose supplied 60 cm (23.6") with an outlet under the machine Water outlet diameter 75 mm (2.9") 13.11 Exhaust Recommended Minimum capacity: 150 m /h (5297 ft /h) at 0 mm (0") water gauge. Labotom-20... -
Page 80: Cooling System
The use of a Struers cooling system is recommended. Required Struers recommends adding a Struers anti-corrosion additive to the cooling water. The use of Struers consumables is recommended. Other products may contain aggressive solvents, which dissolve e.g. rubber seals. The warranty may not cover damaged machine parts (e.g. -
Page 81: Declaration Of Conformity
Tip / Typ / 種類 / 유형 / Type / Тип / Tür / 类型 06936147, 06936154 Labotom-20 for tunnels 06936229, 06936230, 06936235, 06936236, 06936246, 06936247, 06936254 Serial no. / Сериен номер / Výrobní číslo / Serienummer / Seriennummer / Σειριακός αριθμός / N.º de serie / Seerianumber / Sarjanro / No de série / Serijski broj / Sorozatszám / N.
Need help?
Do you have a question about the Labotom-20 and is the answer not in the manual?
Questions and answers