EBECO EB-Therm 800 Manual
Multifunctional with four operation modes for din installation
Hide thumbs
Also See for EB-Therm 800:
- Quick manual for installation & use (88 pages) ,
- Quick manual (86 pages) ,
- Manual (36 pages)

Related Manuals for EBECO EB-Therm 800


Summary of Contents for EBECO EB-Therm 800
- Page 1 EB - Therm 800 Multifunctional digital thermostat with four operation modes for DIN installation MANUAL EB-Therm 800...
- Page 2 EB-Therm 800 Thank you for choosing Ebeco and EB-Therm 800, which we hope will serve you well for a long time to come. This is a microprocessor controlled thermostat intended for DIN installation with a background lit LCD display. There are three operation buttons on the front.
-
Page 3: Table Of Contents
Contents Included in the package Accessories ......................4 Installation ....................... 5 Thermostat ........................5 Sensor ......................... 5 Introduction ......................6 Four operation modes ....................6 Menu navigation ......................7 Start menu ........................8 Display mode ........................ 9 Functions in display mode ......................9 Operation mode ..................... -
Page 4: Included In The Package
Included in the package 1. Thermostat 3. Sensor cable 3 m E 85 816 10 E 85 816 71 2. Quick guide Accessories Depending on how you are going to use your thermostat, you may need to complement it with some of the parts below. 1. -
Page 5: Installation
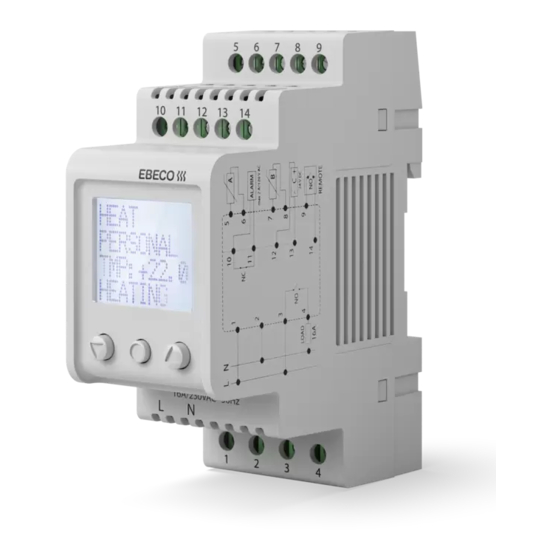
Installation Thermostat EB Therm 800 must be installed on a DIN standard rail (EN 50022-35) in a normskåp with the applicable encapsulation class. EB Therm 800 is IP20 classed and intended for installation in environments with a temperature range of -20 °C to +45 °C. The thermostat has 14 terminal blocks numbered according to the wiring diagram below: The incoming phase and... -
Page 6: Introduction
INTRODUCTION Introduction The manual, like the thermostat, is divided into four operation modes so that you only need to read about the functions you will use. The thermostat operation mode can only be installed in the start menu, which is shown the first time the thermostat is started (read more about the start menu on page 8) or after it has been reset. -
Page 7: Menu Navigation
INTRODUCTION Menu navigation The functions in EB Therm 800 are arranged in a system of menus and sub- menus. The Main menu always contains three submenus TEMP PROGRAM . There are further choices under these. SYSTEM The first time the thermostat is started, a number of requisite values must be set in the START menu (see page 8). -
Page 8: Start Menu
INTRODUCTION Start menu The start menu is used to quickly and simply set the three requisite basic settings; it is only shown the first time the thermostat is switched on (or if the thermostat is fully reset using the reset function). Begin by choosing a language, continue with the date and time setting, and finish off by setting operation mode and sensor. -
Page 9: Display Mode
INTRODUCTION Display mode The display mode is the thermostat's "normal" mode; the most important settings, statuses and functions are shown and set here. The display shows, alternatingly, the set point and current values at the same time as it always shows the operation mode and if the installation is switched on or off. - Page 10 INTRODUCTION Connection time [press To see the total and momentary connection times*, press when the thermostat is in display mode. The counter shows the total hours the thermo stat has been connected for as well as the momentary time, in the same way as a vehicle trip meter, i.e. the number of hours the installation has been connected for since the counter was reset.
-
Page 11: Operation Mode
Operation mode Heating Heating mode is used in homes, offices, storerooms and such like. With this operation mode, you can regulate the heating within a temperature range of +5 °C to +45 °C. The thermostat can be used as a floor thermostat, room thermostat or room thermostat with over heating protection for wood floors. -
Page 12: Program Menu
The surface temperature is an average value and varies somewhat depending on the material and the thickness. Denser (harder) wood insulates less than softer wood, which increases the surface temperature. Also, the thinner the floor, the higher the surface temperature. Two sensors are required for over heating protection: a room sensor (sensor A) and an over heating protection sensor (sensor B). - Page 13 The temperature can be set between +5 °C and +45 °C. The thermostat works from the temperature that is set in the manual program where the factory setting is +22 °C. If you change the temperature in the manual program, or the set point in the TEMP menu, the thermostat works from the new temperature, and lowers the tem- perature by +5 °C from the newly set temperature.
- Page 14 Personal program [PERSONAL] Manual setting of the program allows optimisation of energy consumption to suit just your needs by making settings for four events each day: WAKE, AWAY, HOME and NIGHT. There are three menu alternatives to choose between: ACTIVATE, CHANGE and RESET.
-
Page 15: System Setting Menu
+HEAT Time relay, Off-delay: adjustable from 0 to 4 hours. The factory setting is 2 hours. LOW TEMP Set point can be set to between +5 °C and +20 °C. The factory setting is +15 °C. ACTIVATE You start the program with ACTIVATE and the program will remain active until you choose to start another program. - Page 16 Date and time DATE/TIME A set time and date can be changed if needed, for example, if the electrical supply to the thermostat was disrupted for a period of more than fifty hours. The setting function then comes up automatically. You will find date and time setting in the MAIN MENU under SYSTEM and DATE/ TIME.
- Page 17 thermostat is set as a floor thermostat, this is the temperature that you set in the TEMP menu and not the temperature in the room or on the surface of the floor. ROOM THERMOSTAT If the room is very large or has large areas of glass, it can sometimes be better to regulate the heating via a room sensor.
-
Page 18: Operation Mode Cooling
Operation mode Cooling Operation mode Cooling is used in home, office, storeroom environ- ments and such like. In this operation mode, the thermostat works as a room thermostat for regulating air conditioning or other cooling within a temperature range of +5 °C to +45 °C. Energy saving pro- grams are primarily adapted for home and office environments but can also be used for cooling, for example, storerooms. - Page 19 The programs are in the under . To change program, MAIN MENU PROGRAM browse using and select using . The manual program is the fac- tory setting, i.e. you set the required temperature (set point) and the ther- mostat maintains that temperature. Program for home environment HOME The temperature is raised by 5 °C at the following times:...
- Page 20 ACTIVATE The program is started with , and from there you can choose to use ACTIVATE . If you want to start the program without the timer function, TIMER SETTING select and the program will then be active until another program is start- ed.
-
Page 21: System Setting Menu
To set your personal program, go in under . There are different ways CHANGE of setting the various events; you can choose to program day by day, week- end (Saturday and Sunday) or the whole week. It is normally easiest to set the whole week first and then adjust this for the days requiring a different setting. - Page 22 Summer and winter time S/W TIME The thermostat calendar and clock are automatically set to summer and winter time but the function can, if it is not required, be switched off. Summer and winter settings are in the under ; select MAIN MENU SYSTEM .
- Page 23 Reset connection time CONN TIME The connection time is shown in hours; as with a vehicle trip meter, it shows the number of hours an installation has been connected for since it was last reset. This is beneficial if you want to calculate the energy consumption for a certain period.
-
Page 24: Operation Mode Industry
Operation mode Industry Operation mode Industry is used to regulate the temperature of industrial processes, high temperatures or for the frost protection of sensitive installations. Temperatures within the ranges -15 °C to +75 °C and 0 °C to +150 °C can be regulated in this mode or the range can be limited to between -10 °C and +15 °C for frost protection purposes. - Page 25 Temperature hysteresis TEMP HYS The thermostat can be prevented from switching on and off the effect too often by increasing the temperature hysteresis. The hysteresis is the range the current value is permitted to deviate from the set point without the thermostat switching on or off the effect. A set hysteresis value of 0.3 °C and a set point of +40.0 °C means that the temperature (current value) can vary between +39.7 °C and +40.3 °C.
-
Page 26: Program Menu
Program menu PROGRAM To be able to measure the temperature as accurately as possible, there are two temperature ranges, one from -15 °C to +75 °C and one from 0 °C to +150 °C. There is also a frost protection program to enable sensitive installations to be safeguarded against frost in a simple manner. -
Page 27: System Setting Menu
System setting menu SYSTEM Under system settings, you will find settings for, for example, language and date, as well as resetting functions for the time counter and for complete resetting to factory settings. The system settings are under SYSTEM in the MAIN MENU. Language LANGUAGE You can choose between several languages;... - Page 28 Reset RESET There are three choices under the reset menu: CONN TIME, OP MODE and FAC SET. The RESET menu is under SYSTEM in the MAIN MENU. Reset connection time CONN TIME The connection time is shown in hours; as with a vehicle trip meter, it shows the number of hours an installation has been connected for since it was last reset.
-
Page 29: Operation Mode Max/Min
Operation mode Max/Min The Max/Min operating position is mainly used to keep roof and ground surfaces free of snow and ice. The temperature range is adjustable between -20 °C and +10 °C. For the best results and the best energy saving, combined temperature and humidity control should be used in the Max-/Min position, with associated Roof Sensor (E 89 350 75) or Ground Sensor (E 85 801 01). -
Page 30: Program Menu
Set the required max temperature by pressing and confirm with , then set the required min temperature in the same way. The values can be set with an accuracy of 0.5 degrees, and the factory settings are max +2 °C and min -10 °C. -
Page 31: System Setting Menu
Example: You want snow melting to be deactivated between 22:00 and 04:00 and between 11:00 and 15:00 every day, i.e. the installation shall be active between 04:00–11:00 and 15:00–22:00. First select and then WEEK . The first event is at 04:00 and at 11:00. - Page 32 Temperature, A and B The thermostat uses external sensors that can be installed as . If there are two sensors installed, it is possible to switch between A & B Moisture sensor, C The thermostat uses moisture sensor C together with temperature sensor Delay +HEATING The delay can be set to ensure that the entire installation is free of snow...
- Page 33 Reset factory settings FAC SET The thermostat can be entirely reset to factory settings. All programmed data is deleted and the start up menu is opened. If you choose to reset the thermostat, it is important to know the operation mode it uses and the con- figuration of the sensors.
-
Page 34: Fault Tracing
Fault tracing Cause Message The sensor installed on terminal blocks 5 and 6 is not DISRUPTION ON SENSOR A correctly connected or is damaged. The sensor installed on terminal blocks 7 and 8 is not DISRUPTION ON SENSOR B correctly connected or is damaged. The sensor installed on terminal blocks 5 and 6 is not SHORT CIRCUIT ON SENSOR A correctly connected or is damaged. -
Page 35: Technical Data
Technical data Voltage 230 VAC +/- 10 % ~ 50 Hz Break-off capacity 3680 W/16 A/230 VAC Power consumption 2.5 W Application range -20 °C to +150 °C divided into two ranges Low temperature range -20 °C to +75 °C – Sensor type NTC High temperature range 0 °C to +150 °C –... - Page 36 EBECO AB Lärjeågatan 11 415 02 Göteborg, SWEDEN Phone +46 31 707 75 50 Fax +46 31 707 75 60 ebeco.com info@ebeco.se...
Need help?
Do you have a question about the EB-Therm 800 and is the answer not in the manual?
Questions and answers