EBECO EB-Therm 800 Manual
4 in 1 digital thermostat with fuzzy technology for din rail mounting
Hide thumbs
Also See for EB-Therm 800:
- Quick manual for installation & use (88 pages) ,
- Quick manual (86 pages) ,
- Manual (36 pages)
Table of Contents
Advertisement
Quick Links
Download this manual
See also:
Quick Manual
Advertisement
Table of Contents

Related Manuals for EBECO EB-Therm 800


Summary of Contents for EBECO EB-Therm 800
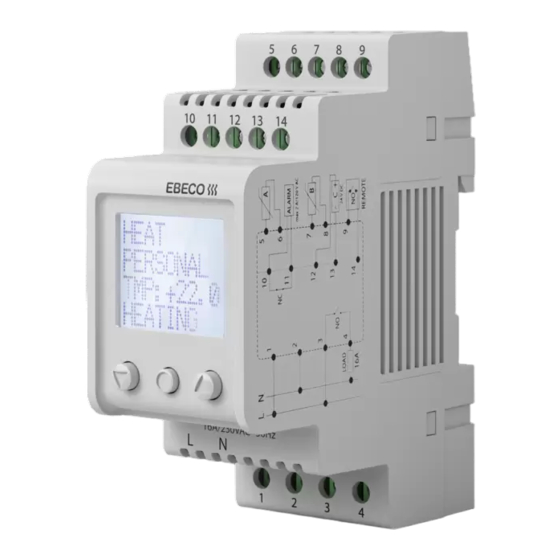
- Page 1 EB - Therm 800 4 in 1 Digital thermostat with fuzzy technology for DIN rail mounting MANUAL EB-Therm 800...
- Page 2 EB-Therm 800 Thank you for choosing Ebeco and EB-Therm 800, which we hope you will use and enjoy for many years to come. This is a microprocessor controlled thermostat intended for a DIN rail mounting with a backlit LCD display. The front is fitted with three control buttons. There are four operational modes and a number of temperature reduction programs to choose between for energy-smart control.
-
Page 3: Table Of Contents
Contents In the box ........................4 Accessories ........................4 Installation ......................5 Thermostat ........................5 Sensor ..........................5 Introduction ...................... 6 Four different operational modes ................6 Menu navigation ....................7 Start menu ......................8 Display mode ......................9 Display mode functions ....................9 Operational mode heating ................ -
Page 4: In The Box
In the box 1. Thermostat 3. Sensor cable 3 m E 85 816 10 E 85 816 71 2. Quick guide Accessories Depending on how the thermostat is used you may need the articles below. 1. Sensor cable 3 m (High temperature sensor) E 85 816 73 You need this article if you want to control temperatures above +75 °C. -
Page 5: Installation
Installation Thermostat The EB-Therm 800 must be fitted on a DIN standard rail (EN 50022-35) in a stand- ard cabinet available for the applicable enclosure protection class. The EB-Therm 800 with protection class IP20 is intended for installation in environments with a temperature interval of -20 °C to +45 °C. -
Page 6: Introduction
INTRODUCTION Introduction The manual, like the thermostat, is divided into four different operational modes so you will only need to read about the functions that you will use. The thermo- stat’s operational mode can only be set in the start menu which appears the first time the thermostat is started (read more about the start menu on page 8) or after it has been reset. -
Page 7: Menu Navigation
INTRODUCTION Menu navigation The functions in the EB-Therm 800 are arranged in a system of menus and sub- menus. In the MAIN MENU there are always three submenus, TEMP PROGRAM . There are further menu selections under each of these. -
Page 8: Start Menu
INTRODUCTION Start menu The Start menu is designed to quickly and easily set three required basic settings. It only appears the first time the thermostat is turned on (or if the thermostat is reset entirely using the reset function). You begin by selecting language, contin- ue with date and time settings and conclude with operational mode and sensor settings. -
Page 9: Display Mode
INTRODUCTION Display mode The display mode is the thermostat’s normal mode, which shows the most im- portant settings and function status. The display alternates between set points and actual values, and it always shows the thermostat’s operational mode and if the installation is on or off. The set point describes the required temperature while the actual value describes the actual temperature. - Page 10 INTRODUCTION Operation time [press To see the total and momentary operation time*, press when the ther- mostat is in the display mode. The counter counts both the total number of hours the thermostat has been in operation and the momentary time i.e.
-
Page 11: Operational Mode Heating
Operational mode heating The Heating operational mode is used in living areas, offices, warehouses and likewise. This operational mode allows you to control the heating in the temperature interval from +5 °C to +45 °C. The thermostat can be used as a floor thermostat, a room thermostat or a room thermostat with overheating protection for wooden floors. -
Page 12: Program Menu
The surface temperature is an average value and varies slightly depending on ma- terial and thickness. Denser (harder) types of wood provide less insulation com- pared to softer types of wood which results in a higher surface temperature. A thinner floor results in a higher surface temperature compared to a thicker floor. The overheating protection works only if two sensors are installed: a room tem- perature sensor (sensor A) and a overheating protection (sensor B). - Page 13 The temperature can be set between +5 °C and +45 °C. The thermostat operates based on the temperature selected in the manual program, where the default is +22 °C. If you change the temperature in the manual program, or set point in the menu, the thermostat operates based on the new temperature and decreas- TEMP es by 5 °C according to the temperature now set.
-
Page 14: System Settings Menu
Personal program [PERSONAL] By programming the thermostat yourself, you can optimise energy consumption according to your needs by setting four events each day: WAKEUP HOME . There are three menu options to choose from: NIGHT ACTIVATE CHANGE RESET The personal program is found under in the . - Page 15 Language LANGUAGE You can select from a number of different languages – the factory setting is English. Set your required language by scrolling among the different language selections using the button and confirm your selection with You can also use the shortcut commando in the display mode (hold pressed in for three seconds).
- Page 16 Ventilation mode VENT If the room temperature falls by more than 3 °C in a single minute, e.g. when airing the room, the ventilation mode is activated. Then the thermostat stops the heat for 15 minutes and returns to the previous mode. If the ventilation mode is acti- vated, it is shown in the display mode.
- Page 17 Reset operational mode settings OPERATIONAL MODE You can reset the settings in . All programs are reset OPERATIONAL MODE HEATING and temperature and sensor settings return to the default values. A reset does not have effect on the selection of or set OPERATIONAL MODE LANGUAGE...
-
Page 18: Operational Mode Cooling
Operational mode cooling The cooling operational mode is used in living areas, offices, warehouses and likewise. With this operational mode, the thermostat functions as a room thermostat that allows you to control the air conditioning or other cooling in the temperature interval from +5 °C to +45 °C. The energy saving programs are primarily designed for residential and office environments, but can also be used to cool warehouses for instance. - Page 19 You can find the different programs in the under . To change MAIN MENU PROGRAM programs, scroll using , and select with . The thermostat is set to man- ual program when it leaves the factory, i.e. you set the required temperature (set point) and the thermostat then maintains this temperature.
- Page 20 ACTIVATE The program is started with , and here you can select to use the ACTIVATE TIMER SET- . If you want to start the program without a timer function, select and the TING program will be active until you decide to start another program. If you select the program will be active during the selected time period to then return to the latest run program.
-
Page 21: System Settings Menu
Once you have selected which day/days the events are to occur, you need to set the time of day they will occur and what temperature you want the floor to have at that time. You start by setting the time, which flashes. Scroll with the button until you reach the time you want the event to occur. - Page 22 You can find the summer and winter time setting in the under MAIN MENU SYSTEM and select . Disable this function under in the menu and there se- DS TIME ON/OFF lect , and a message appears briefly in the display if the function is turned off. You can enable this function in the same way by selecting Sensor settings SENSOR...
- Page 23 When the thermostat is in display mode, press to view the total and momentary operation time. You can find the reset function in the menu under and there select SYSTEM RESET is the preset value and you can change this to by pressing OPERATION TIME and confirming with...
-
Page 24: Operational Mode Industrial
Operational mode industrial The industrial mode is used for temperature control of industrial processes, high temperatures or to protect sensitive installations from frost. This opera- tional mode allows you to control heating in the -15 °C to +75 °C and +60 °C to +170 °C intervals, or limit the range to -10 °C and +15 °C to provide frost protec- tion. - Page 25 Temperature alarm ALARM The EB-Therm 800 is equipped with both over and under temperature alarms. If the temperature goes above or below the set temperature, the installation turns off, an alarm circuit opens and the display shows an alarm message while the background lighting flashes.
-
Page 26: Program Menu
SENSOR B: HIGH TEMP IMPORTANT - The sensor supplied with the EB-Therm 800 is designed for the low temperature and frost protection program, and should not be used for the high temperature program. The sensor for the high temperature program is not includ- ed in the package, but must be ordered separately and has the article number E 85 816 73. -
Page 27: System Settings Menu
System settings menu SYSTEM Under system settings you can find settings options such as language and date, but also restore functions for the counter and a master reset to factory settings. The system settings can be found under in the SYSTEM MAIN MENU Language... - Page 28 Reset RESET There are three options in the reset menu: OPERATION TIME OPERATIONAL MODE . You can find the menu under in the FACTORY SETTING RESET SYSTEM MAIN MENU Reset operation time OPERATION TIME The operation time is counted in hours, like a car’s speedometer it counts the number of hours the installation has been run since the last reset.
-
Page 29: Operational Mode Max/Min
Operational mode Max/Min The Max/Min operational mode is primarily used to keep small areas on roofs and the ground snow and ice-free. The temperature interval is adjustable be- tween +10 °C and -10 °C. It is also possible to control the heating with a timer to further reduce operational costs. -
Page 30: Program Menu
The required maximum temperature is set by pressing and then confirm- ing with , and the minimum temperature can then be set in the same way. The values can be set to within half a degree of accuracy and the factory setting is a maximum of +2 °C and a minimum of -6 °C. -
Page 31: System Settings Menu
Example: You want to turn off the snow melting installation at night between 10pm and 4am and in the middle of the day between 11am and 3pm seven days a week, i.e. the installation must be active from 4am to 11am and from 3pm to 10pm. - Page 32 Sensor settings SENSOR The thermostat uses external sensors which can be installed as either . You can only use one sensor at a time but if there are two sensors installed, you can alternate between You can find the sensor setting in the under and there select SYSTEM MENU...
-
Page 33: Troubleshooting
SENSOR A connected properly or is damaged. SHORT CIRCUIT IN If the sensor has to be replaced, you can order it from SENSOR B Ebeco: High temperature sensor: E 85 816 73 Low temperature sensor: E 85 816 71 The reserve power has run out if the thermostat... -
Page 34: Technical Specifications
Technical specifications Voltage 230VAC +/- 10% ~ 50Hz Breaking capacity 3,680W/16A/230VAC Power consumption 2.5 W Range of application -15 °C to +170 °C, divided in two areas Low temperature range -15 °C to +75 °C – NTC sensor High temperature range +60 °C to +170 °C – PTC sensor Connection cable max 2.5 mm²... -
Page 35: Guarantee
In the event of a material defect arising that is covered by the guarantee Ebeco AB must be notified. In the event of the guarantee being invoked, this guarantee certificate, together with accompanying installation invoice, a materials specification must be presented. - Page 36 EBECO AB Lärjeågatan 11 SE-415 25 Göteborg, SWEDEN Phone +46 31 707 75 50 Fax +46 31 707 75 60 ebeco.com info@ebeco.se...
Need help?
Do you have a question about the EB-Therm 800 and is the answer not in the manual?
Questions and answers