Siemens HiPath 4000 Operating Instructions Manual
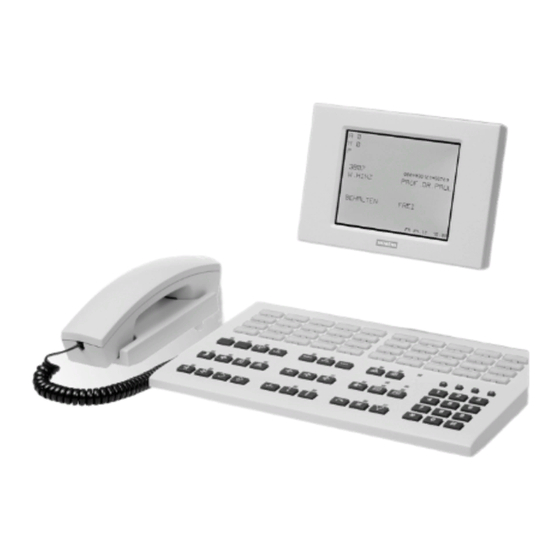
Attendant console ac4
Hide thumbs
Also See for HiPath 4000:
- Operation manual (164 pages) ,
- Operating manual (134 pages) ,
- Operating instructions manual (133 pages)
Table of Contents
Advertisement
Quick Links
Advertisement
Table of Contents

Related Manuals for Siemens HiPath 4000


Summary of Contents for Siemens HiPath 4000
- Page 1 HiPath 4000 Operating Instructions Attendant Console AC4...
- Page 2 Safety precautions Please remember! Use only AC/DC adapter S30122-X7311-X or C39280-Z4-C58. For UK only Use AC/DC adapter S30122-X7311-X100 or C39280-Z4-C66. For U.S. only Use AC/DC adapter S30122-X7311-X200 or C39280-Z4-C70. Bitte beachten! Nur Steckernetzteil S30122-X7311-X bzw. C39280-Z4-C58 verwenden. In Großbritannien Nur Steckernetzteil S30122-X7311-X100 bzw. C39280-Z4-C66 ver- wenden.
-
Page 3: Table Of Contents
Contents About these operating instructions ....7 Quick-check instructions ........7 Date and time . - Page 4 Contents Dialing with speed dialing numbers......30 Dialing with the trunk group keys ......30 Dialing with the notebook .
- Page 5 Contents Checking trunk numbers ..... . 50 Station-to-station restriction for station groups . . 51 Interrogating the internal station-to-station restriction....51 Changing the internal station-to-station restriction state (on/off).
- Page 6 Contents...
-
Page 7: About These Operating Instructions
About these operating instructions About these operating instructions These instructions cover all attendant facilities. The facilities available to you depend on the capacity and configuration of your PABX. Quick-check instructions At the back of these instructions you will find a detachable set of "quick- check instructions"... -
Page 8: Key Panel And User Interface
Key panel and user interface Key panel and user interface The display is illuminated for optimum visibility and can adjusted to suit the lighting in your individual environment. A key panel and user interface consisting of two basic displays (call pro- cessing layout and memory layout) are provided for attendant console op- eration. -
Page 9: Function And Feature Keys
Key panel and user interface Function and feature keys Output call data MCID Connect the current call to another on-hold connection JOIN Tape recorder activation/deactivation TAPE Trunk no. identification (test) TRACE Serial call SERIAL Park call PARK Release connection Alarm inquiry ALARM Charge inquiry ACCT... - Page 10 Key panel and user interface Internal or external call setup DIAL Answer or set up a personal call Answer call on line 1 LINE 1 Answer call on line 2 LINE 2 Paging PAGE - no function - Open Program menu PROG Memory input ENTER...
-
Page 11: Dialing Keypad
Key panel and user interface Dialing keypad Keys in the dialing keypad: • dial a call number • suffix-dialing possible as DTMF signaling (system-specific) Display and volume keys Ringer high/low and handset volume high/low RINGER The ringer signal can be decreased (by pressing "–") or increased (by pressing "+") when tone ringing is activated. -
Page 12: User Interface
Key panel and user interface User interface The user interface consists of two display areas, the call processing layout and the memory layout. In the default setting, up to 26 characters per line are displayed. The dis- play switches to a smaller script if up to 40 lines are required. Call processing layout Call processing layout provides an overview of queued calls and the current call processing state. - Page 13 Key panel and user interface Lines 1 to 3: Calls waiting to be answered (Æ page 17) are displayed in the first 3 lines starting with L, L and P . The figure after L indicates the number of waiting calls.
-
Page 14: Call And Traffic Displays
Key panel and user interface Call and traffic displays The type and origin of a call are displayed in the Call and Traffic fields in lines 1 to 3 of the call processing layout. Line 1 Call Traffic From Call Traffic From Call... - Page 15 Key panel and user interface The following traffic types are displayed in the Traffic field: Call Traffic From • EXCH Trunk call from public network. • Tie line from another PABX. • Internal call from own PABX or from a PABX with the same status as yours.
-
Page 16: Memory Layout
Key panel and user interface Memory layout You can configure the attendant console in memory layout and obtain infor- mation about the current assignment of memory contents. Every page in memory layout consists of 12 lines. • Line 1 (unnumbered) contains the name of the memory page (e.g. -
Page 17: Answering Calls
Answering calls Step by Step Answering calls You must answer a call before you can extend it. Press Personal call. The next call on the private line is answered. Press LINE 1. The next call on line 1 is answered. LINE 1 Press LINE 2. - Page 18 Answering calls Step by Step The right-hand side of line 9 may also indicate reasons for unsuccess- ful call attempts: NOT AVAILABLE NOT POSSIBLE/NO NUMBER STORED NOT AUTHORIZED INDIAL RESTRICTION DO NOT DISTURB CURRENTLY BLOCKED If NO CONNECTION POSSIBLE appears in line 11 and if you have answered a recall, a transferred call, or an intercept call, any further transfer attempt to contact this number will be un- successful.
-
Page 19: Extending A Call
Extending a call Step by Step Extending a call An answered call can be extended to a station or an attendant in two ways: • with speed servicing if you do not want to announce the call prior to extending it to the destination station, or •... -
Page 20: Normal Extending (To Free Station)
Extending a call Step by Step Normal extending (to free station) You can use the normal extending procedure in the case of • personal calls (P displayed) or • calls that you set up yourself. Prerequisite: a call is answered. Line 5 No. -
Page 21: Extending To The User On Hold
Extending a call Step by Step Extending to the user on hold If you were unable to contact the extension destination with normal extending, you can switch back to the user on hold. Press Call setup. DIAL Press Personal call. Press LINE 1. -
Page 22: Override
Extending a call Step by Step Override If BUSY, NOT AUTHORIZED or DO NOT DISTURB is displayed when extending a call to a destination user, you can still reach this user with the override function. ON HOLD appears on the left and FREE on the right in line 9 when the busy party hangs up. -
Page 23: Serial Call
Serial call Step by Step Serial call If a caller (LINE 1/LINE 2) wishes to be connected to several parties in turn, the call is handled as a serial call. Prerequisite: a call answered. Press Serial call. SERIAL The LED above the key lights up. The serial call function is active. -
Page 24: Toggling (Alternating)
Toggling (alternating) Step by Step Toggling (alternating) You can speak alternately to a caller and a destination station without the other party listening in or you can interrupt an ongoing call, e.g. a personal call, in order to answer another (urgent) call, e.g. a call on line 2. -
Page 25: Toggling Between A Caller And A Destination User
Toggling (alternating) Step by Step Toggling between a caller and a destination user You can speak to both users in turn by alternately pressing Personal call and the answering key you used to answer the call (toggle). Prerequisite: you answered a call and reached a destination user by means of normal extending. -
Page 26: Joining
Joining Step by Step Joining You can connect a parked user with the current calling party. Prerequisite: you parked at least one call Æ page 27. Press Join calls. The LED lights up. JOIN Press Call Park. The list of parked calls appears in memory layout. PARK Memory lines PARK... -
Page 27: Call Parking
Call parking Step by Step Call parking You can park up to 10 calls, whether answered or set up by you in or- der to continue or extend them later. Parking a call Prerequisite: you answered a call. Press Call Park. The call is parked in a free parking location. - Page 28 Call parking Step by Step Activating a parked call Prerequisite: you parked a call and apart from the permanent dis- plays, nothing is displayed (idle state). Press Call Park. The list of parked calls appears in memory layout. PARK Memory lines PARK 3112 MEYER...
-
Page 29: Dialing
Dialing Step by Step Dialing Dialing with manual call number input Press Call setup (optional). DIAL Enter the call number. The LED above Call setup lights up. The call number is dialed. Enter the call number. The LED above Call setup lights up. The call number is dialed. -
Page 30: Dialing With Speed Dialing Numbers
Dialing Step by Step Dialing with repertory keys Prerequisite: you have programmed a call number to a repertory key Æ page 38. Press Name and, where applicable, enter additional digits via the key- Name pad. The call number is dialed. Dialing with speed dialing numbers Speed dialing numbers are preprogrammed in the system. -
Page 31: Dialing With The Notebook
Dialing Step by Step Dialing with the notebook Prerequisite: you stored a call number in the notebook Æ page 40. Press Trunk reservation. Press Personal call. Press Program menu. PROG Press Number redial/Notebook. REDIAL The list of stored notebook numbers appears in memory layout. Memory lines NOTEBOOK 256 (destination) - Page 32 Dialing Step by Step Dialing the first call number: The 1st call number is dialed (here, e.g. 256) (automatic). Line 5 Line 6 LEO (name if provided) Line 9 FREE/CONNECTED Press Call extension. ON HOLD appears in line 9. DEST Dialing the second call number: Press Call extension.
-
Page 33: Settings/Interrogating The Memory
Settings/interrogating the memory Step by Step Settings/interrogating the memory There are two ways of calling up the memory layout to perform set- tings or memory interrogations: • Call up the Program menu which provides access to all other sub- menus and memory inquiries, or •... - Page 34 Settings/interrogating the memory Step by Step Memory lines Page 2 PROGRAMMABLE OPTIONS 2– CALLBACK (booking) NOTEBOOK PARK ALARM Spare Spare Spare Spare Spare Spare Acknowledgment Date Time or e.g. Press the icon key for the required memory inquiry (e.g. PARK). The selected memory is displayed.
-
Page 35: Interrogating A Memory Directly
Settings/interrogating the memory Step by Step Interrogating a memory directly The memory layout for a specific memory is displayed automatically if you press one of the following keys when the attendant terminal is free (no call is being answered): Notebook REDIAL Call parking PARK... - Page 36 Settings/interrogating the memory Step by Step Terminating memory inquiries You are in the Program menu or a submenu and want to switch back to the call processing layout. Press Program menu or answer a new call. The memory inquiry is terminated. PROG...
-
Page 37: Programming Repertory Keys
Programming repertory keys or trunk group keys Step by Step Programming repertory keys or trunk group keys Up to 42 numbers with a maximum of 22 digits (including trunk group code) or individual trunk group codes (tie trunks) can be stored under repertory keys or the trunk group keys External route 1 External route 2... -
Page 38: Interrogating A Specific Repertory Or Trunk Group Key
Programming repertory keys or trunk group keys Step by Step Interrogating a specific repertory or trunk group Press Program menu. PROG Press Name. Name External route 1. External route 2. The key assignment is displayed (cursor). Memory lines REPERTORY/TRUNK GROUP KEYS 111123 (destination) 222123 (destination) 222222 (destination) -
Page 39: Terminating Repertory Or Trunk Group Key Interrogation
Programming repertory keys or trunk group keys Step by Step Deleting a destination number Prerequisite: you interrogated the assignment of a repertory key and marked it with the cursor. Press Clear. The key assignment is deleted. CLEAR The acknowledgment CLEARED appears in line 12. Terminating repertory or trunk group key interrogation If 5 seconds have elapsed since an entry was performed, the... -
Page 40: Number Redial/Notebook
Number redial/notebook Step by Step Number redial/notebook The number redial function allows you to store the last call number di- aled in order to redial this call number at a later stage Æ page 29. You can store the numbers of up to 10 callers and the corresponding stations in the notebook for subsequent use Æ... -
Page 41: Storing A Call Number And Required Station In The Notebook
Number redial/notebook Step by Step Storing a call number and required station in the notebook Storing a number without call extension attempt Prerequisite: you answered a call. Press Number redial. The call number is stored. REDIAL Dial the call number. Press Connection release. -
Page 42: Checking Stored Call Numbers
Number redial/notebook Step by Step Checking stored call numbers Prerequisite: nothing is displayed in lines 4–11 in the call processing layout (idle state). Press Number redial/Notebook. The list of stored notebook numbers appears in memory layout. REDIAL NOTEBOOK Line 1 Deleting call numbers in the notebook Prerequisite: nothing is displayed in lines 4–11 in the call processing layout (idle state). -
Page 43: Exch/Tie Trunk Reservation
EXCH/TIE trunk reservation Step by Step EXCH/TIE trunk reservation If at times it is necessary for you to have immediate access to free ex- ternal lines (EXCH/TIE), for example during busy hours, selected trunks which have been defined by an administration and mainte- nance procedure can be reserved. -
Page 44: Charge Registration At The Attendant Console
Charge registration at the attendant console Step by Step Charge registration at the attendant con- sole Prerequisite: you dialed an external number. Press Charge inquiry. Charge registration at the attendant console is activated for the call. ACCT Charge registration at the attendant console can be provided for all dialed external calls (for specific systems) by pressing Charge inquiry. -
Page 45: Night Service
Night service Step by Step Night service When the attendant position is not manned (for example outside working hours) and "night service" is initiated, incoming calls are rout- ed to a night answering service (e.g.porter). To change from daytime to nighttime service, all the headset/handset plugs must be pulled. -
Page 46: Canceling Night Service
Night service Step by Step Activation of night service is displayed: Line 12 NIGHT SERVICE * 2 = Night service option Screen is cleared after five seconds. If you wish to use a night service option other than the one displayed, you can select one of up to 8 possible options prior to activation of night service as described below. - Page 47 Night service Step by Step Checking/changing night service options Press Program menu. PROG Press Night service. The list of night service options (maximum of 8) appears in memory NIGHT layout. Memory lines NIGHT SERVICE PORTER (example) UNIVERSAL NIGHT ANSWER NIGHT CONSOLE NO NIGHT SERVICE PERLACH COX (example)
- Page 48 Night service Step by Step Terminating night service interrogation If 5 seconds have elapsed since an entry was performed, the Program menu is displayed. You can retrieve the list by pressing Night service or terminate the interrogation. Press Program menu or answer a new call. The memory inquiry is terminated.
-
Page 49: Alarm
Alarm Step by Step Alarm Faults are indicated by flashing of the LED above the alarm key. Minor faults are signaled by a slow flashing sequence (general alarm). Faults which must be reported to Customer Service immediately are sig- naled by a rapid flashing sequence (urgent alarm). If the LED does not flash but remains lit, this indicates that another attendant position is currently querying the alarms. -
Page 50: Checking Trunk Numbers
Checking trunk numbers Step by Step Terminating alarm interrogation If 5 seconds have elapsed since an entry was performed, the Program menu is displayed. You can retrieve the list by pressing Alarm or terminate the in- terrogation. Press Program menu or answer a new call. PROG The alarm interrogation is terminated. -
Page 51: Station-To-Station Restriction For Station Groups
Station-to-station restriction for station groups Step by Step Station-to-station restriction for station groups Station-to-station calls by certain groups of stations can be prevented temporarily. These calls can then only be made via the attendant (example: hotels). Interrogating the internal station-to-station re- striction Prerequisite: the terminal is idle or in call state. -
Page 52: Changing The Internal Station-To-Station Restriction State (On/Off)
Station-to-station restriction for station groups Step by Step Changing the internal station-to-station restriction state (on/off) You have activated the groups with station-to-station restriction. To change the state of individual groups: press group number 1 to 8. To change the state of all groups together: press 0. Press Program menu. -
Page 53: Class-Of-Service Changeover For Station Groups
Class-of-service changeover for station groups Step by Step Class-of-service changeover for station groups The class of service of certain groups of stations can be temporarily changed to another class of service (a predefined alternative class of service). This changeover can be used to prevent toll calls being made after hours, for example. -
Page 54: Changing The Class-Of-Service State In Multiple Station Groups
Class-of-service changeover for station groups Step by Step Changing the class-of-service state in multiple station groups You activated the station groups with class-of-service changeover. To change groups individually: press group number 1 to 8. To change all groups together: press 0. Press Memory input. -
Page 55: Do-Not-Disturb Group
Do-not-disturb group Step by Step Do-not-disturb group Do-not-disturb group can be activated temporarily for certain groups of stations if these stations do not wish to be disturbed by incoming calls. Interrogating do-not-disturb Prerequisite: the terminal is idle or in call state. Press Program menu. -
Page 56: Terminating Do-No-Disturb Interrogation
Do-not-disturb group Step by Step Activating/deactivating do-not-disturb You called up a station group with do-not-disturb. To change groups individually: press group number 1 to 8. To change all groups together: press 0. Press Memory input. The ON/OFF or OFF/ON state change is stored. The message ENTER STORED appears in line 12. -
Page 57: Searching For A Party (Paging)
Searching for a party (paging) Step by Step Searching for a party (paging) You can use the paging system to search for an absent party. Prerequisite: a paging system is set up in the communications sys- tem. Call setup. DIAL Press Personal call. -
Page 58: Malicious Call Identification
Malicious call identification Step by Step Example: When a caller wants to speak to a party who is not at his/her desk, the caller can page this party. The paged party calls your attendant con- sole. Prerequisite: you answered a call. Press Call Park. -
Page 59: Tape Recorder
Tape recorder Step by Step Tape recorder If the facility is set up in your communications system, you can make a tape recording during a call or configure automatic tape recorder ac- tivation when answering trunk calls. Activating/deactivating a tape recorder during a call Prerequisite: you are conducting a call. -
Page 60: Deactivating Automatic Tape Recorder Start
Tape recorder Step by Step Press 1. The LED test is performed. Press 0. The test menu disappears. Plug in the handset or the headset. The tape recorder is automatically activated every time a trunk call is received. Deactivating automatic tape recorder start Prerequisite: the handset or the headset is unplugged: Press Program menu. -
Page 61: Audible And Visual Operating Aids
Audible and visual operating aids Audible and visual operating aids Audible signals and user prompting Tone Cadence Meaning Dial tone* The tone sequence de- Dial number (internal/external). pends on the communi- Ringing Number or service free. cations system settings. tone Busy tone Number or service busy. -
Page 62: Index
Index Index Index Index Index Handset volume, setting ......11 Alarm ............49 Internal call indicator ........8 Alarm display(s) canceling ..........49 displaying ..........49 Alternating ........... 24 Key legend ..........9, 17 Answering ........... 17 Keys ..............8 Answering trunk calls, configuring .. - Page 63 Index Index Index Index Ringer, activating/deactivating ....11 Ringing tones ..........61 Serial call ............23 Setting the ringer ........11 Speed servicing .......... 19 Station groups station-to-station restriction ....51 Station-to-station restriction ..... 51 Tape recorder ..........59 Text communication ........
- Page 64 -43$643360663330%:<6060:94<- 1P A31003-S3000-B793-3-7619 Reference no.: A31003-S3000-B793-3-7619 • Printed in the Federal Republic of Germany • BA 3.8.2000 © Siemens AG 2000 • Information and Communication Networks • Hofmannstr. 51 • D-81359 München •...
- Page 65 HiPath 4000 Quick-Check Instructions Attendant Console AC4...
- Page 66 Keypad Keypad MCID Output call data DIAL Call setup JOIN Connect a call to another on-hold Answer or set up a personal call connection TAPE Activate/deactivate LINE 1 Answer call on line 1 TRACE Trunk no. identification (test) LINE 2 Answer call on line 2 SERIAL Serial call...
- Page 67 Examples of operation Examples of operation Dialing Dial Wait for answer Speak Disconnect destina- tion Extend call (seebelow) Answering Disconnect Extend call (see below) Speak Extending a call Dialed party/caller only for answering Dial desti- Speed servicing Speak is automatically nation with extended...
- Page 68 Examples of operation Toggling (alternating) Switch Dialed Speak back to party/caller Wait for dialed is extended party/ answer or caller (desti- Switch Dialed nation) back to Speak party/ destina- caller is tion extended Charge registration at the attendant console If a station user requests you to record the charges of a trunk call, mark the extended call with (ACCT) when the called subscriber answers.
Need help?
Do you have a question about the HiPath 4000 and is the answer not in the manual?
Questions and answers