Table of Contents
Advertisement
Quick Links
Advertisement
Table of Contents

Related Manuals for Bartscher 900T2


Summary of Contents for Bartscher 900T2
- Page 1 900T2 - 900T1S2 - 900T2 110256 - 110257 - 200359...
- Page 2 Bartscher GmbH Phone: +49 5258 971-0 Franz-Kleine-Str. 28 Fax: +49 5258 971-120 Technical Support Hotline: +49 5258 971-197 D-33154 Salzkotten Germany www.bartscher.com Version: 1.0 Date of preparation: 2021-09-08...
-
Page 3: Table Of Contents
Original instruction manual Safety ......................2 Explanation of Signal Words ..............2 Safety instructions..................3 Intended Use ................... 6 Unintended Use ..................6 General information ..................7 Liability and Warranty ................7 Copyright Protection ................7 Declaration of Conformity ................ 7 Transport, Packaging and Storage .............. -
Page 4: Safety
Safety Diese Bedi enungsanlei tung besc hrei bt di e Installation, Bedi enung und Wartung des Geräts und gilt als wic htige Infor mationsquelle und N achschl agewer k. Di e Kenntnis aller enthaltenen Sic herheits hinweis e und H andlungs anweisungen schafft die Vorauss etz ung für das sichere und s ac hger echte Ar beiten mit dem Gerät. D arüber hi naus müs sen die für den Ei ns atz ber eic h des Geräts geltende n ör tlichen Unfall verhütungs vorsc hriften und allgemeinen Sicherheits besti mmungen eing ehalten wer den. Dies e Bedi enungs anleitung is t Bes tandteil des Produkts und muss i n unmi ttelbarer N ähe des Ger äts für das In¬s tall ations-, Bedi enungs-, Wartungs- und R einigungspers onal jederzeit z ugänglich auf¬bewahrt werden. Wenn das Ger ät an eine dritte Pers on weiterg egeben wird, muss die Bedi enungsanlei tung mit ausgehändigt wer den. -
Page 5: Safety Instructions
Safety WARNING! The signal word WARNING warns against hazards that may lead to moderate or severe injuries or death if the hazards are not avoided. CAUTION! The signal word CAUTION warns against hazards that may lead to light or moderate injuries if the hazards are not avoided. , di e IMPORTANT! The signal word IMPORTANT indicates possible property damages,... - Page 6 Safety • Always completely unwind the power cord. • Never place the appliance or other objects on the power cord. • Always take hold of the plug to disconnect the appliance from the power supply. • Check the power cord regularly for damage. Do not use the appliance if the power cord is damaged.
- Page 7 Safety Improper Use • Unintended or prohibited use may cause damage to the appliance. • The appliance may only be used when its technical condition is flawless and allows for safe operation. • The appliance may only be used when all connections are executed according to rules of law in force.
-
Page 8: Intended Use
Safety Intended Use As described below, every use of the appliance for a purpose differing and/or diverging from its intended standard use, is prohibited and considered to be an unintended use. The following is an intended use: – Cooling, preparation and sales of salads, fruit, vegetables and cold dishes. -
Page 9: General Information
General information General information Liability and Warranty All information and instructions in this instruction manual account for legal regulations in force, current level of technical engineering knowledge as well as our expertise and experience, developed over the years. If special models or additional options are ordered, or state-of-the-art technical solutions were implemented, the actual scope of delivery of the appliance may, in some circumstances, differ from descriptions and numerous drawings in this instruction manual. -
Page 10: Transport, Packaging And Storage
Transport, Packaging and Storage Transport, Packaging and Storage Delivery Check Immediately upon reception, check the delivery for completeness and possible shipping damage. In the case of visible transport damage refuse to accept the appliance or accept it conditionally. Mark and note the scope of damage in shipping documents/consignment list of the shipping company and lodge a complaint. -
Page 11: Technical Data
Technical Data Technical Data Technical Specifications Version / Design • Cooling: circulating air • Cooling cabinets and drawers • Temperature control: digital • Thermostat • Control: electronic, button • Digital display • ON/OFF switch • Indicator light: ON/OFF • Automatic defrost function •... - Page 12 Technical Data Mini-Refrigerated Counter 900T2 Name: 110256 Art. No.: Material: Chrome-nickel steel Volume, in l: Number of cabinets: Cabinet dimensions (W x D x H), in mm: 428 x 497 x 590 Cabinet Gastro Norm: 1/1 GN Number of grates:...
- Page 13 900 x 700 x 880 Weight, in kg: 76,5 More information on the appliance is available in our website www.bartscher.com or, pursuant to the Regulation (EU) 2015/1094, in our product data base at https://energy-label.ec.europa.eu/. Enter article number for a model. 110256...
- Page 14 Technical Data Preparation table 900T2 Name: 200359 Art. No.: Material: Chrome-nickel steel Volume, in l: Number of cabinets: Cabinet dimensions (W x D x H), in mm: 428 x 497 x 590 Cabinet Gastro Norm: 1/1 GN Number of grates:...
-
Page 15: List Of Components Of The Appliance
Technical Data List of Components of the Appliance 110256 Fig. 1 1. Worktop 2. Housing 3. Door (2 pcs) 4. Ventilation openings 5. Grate (2 pcs) 6. Guides for grate shelf 7. ON/OFF switch with integrated 8. Digital temperature controller power indicator light (green) 110256 13 / 28... - Page 16 Technical Data 110257 Fig. 2 1. Worktop 2. Housing 3. Door (1 pcs) 4. Ventilation openings 5. Drawer (2 pcs) 6. Grate (1 pcs) 7. Guides for grate shelf 8. ON/OFF switch with integrated power indicator light (green) 9. Digital temperature controller 14 / 28 110256...
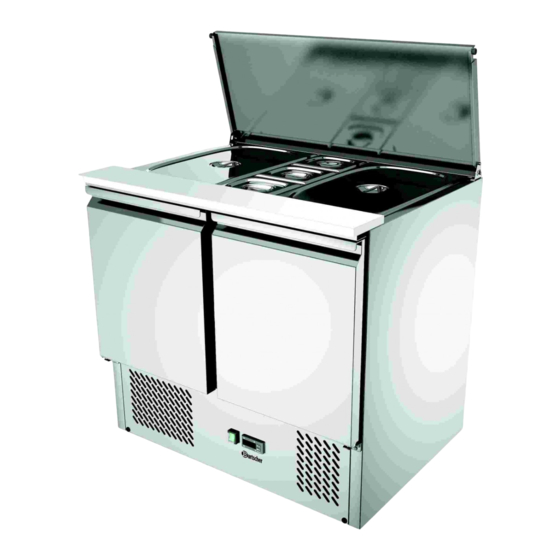
- Page 17 Technical Data 200359 Fig. 3 1. Cooling top lid 2. Cooling tray for GN containers 3. Cooling top 4. Housing 5. Ventilation openings 6. Door (2 pcs) 7. Worktop 8. Grate (2 pcs) 9. Grate guides 10. ON/OFF switch with integrated power indicator light (green) 11.
-
Page 18: Functions Of The Appliance
Installation and operation Functions of the Appliance Food products or meals prepared in suitable containers may be cooled and stored through a specified time with suitable temperature settings. Installation and operation Installation CAUTION! Incorrect installation, positioning, operation, maintenance or misuse of the appliance may lead to personal injury or property damage. - Page 19 Installation and operation – sufficiently large, and thus enabling usage of the appliance with no problems; – easily accessible; – well ventilated. • Nie nal eż y umies zcz ać urządz eni a w g orąc ym otoczeniu ani w pobliż u materiał ów łatwo palnyc h. •...
-
Page 20: Operation
Installation and operation Power supply connection • Verify if technical data of the appliance (see rating plate) correspond with the local electric power grid specification. • Connect the appliance to a single, properly grounded mains socket with protective contact. Do not connect the appliance to a multi-socket. •... - Page 21 Installation and operation Appliance Preparation and Start-Up 1. Before use, clean the appliance and accessories thoroughly, following indications in section 6 'Cleaning and Maintenance'. 2. To end with, dry the appliance and accessories thoroughly. 3. Switch the appliance on (without food products). Follow indication in the subsequent sections of the instruction.
- Page 22 Installation and operation LED indicators The LED indicators in the digital display show the status of the active function: Status of the Meaning active function illuminates activated compressor flashes in delay illuminates defrosting in progress flashes defrosting delay illuminates fan activated flashes delay after defrosting illuminates...
- Page 23 Installation and operation Automatic defrosting The appliance defrosts automatically 4 times over 24-hour period. The timer initiates with the first activation. 1. If there is a need for the change of automatic defrosting phases, press the button and hold it for more than 2 seconds. The digital display shows the symbol.
- Page 24 Installation and operation Button combinations Concurrent pressing of two buttons enable activation/deactivation of a number of functions. Button locking or unlocking: – to lock, press both buttons concurrently and hold them pressed for more than 3 seconds, until the digital display shows the "OFF"...
-
Page 25: Cleaning And Maintenance
Cleaning and Maintenance Cleaning and Maintenance Safety Instructions for Cleaning • Before cleaning, disconnect the appliance from the power supply. • Leave the appliance to cool down completely. • Make sure water does not enter the appliance. Do not immerse the appliance in water or other liquids during cleaning. -
Page 26: Possible Malfunctions
Possible Malfunctions Avoid using hard objects or metal implements, which might damage condenser ribs. 2. Cleaning the filter behind the service hatch (weekly, by operating personnel): – use the key to open the service hatch at the front and tilt downwards; –... - Page 27 Possible Malfunctions Error Possible Cause Solution No cooling Plug improperly inserted into Remove the plug and insert it socket. properly in the socket Electric power supply safety Check the fuse, connect the fuse damaged appliance to another socket No power supply Check the electric power supply Damaged temperature...
-
Page 28: Disposal
Disposal Error Possible Cause Solution Water escapes Condensed water drain pipe Clean the water drain pipe or from housing is clogged or blocked remove the blocking objects Appliance is poorly levelled Adjust the appliance levelling through screwing the feet in/out Strange or loud Appliance is not placed on Place the appliance on an...
Need help?
Do you have a question about the 900T2 and is the answer not in the manual?
Questions and answers