
Subscribe to Our Youtube Channel
Related Manuals for Coccolle Siyana


Summary of Contents for Coccolle Siyana
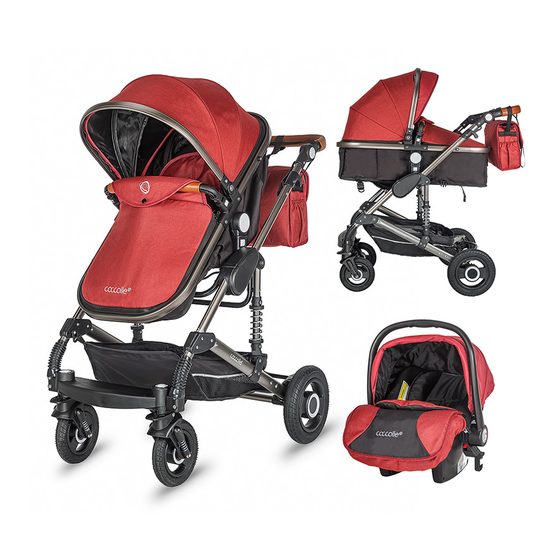
- Page 1 Cărucior 3 in 1 Stroller 3 in 1 Babakocsi 3:1 Manual de instructiuni / User’s manual / Hasznalati utmutato...
- Page 2 Carlig de pliere Folding hook...
- Page 3 Button Buton Centura Buton Centura Button Belt Belt Buton Button Button Buton Button Button Buton Buton...
- Page 4 Frana Buton Button Brake Button Buton...
- Page 5 Buton Clema de prindere Button Safety hook Buton Buton Button Button Buton Button RO: imaginile din acest manual au scop ilustrativ. Produsul achizitionat de dvs poate sa difere. / Functionarea in parametri normali a acestui produs depinde de mentinerea acestuia in conditii de igiena propice. EN: the images shown in this instructions manual have illustrative purpose.
- Page 6 A) copertina B) maner de impins ajustabil C) landou transformabil D) centura de siguranta cu prindere in 5 puncte E) buton ajustare pozitie de inclinare F) cos de cumparaturi G) roti spate cu frana H )roti fata cu suspensii I) roti pivotante cu functie de blocare Instructiuni de asamblare Deplierea caruciorului -Scoateti caruciorul din cutie dupa cum este ilustrat in fig1...
- Page 7 Rotile din fata pivotante Daca butonul de blocare pivot este ridicat atunci rotile din fata se vor roti. Daca butonul de blocare pivot este actionat atunci rotile din fata vor fi blocate in directia fata, asa cum este ilustrat in fig 10a. Folosirea franei de la rotile din spate Folositi piciorul pentru a ridica frana si a elibera sistemul de franare si apasati in jos pentru a actiona mecanismul de franare dupa cum este ilustrat in fig 10b.
- Page 8 - este interzis sa depozitati obiecte ce depasesc greutatea de 2 kg in cosul de cumparaturi - produsul nu este potrivit a alerga cu el sa a face patinaj -cand stationati caruciorul folositi intotdeauna frana -tineti produsul la o distanta considerabile de foc si de surse deschise de caldura -folositi produsul doar pe suprafete netede Ingrijire si mentenanta...
- Page 9 A. Canopy B. Adjustable handle C. Reversible & removable carry cot D. 5 Point safety harness E. Reclining Positions F. Storage basket G. Rear wheel with lock H. Front wheels with suspension I. Swivel wheels with locking function Assembly Instructions: Unfold the Baby Stroller - Take the stroller out of the package as shown in Fig.
- Page 10 Canopy As shown in Fig. 9a, 9b, 9c, 9d and 9e the canopy can be folded or unfolded by pushing or pulling its front edge backward or forward. Front Swivel Wheel If the fixed clip is raised, the front wheels will swivel. If the fixed clips are pushed down, the front wheels can't swivel around the front pipe as shown in Fig.
- Page 11 Warning - Inspect the stroller properly every time before placing your baby in it - Never leave your baby unattended in the stroller - Do not hang or place anything so heavy on the handle that the stroller becomes prone to tipping over backwards - Before use make sure all the locking devices are inspected and secure - The stroller is designed for babies between 0 to 36 months (0 to 6 months while using as carry cot) and maximum carrying capacity is 15 kg (9 kg while...
- Page 12 Coccolle Siyana 3 az 1-ben multifunkcios babakocsi Használati utmutató Alkatrész lista A) kupola B) állítható tolókar C) átalakítható mozeskosár D) 5 pontos biztonsági öv E) hátra döntési pozició beállító gomb F) vásárlókosár G) hátsó kerekek fékkel H) első kerek felfügesztéssi funkció beállitási pont I) bolygósitható...
- Page 13 Bolygósitható első kerekek: Az első kerekek fölött egy gomb található. Ha ez a gomb felemelve van akkor a kerekek bolygósithatoak. Viszont ha lenyomva van a gomb akkor az első kerekek blokkolva vannak előre pozicióban (10a kép). A fék használása Lábbal emelje a féket, ahoz hogy fékezetlen tudja tolni a babakocsit, majd nyomja le a féket amikor szünete vesz a tolástol a 10b.
- Page 14 - a babakocsit 0 és 36 hónapos gyerekek számára lett tervezve és 15 kg maximális súly teherbirása van. Mozeskosár formában csak 6 honapos korig és 9 kg súly eléréseig lehet használni. - tilos a 2 kg súlyt meghaladó tárgyakat a vásárlokosárban tárolni - a termék nem alkalmas korcsolyázni -a babakocsi parkolásákor mindig használja a féket - tartsa a terméket jelentős távolságban a tűztől és a nyílt hőforrásoktól...
- Page 15 Foto/ Photo A...
- Page 16 Foto/Photo B Foto/Photo C Fig. 1-20. Ajustari/ Adjustments/ Beállítások...
- Page 18 Fig.21-25. Selectarea locului in autovehicul si ajustarea scaunului/ Seat selection and adjustment/ Az autoules valasztasa es hordozo bealitasa Fig. 26-30. Instalarea in vehicul/ Installation in vehicle/ A biztonsági gyermekülés rögzítése a gépjárműb...
- Page 19 Fig.31-35. Asigurarea copilului in scaun/ Securing the child/ A biztonsági gyermekülés rögzítése a gépjárműbe...
- Page 20 Fig.36 Indepartarea si inlocuirea husei exterioare/ Removing and replacing the cover/ Az üléshuzat eltávolítása RO: imaginile din acest manual au scop ilustrativ. Produsul achizitionat de dvs poate sa difere. / Functionarea in parametri normali a acestui produs depinde de mentinerea acestuia in conditii de igiena propice. EN: the images shown in this instructions manual have illustrative purpose.
- Page 21 Foto A - Parti componente 1. Tetiera 2. Protectie umeri 3.Centura umeri 4. Protectii ham umeri 5. Ham pentru picioare 6. Reductor sezut 7.Centura ajustare 8. lntrare centura de ajustare 9. lesire centura de ajustare 10. Buton central de ajustare 11.
- Page 22 2. Compatibilitate Scaunul auto Ambra a fost testat si aprobat conform celei mai noi versiuni a reglementarii ECE-R44/04. Este incadrat in categoria ,,Universal''. Cosul auto Ambra este destinat categoriei O+ de varsta, adica pentru copiii cu greutatea intre O si 13kg (nou-nascuti pana la 15 Iuni). Trebuie folosita centura de siguranta in 3 puncte.
- Page 23 Scaunul trebuie pozitionat si instalat corespunzator, astfel incat, in conditii normale de folosinta a vehiculului, nici o parte a acestuia sa nu ramana intepenita/blocata la reglarea unui scaun, sau cu o usa a vehiculului. Daca exista o incompatibilitatea cataramei centurii pentru adulti si cea a sistemului de prindere a scaunului de masina pentru copii, sau o nepotrivire intre punctele de prindere a acestora, este indicat sa contactati producatorul in cazul in care aveti dubii.
- Page 24 4.3.3. Apoi trageti catre lateral si inserati in orificiul intern (fig10,11). 4.3.4. Acum inserati prin partea metalica in celalalt orificiu, situat pe suprafata scaunului ( fig.12). 4.3.5. lnserati din nou prin celalalt orificiu (fig13). 4.3.6. lmbinati presand partea de metal pentru a termina. (fig14). 4.4 Ajustarea pe inaltime a curelelor pentru umeri.
- Page 25 lntotdeauna folositi bancheta din spate ale vehiculului, chiar daca legislatia in vigoare permite si folosirea scaunului de pasager din fata. Verificati legislatia in vigoare, deoarece aceasta poate sa difere de la o tara la alta. Este indicat sa asamblati scaunul dumneavoastra pentru copii intr-o parcare amenajata.
- Page 26 7.3. Asezati copilul in scaunul pentru copii, cu catarama centurii pentru picioare (pozitia nr. 22 pagina 01) pozitionata intre picioareleacestuia. lntroduceti mainilecopilului prin centurilede umeri (part no.03 page 01), astfel incat centurile si protectiile acestora sa fie deasupra umerilor copilului. (fig 33). Ajustati centura si tetiera pe inaltime urmarind capitolul 4.4.
- Page 27 10. Masuri de luat in cazul unui accident Dupa un accident produs la o viteza mai mare de 10 km/h, produsuI trebuie trimis la producator, pentru a ti verificat de posibile avarii, si inlocuit daca este necesar. Partea textila: Toate materialelel indeplinesc cele mai inalte standarde de protectie a culorilor importriva razelor ultraviolete UV.
- Page 28 Photo A- Parts indication 1. Headrest liner 2. Shoulder pad 3. Shoulder strap 4.Hip pad 5. Crotch strap 6. Seat cushion 7. Adjust belt 8. Inner slot 9. Outer slot 10. Center adjuster 11. Shoulder belt of vehicle 12. Vehicle buckle tongue 13.
- Page 29 2. Suitability The Ambra has been tested and approved according to the newest version of the ECE-R44/04 regulation. It's approved with the "universal" category. The Ambra child restraint system is suitable for weight classes O+, i.e. for children weighing between Oto 13kg (approximately new born to 15 months).
- Page 30 If there is an interference between the adult safety-belt buckle and child restraint system, it is unsatisfactory position of the adult safety-belt buckle relative to the main load bearing contact points on the restraint. You shall be advised to contact the child restraint manufacturer if in doubt about this point.
- Page 31 Notice: Ambra child seat's harness have 2 height position, the top of the shoulder belt must be parallel or a little higher than the child's shoulders. That can provide the effective protect for your child at collision. Follow the step as bellow. 4.4.1.
- Page 32 6. Installation in vehicle 6.1. Seat installation: Place the child seat to the rear seat in the vehicle, Let the bottom of the seat against vehicle seat surface, and the front of the seat touched vehicle seat backrest. (fig.26) 6.2. Then Extend the vehicle belt longer enough, Insert it from the slot at the front of the seat, then through it into the slot to the other side.
- Page 33 8. Removing and replacing the cover The fabric cover on this seat can be remove for washing, It just need release the plastic clip and pull out at the fringe of the seat. (fig.36) After washing you can assemble it to the seat again.
- Page 34 Please contact your specialist dealer immediately in the event of warranty claim. Thank you for purchasing this Group:O+ car seat. Please take the time to read and understand these instructions fully. Not following the instructions might compromise safety of your baby. If you are not completely satisfied with the car seat or you would like to change any accessory or obtain any help about the car seat, and you have any doubt, you can contact our customer services department (details on the back of this...
-
Page 35: Biztonsági Előírások
0+ csoport születéstől 15 hónapos korig 0-13 kg-ig Köszönjük, hogy a Coccolle Ambra terméket választotta! Kérjük, olvassa el figyelmesen az útmutatóban leírtakat az első használat előtt, és őrizze meg a dokumentumot a biztonsági gyermekülés teljes élettartamára! Ez az univerzális babahordozó és biztonsági gyermekülés, az ECE 44.04 számú... - Page 36 10. Védje a babahordozót a közvetlen napfénytől, mert a fém részek felforrósodhatnak és gyermeke megsérülését okozhatják. 11. Győzödjön meg róla, hogy minden elem a helyén van és nem szorult be az ülések közé vagy az ajtónyílásba. 12. A csomagokat és nehéz tárgyakat biztonságosan helyezzük el az autóban. Soha ne helyezzen nehéz tárgyakat és csomagokat a biztonsági utóshordozóra! 13.
- Page 37 25. övcsat 26. a gyermekülés váza 27. hordozókar beállító gomb 28. hordozókar A vállmagasság beállítása A vállöv magassága két pozícióba állítható. Az övet abba a nyílásba kell befűzni, amelyik a gyermek válla fölött van, vagy ahhoz közelesik. Ha a vállöv magassága nem felel meg a gyermek méreteinek, állítsa be a magasságot a következő...
- Page 38 3. lépés: Vezesse át a biztonsági öv felső részét a gyermekülés hátulján lévő vezető nyíláson. 4. lépés: Állítsa szorosra az autó biztonsági övét, hogy a babahordozó biztonságosan rögzítve legyen. 5. lépés: Amennyiben nem boldogul a bekötéssel, akkor használat előtt vegye fel a kapcsolatot a termék gyártójával vagy forgalmazójával.
- Page 39 Garanciára vonatkozó rendelkezése: A garancia a termék fogyasztó részére való átadás napjával kezdődik és az eladó üzlet által kibocsátott nyugtával vagy számlával együtt érvényes. A garancia a termék rendeltetésszerű használata alatt bekövezkezett hibára/hibákra érvényesíhető. A termék csak ép és tiszta állapotban tudjuk javításra átvenni. Az alábbi hibák nem tartozik a garancia alá: - a termék természetes elhasználódása, vagy annak nem indokolt, oktalan szakadása...
Need help?
Do you have a question about the Siyana and is the answer not in the manual?
Questions and answers