
Related Manuals for Coccolle Neve


Summary of Contents for Coccolle Neve
- Page 1 Cărucior 3 in 1 Stroller 3 in 1 Passeggino 3 in 1 Babakocsi 3:1 Manual de instructiuni / User’s manual / Manuale di instruzioni / Hasznalati utmutato...
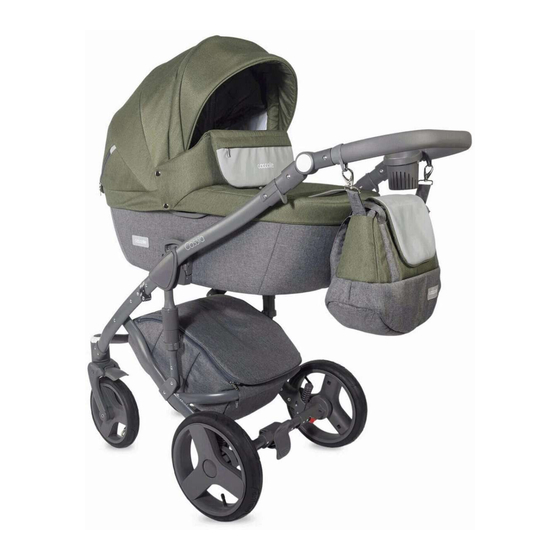
- Page 2 Pastrati acesti manual pentru referinte viitoare. Siguranta copilului dumneavoastra poate fi pusa in pericol daca nu respectati aceste instructiuni. Partile componente: 1. Cleme pentru gentuta 2. Maner ajustabil pe inaltime 3. Blocare de siguranta pe cadru 4. Amortizoare frontale de soc care absorb duritatea suspensiilor 5.
- Page 3 Atentie! Inainte de a utiliza caruciorul, asigurati-va ca toate mecanismele de pliere au fost blocate corespunzator. C. Introducerea si scoaterea rotilor din fata Inserati rotile in locasul destinat acestora pana cand auziti sunetul „click”. Pentru a le scoate complet, apasati butonul situat deasupra rotii, pe cadru.
- Page 4 Stroller's function 1. Hangers for the bag 2. Height-adjustable handle 3. Safety lock on a frame 4. Bottom shock absorbers allows on changing hardness of suspension 5. Safety lock on rear wheels 6. Blockade of unplugging a carrycot or a seat 7.
- Page 5 B. Folding the pram To fold the pram it's necesarry to: detach all the elements from the frame, press safety lock located on the right side of the frame and the same time pull the handgrips on both sides of the pram, right side with the safety lock and left side.
- Page 6 Funzioni passeggino: 1. Appendini per la borsa 2. manico regolabile in altezza 3. Blocco di sicurezza su un telaio 4. Gli ammortizzatori inferiori consentono di cambiare la durezza della sospensione 5. Blocco ruote posteriori – freno 6. Blocco di sicurezza sulle ruote posteriori 7.
- Page 7 Peso (elementi individuali) Telaio con ruote: 10 kg, Seduta passeggino: 5.5 kg; Navicella: 4.5 kg; Seggiolino auto: 3 kg Dimensioni chiuso (telaio con route): LARGHEZZA: 0,63 m, LUNGHEZZA: 0,84 m, ALTEZZA: 0,37 m Possono essere utilizzati solo pezzi di ricambio forniti o consigliati dal produttore / distributor. Gli accessori che non sono approvati dal produttore non devono essere utilizzati.
- Page 8 J. POGGIAPIEDI REGOLABILE Per regolare la posizione del poggiapiedi (per abbassarla), premere contemporaneamente i pulsanti situati su entrambi i lati e modificare la sua posizione. Per riportare il poggiapiedi nella posizione originale (per sollevarlo), sollevarlo finché non si blocca in posizione senza premere i pulsanti.
- Page 9 3. Tartsa messze direkt napsugártol mivel az erős nap változtatja az anyag szinét. Felhasználási feltételek 1. A Neve babakocsi a 0-36 honapos gyerekek számára lett tervezve. A sportrész használható csak a 6 honapos vagy nagyobb gyerekek számára. A mozeskosár az újszülöttek számára lett tervezve és használható...
- Page 10 Telepítési utasításokat A.) A váz emelése: a váz kinyitásához lábbal nyomja a kerék részét és emelje fel a babakocsi tolokarát ameddig a klick hangot hallatszik. B.) A váz összecsukása: a sikeres összecsukásert szukséges a kiegészítők eltávolitása; ezután, nyomja a vázon talált biztonsági zárt és ugyanabban az időben emelye a tolokar alatti gombokat miközben lassan engedi lefele a tolokart.
- Page 11 Cosulet auto Componente: 1. Maner 2. Buton de reglare al manerului 3. Centura de siguranta (cureaua de jos) 4. Baza cosulet 5. Husa 6. Curea de tragere 7. Buton curea de tragere 8. Catarama centura de siguranta 9. Sticker cu informatii 10.
- Page 12 1. Apasati butonul rosu si deschideti catarama centrala a cosuletului auto. 2. Asezati copilul in cosuletul auto. 3. Asigurati-va ca cel mic a fost plasat corespunzator in cosulet si ca spatele lui este sprijinit corect. 4. Puneti centurile de siguranta pe umerii copilului asigurandu-va ca acestea nu sunt rasucite. 5.
- Page 13 Description of the safety seat components: 1. Carrier handle 2. Handle regulation button 3. Lap belt path (seat sides) 4. Seat body 5. Seat cover 6. Pull strap 7. Pull strap regulation buckle 8. Harness fastening buckle 9. Position of information sticker (seat side) 10.
- Page 14 1. Press the red button and open the central buckle of the child seat. 2. Place the child in the car seat. 3. Make sure that the child has been placed correctly in the seat and that his back adheres to the seatback.
- Page 15 Cari genitori, Congratulazioni per l'acquisto del nostro seggiolino auto CAPRI. Garantiamo che seggiolino CAPRI soddisfa i requisiti di sicurezza più severi previsti nella norma europea di sicurezza ECE R44 / 04 ed è adatto per i bambini nel gruppo di peso 0 - fino a 10 kg. Si prega di ricordare che il seggiolino di sicurezza CAPRI garantisce la massima sicurezza solo se utilizzato secondo il manuale dell'utente.
- Page 16 II. Regolazione imbracatura del seggiolino CAPRI RICORDARE che tutte le cinture che fissano il seggiolino in auto devono essere strette, le cinture dell'imbragatura devono adattarsi al corpo del bambino e non devono essere attorcigliate. 1. Per allentare le cinture dell'imbracatura premere il dispositivo di regolazione - la fibbia nella parte anteriore della scocca del seggiolino, tirando entrambe le cinture contemporaneamente.
- Page 17 2. Ez a hordozó rögzíthető a jármű első vagy hátsó ülésére és mindig a menetiránnyal ellentétesen. 3. Az első ülésen kizárólag kikapcsolt légzsák esetén használható a Neve/Gioia hordozó. 4. Az ön biztonságára kérjük mindig rögzitse a hordozót a jármü biztosági övvel, akkor is ha gyerek nincs benne.
- Page 18 A biztonsági öv beállítása Vigyázzon arra hogy a biztonsági öv minding elégé soros és nem csavaros. 1. A vállpántok lazításához nyomja meg az álitási pánt gombját és mindkét pántot egyszerre húzza. 2. A vállpántok megszorításához húzza meg a középső pántot az ülés elején amíg a válpántok szoros a gyermek testéhez.
Need help?
Do you have a question about the Neve and is the answer not in the manual?
Questions and answers