Table of Contents
Advertisement
Quick Links
Advertisement
Table of Contents

Related Manuals for In-situ Partech 228531


Summary of Contents for In-situ Partech 228531
- Page 1 750w² Monitor Operator’s Manual 2022-01-18 | 0046360...
-
Page 2: Table Of Contents
Contents Getting Started....................................... 4 Sensor Calibration ....................................5 Suspended Solids Sensor - Zero Calibration ........................5 Suspended Solids Sensor - Set Measurement Range (Set Cal) ..................5 Suspended Solids Sensor - Take Sample for Calibration ....................6 Sample Result (Turbidity/Suspended Solids Sensors) ...................... 7 Dissolved Oxygen Sensor - 100% Open Air Calibration .................... - Page 3 Introduction ....................................14 Add a Site ......................................14 Delete a Site ....................................14 Edit a Site Name ....................................15 Sensors with more than one active site ..........................15 Measurement Configuration ................................16 Title Menu Options ..................................16 Units Menu Options ..................................16 Recorded Data ......................................17 Data Via USB ....................................17 Monitor Configuration ..................................18 Auto Shutdown Menu Option ..............................18 Enable Service Mode ..................................18...
-
Page 4: Getting Started
Getting Started Connect the sensor. Measure Plug the sensor into the port on the right-hand Press the On/Off button if the monitor isn’t side of the 750w2 Monitor. already displaying a reading. Use the menu. Charge as needed. Press the Menu button and use the arrow keys Connect a charging cable to the left port to access menu options. -
Page 5: Sensor Calibration
Sensor Calibration Suspended Solids Sensor - Zero Calibration Use the Set Zero function to perform a zero calibration. Start by immersing the sensor in clean water. Use a dark container to prevent interference from ambient light. Press Menu on the Select Measurement Select Suspended Choose Set Zero and... -
Page 6: Suspended Solids Sensor - Take Sample For Calibration
The Set Cal screen Use the arrow keys to The monitor displays a “Calibration Success” displays sensor info. adjust the value to the reading. Press OK. appears at the bottom Press OK. maximum expected of the screen. concentration. Press Suspended Solids Sensor - Take Sample for Calibration Use Take Sample when you don’t know the value of the calibration solution. -
Page 7: Sample Result (Turbidity/Suspended Solids Sensors)
Sample Result (Turbidity/Suspended Solids Sensors) Use Sample Result to adjust the value stored earlier with the Take Sample function. You must know the value of the calibration solution based on a lab analysis. Press Menu on the Select Measurement Choose Sample Use the arrow keys Config with the arrow Result and press OK. -
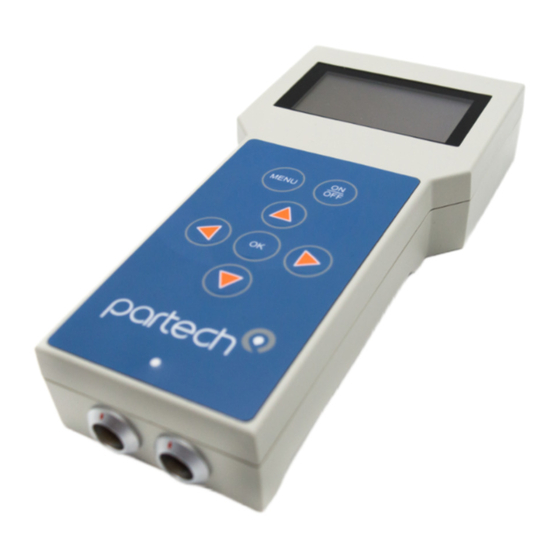
Page 8: Introduction To The 750W 2 Monitor
Introduction to the 750w Monitor General The 750w² Monitor is designed to work with Partech’s WaterWatch² (w²) sensors. It combines a clear display of the measured parameter and a simple user interface with flexibility to enable configuration to satisfy the users needs. Display The 750w²... -
Page 10: Basic Operation
Basic Operation Power On/Off Press the On/Off button to turn With no sensor connected, the on the monitor. The monitor status bar displays ‘NO SENSOR’ . automatically enters measure mode. Measure Mode The normal operating mode for the Pressing the OK key in measure 750w Monitor is measure mode. -
Page 11: Configuration Structure
Configuration Structure Menu Mode To access the main menu, Pressing the Menu key when Use the arrow keys to select an press the Menu key when the the main menu is displayed option from the menu. monitor is in measure mode. returns the monitor to the measure mode. -
Page 12: Monitor Configuration
Monitor Configuration This section explains the options available under the Monitor Configuration menu. Press the OK key to select a highlighted menu option. Bleeper Menu Option Highlight Bleeper in the menu Highlight On or Off to activate and press the OK button. or deactivate the bleeper. -
Page 13: Auto Shutdown Menu Option
Auto Shutdown Menu Option Set Date and Time Menu Option Auto shutdown deactivates You can change the date and the monitor if 60 seconds pass time with the monitor’s arrow without a key press. keys. Enable Service Mode Menu Option The Enable Service Mode option provides diagnostic information. -
Page 14: Site Management
Site Management Introduction This section explains the options under site management menu for use with the Suspended Solids/Turbidity sensor only. Some sensors do not support sites. If a sensor does not support sites, then the Site option will not be visible within the menu. In order to support the Site option, both monitor and sensor require the necessary firmware versions. -
Page 15: Edit A Site Name
Edit a Site Name Select Sites on the main menu. Select Edit Site Name. Press Edit the site name with the Press the OK key. the OK key. arrow keys. Press OK when complete. Sensors with more than one active site If a sensor with multiple sites is attached to the device when powered on, the device with display a ‘Loading Sites’... -
Page 16: Measurement Configuration
Measurement Configuration Measurement Config provides access to sensor calibration and other measurement- related settings. These settings reside on the sensors. Thus, you can swap sensors without reconfiguring them. Press OK to select within this menu. Title Menu Options From the Main Menu, navigate to Select one of the standard ti- Measurement Config to see the tles, or choose User Defined to... -
Page 17: Recorded Data
Recorded Data The recorded data function displays saved snapshot readings from sensors. Get to it by pressing the OK key in Measure Mode. Each individual record consists of: • Date / time • Measurement title • Value / units The records appear with the newest first (at the bottom of the display). -
Page 18: Monitor Configuration
Monitor Configuration Auto Shutdown Set Date and Time Menu Option Menu Option Auto shutdown deactivates You can change the date and the monitor if 60 seconds pass time with the monitor’s arrow without a key press. keys. Enable Service Mode Menu Option The Enable Service Mode option provides diagnostic information. -
Page 19: Battery Charging
Battery Charging Battery The monitor contains a Nickel Metal Hydride (NiMH) battery pack that supplies the power for operation. This type of battery does not have to be fully discharged prior to charging, although this is a preferred option. It’s therefore possible to “top up” the battery charge as required. This is particularly useful prior to using the instrument for a long period. -
Page 20: Firmware Updates
Firmware Updates Introduction The firmware on the 750w is easy to update. Follow the steps below to put the latest firmware on your 750w . Please contact customer service with any questions. Updating Firmware Make sure the monitor is fully Plug the USB cable into the PC. -
Page 21: Technical Support
Technical Support Technical Support is available by phone, fax, or email. Outside the United States: Phone: +44 (0) 1726 879800 Email: techsupport@partech.co.uk Website: www.partech.co.uk Inside the United States: Phone: 1-800-665-7133 Email: service@chemscan.com Website: www.chemscan.com To enable us to provide quick and accurate technical support, please have the following informa- tion ready when you contact us: •... - Page 22 Inside the United States: Send equipment to the following address for repairs or service: ChemScan 2325 Parklawn Drive Suite I Waukesha, WI 53186 Please include the following information with the returned equipment. Also ensure that products are adequately protected for transportation. Ask our service department if you need packing advice.
-
Page 23: Technical Specifications
Technical Specifications Power Supply Internal Rechargeable Battery Pack NiMH Charge Input 5 VDC (min 500mA) Partech Charger USB Power Adaptor, 100 to 240VAC Input, 5VDC 2.1A Output, 10 Watt Battery Life Sufficient for 1 week normal use (30 measurements per day) EMC Conformity EN 61326:2013, IEC 61010-1:2017 Adjustment... -
Page 24: Sensor Specifications
Sensor Specifications IR Sensor - Physical Specifications Weight 0.7kg inc 5m of cable Protection Class IP68 Enclosure Material Black Acetal Co-Polymer Cable Connection 4 Way Lemo Circular Plug Cable Type 4 core. 2 twisted pair 5mm O/D Polyurethane Cable Length 5 and 10 meters available as standard Height (mm) Width (mm) -
Page 25: Declaration Of Conformity
Following the provisions of European Directives: 2014/30/EU EU EMC Directive 2014/25/EU Low Voltage Directive 2011/65/EU RoHS Directive Ben Kimbell Vice President of Research & Development In-Situ, Inc. 221 E. Lincoln Avenue Fort Collins, CO 80524 November 11, 2021...
Need help?
Do you have a question about the Partech 228531 and is the answer not in the manual?
Questions and answers