Table of Contents
Advertisement
Quick Links
Advertisement
Table of Contents

Subscribe to Our Youtube Channel
Related Manuals for In-situ 750


Summary of Contents for In-situ 750
- Page 1 750 Portable Monitor Operator’s Manual www.in-situ.com 2024-07-08 | 2285314...
-
Page 2: Technical Support
Your equipment was carefully inspected before shipping. Check the equipment for any physical damage sustained during shipment. Notify In-Situ and file a claim with the carrier if there is any such damage. Do not attempt to deploy or operate the equipment. -
Page 3: Table Of Contents
Set Date & Time ................................ 12 Measuring Data ........................... 13 View Measurements ..............................13 Save Measurements..............................13 Configure Measurements ............................13 Download Data ........................... 14 Connect monitor to computer..........................14 Copy files to computer.............................. 14 Open 750w2 drive..............................14 www.in-situ.com... - Page 4 Battery Charge Status ............................... 17 Serial Number & Part Numbers ......................18 750 Portable Monitor ..............................18 SoliTech IR Sensor for 750 Portable Monitor ......................18 OxyTech RDO Sensor ..............................18 . T echnical.Specifications ........................19 750 Portable Monitor ..............................19...
-
Page 5: Safety
Read the safety information on this page before using the 750 Portable Monitor. If you have questions, contact Technical Support for assistance. • The 750 Portable Monitor is designed for use with the SoliTech IR and OxyTech RDO sensors. Using other sensors may damage the instrument or the sensor. •... -
Page 6: Introduction
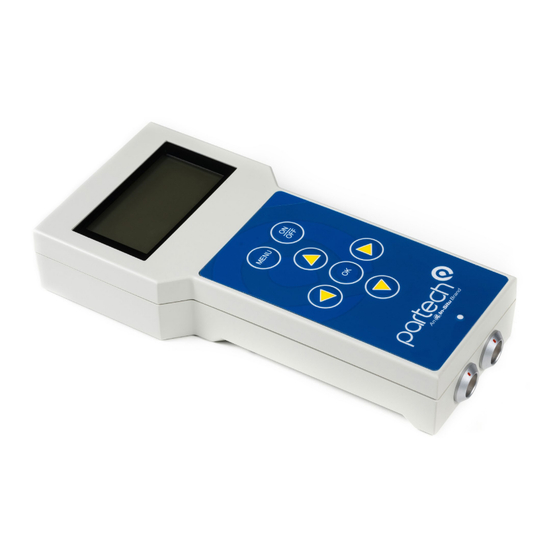
Introduction Monitor Description The handheld 750 Portable Monitor connects with the SoliTech IR sensor and the OxyTech RDO sensor to clearly display sensor parameters with a simple, customizable user interface. The monitor automatically discovers the connected sensor and displays a reading for total suspended solids (TSS), turbidity, or dissolved oxygen (DO). Use this accurate, real-time data to check online systems or to monitor operations when no online output is available. -
Page 7: Sensors
Sensors The OxyTech RDO and SoliTech IR sensors are designed for use with the 750 Portable Monitor through a 4-way socket that integrates with the sensor’s IP68 connector. When you connect a sensor, the monitor immediately displays a value for the measured parameter. -
Page 8: Getting Started
Before saving data, set the date and time in the Monitor.Config menu to ensure accurate time stamps. 2024-07-08 | 231271 Information subject to change without notice. In-Situ, In-Situ logo, “Water Simplified”, VuLink, RDO, RuggedCable, TROLL, BaroTROLL, HydroVu, VuSitu, Baro Merge, and Win-Situ are trademarks or registered trademarks of In-Situ Inc. -
Page 9: Learn More
Check that the monitor is displaying a sensor date, and measurement. reading. If needed, the 750 Portable Monitor may be cleaned after use with a soft, damp cloth and mild detergent. View recorded data. Press OK. From the main menu,... -
Page 10: Monitor Key Use
Monitor Key Use When using the 750 Portable Monitor, use these methods to make selections or input values: • List selection • Value or text entry List Selection Press OK to confirm. View a list of options. Use An asterisk identifies the Use arrow keys to make selection. -
Page 11: Monitor.configuration
Bleeper Select Bleeper. Press OK. Select On or Off. Press OK to confirm. Backlight Select Backlight. Press OK. Press OK to confirm. Select your preference. Choose On.after.keypress to turn on the display’s backlight only after you press a button. www.in-situ.com... -
Page 12: Backlight Brightness
Press OK. Select Off.or On. Press OK to save. Set Date & Time Select Set Date & Time. Press OK to save. The blinking cursor Use arrow keys to set time Press OK. underlines the current and date. selection. www.in-situ.com... -
Page 13: Measuring Data
Config menus. These settings are stored on each sensor and automatically loaded when the sensor is connected to the monitor. See the sensor manuals for more information on the settings available for each sensor. Select Measurement Press OK to access sub- Press Menu to go back. Config. menus. www.in-situ.com... -
Page 14: Download Data
Download Data Download recorded data from the 750 Portable Monitor to your computer by using the supplied USB cable, which connects to a standard USB drive. When you press OK on the monitor while in measure mode, the monitor records: •... -
Page 15: Update Monitor Firmware
Press OK. Delete old .bin files (if 750w2 drive folder. Eject needed). the drive. Select Update Monitor Monitor requests the Monitor loads the file and F/W. Press OK. update. restarts. Fully charge the 750 Portable Monitor before updating firmware. www.in-situ.com... -
Page 16: Sensor Scan
Sensor Scan Use Sensor Scan if the 750 Portable Monitor does not immediately find the sensor after you insert the sensor connector into the monitor’s 4-way socket. Press Menu. Select Monitor.Config. Select Enable Service Ensure sensor connector is Press OK. -
Page 17: Battery
Battery A rechargeable Nickel Metal Hydride (NiMH) battery powers the 750 Portable Monitor: • Use the supplied USB cable and any USB charging source with a minimum current of 500 mA to charge the battery. • On first use of the monitor, charge the battery to full capacity (up to 24 hours). -
Page 18: Serial Number & Part Numbers
172440 Monitor cover 228774 USB cable SoliTech IR Sensor for 750 Portable Monitor The serial number is located on the sensor. Refer to the sensor instruction manual for information on selecting the correct sensor range for your application. PART NUMBER... -
Page 19: Technical.specifications
Technical.Specifications 750 Portable Monitor MONITOR SPECIFICATIONS Power Supply Internal rechargeable NiMH (Nickel-Metal Hydride) battery Charge Input 5 VDC (minimum 500 mA) 1 week normal use (30 measurements per day), under normal operating Battery Life conditions (default contrast and brightness settings)
Need help?
Do you have a question about the 750 and is the answer not in the manual?
Questions and answers