Table of Contents
Advertisement
Available languages
Available languages
Quick Links
π
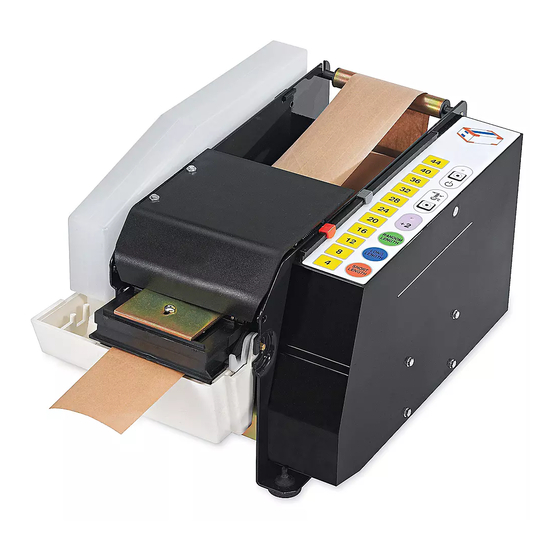
H-1036
ELECTRONIC KRAFT
TAPE DISPENSER
IMPORTANT!
Read these instructions thoroughly and
familiarize yourself with all controls and
operating features. Keep for future reference
and maintenance.
Unpacking: Check the machine for damage. If
damage is found, return to Uline.
CAUTION! Only trained personnel should be
allowed to operate or service this machine.
WARNING! Burn Danger – Switch off power,
unplug the dispenser and allow the top heater
to cool down before performing any cleaning,
maintenance or repair.
PAGE 1 OF 20
1-800-295-5510
uline.com
TECHNICAL DATA
Overall Dimensions
Weight of Machine
Voltage and Frequency
Control Circuit in DC
Electrical Power
Dispensing Velocity
Length
Sound Measured in a Room
TAPE
Types of gummed tape: All
17¾ x 11½ x 9¾"
26½ lbs.
See Machine Label
115 Volts
100W
2.5 ft. or 30" / sec.
Min. 4" / Max. 46"
> 70 dB (A)
PAPER FEATURES
Width: min. 3/4" / max. 4"
Maximum roll diameter: 7¾"
SAFETY
Follow all safety and operating instructions contained in
this manual. Check state and local safety and
electrical codes.
NOTE: Tape dispenser is for use with gummed
tape ONLY. Uline accepts no responsibility for
damage due to improper use.
Check Voltage – Verify that machine voltage and power
supply voltage are the same before plugging in
the dispenser.
Keep the machine clean, dry and in good operating
condition. Do not place or operate machine in damp or
humid environments.
Para Español, vea páginas 7-13.
Pour le français, consulter les pages 14-20.
0122 IH-1036
Advertisement
Table of Contents

Related Manuals for U-Line H-1036


Summary of Contents for U-Line H-1036
- Page 1 Para Español, vea páginas 7-13. Pour le français, consulter les pages 14-20. π H-1036 1-800-295-5510 uline.com ELECTRONIC KRAFT TAPE DISPENSER TECHNICAL DATA Overall Dimensions 17¾ x 11½ x 9¾" Weight of Machine 26½ lbs. Voltage and Frequency See Machine Label...
- Page 2 SETUP INSTALL WATER RESERVOIR INSTALL BRACKETS FOR WATER BOTTLE Before using the dispenser: Wash the moistening brush Mount the bottle brackets on left side of machine, with soap and water. Rinse thoroughly. inserting first the upper tooth in top slot then the lower slot until it locks.
- Page 3 SETUP CONTINUED INSTALL TOP HEATER NOTE: If bottle is not empty, cover the filler opening to prevent spills. For lighter paper tapes (60/70 grade), remove the 2. Fill bottle with clean water. Cover the filler opening weight on the top heater. For heavier paper tapes to prevent spilling, turn bottle over and place filler (70+ grade), adjust screw and reposition the weight opening over desired water level peg in the water...
- Page 4 SETUP CONTINUED LOAD TAPE ROLL GUMMED OUT TAPE Insert tape roll. 1. Adjust roll guide plates to fit tape width. Figure 12 (See Figure 12) (See Figure 9) Figure 9 Roll Guide Plates 2. Feed tape over lower roller and under the lower paper guide and white wheel.
-
Page 5: Operation
OPERATION With machine switched on, tape loaded and water in 3. Use the Short Length key to dispense your shorter reservoir: length and the Long Length key to dispense the longer length. For preset lengths of tape: Press the numbered key that corresponds to the desired length. - Page 6 REFERENCE 100° 8O° °C DESCRIPTION Power Cord Side Cover Power Control Panel Green Key 'Random Length' – Dispenses tape Keys for 11 presets of tape length +2 (inches) key – presets length by 2" 'Short Length' – Sets one length of tape shorter 'Long Length' –...
-
Page 7: Información Técnica
π H-1036 800-295-5510 uline.mx DESPACHADOR ELECTRÓNICO DE CINTA KRAFT INFORMACIÓN TÉCNICA Dimensiones de la Máquina 45 x 29.2 x 24.8 cm (17¾ x 11½ x 9¾") Peso de la Máquina 12 kg (26½ lbs.) Voltaje y frecuencia Ver Etiqueta de la Máquina... -
Page 8: Instrucciones De Configuración
INSTRUCCIONES DE CONFIGURACIÓN INSTALACIÓN DEL DEPÓSITO DE AGUA INSTALACIÓN DE LOS SOPORTES PARA LA BOTELLA DE AGUA Antes de usar el despachador: Lave el cepillo de humectación con agua y jabón. Enjuáguelo bien. 1. Coloque los soportes de la botella en el lado izquierdo de la máquina, insertando primero el Inserte el cepillo en el depósito de agua. - Page 9 CONTINUACIÓN DE INSTRUCCIONES DE CONFIGURACIÓN INSTALACIÓN DEL CALENTADOR NOTA: Si la botella no está vacía, cubra la abertura de llenado para evitar derrames. SUPERIOR 2. Llene la botella con agua limpia. Cubra la abertura Para cintas de papel más ligeras (grado 60/70), de llenado para evitar derrames, voltee la botella quite la pesa del calentador superior.
- Page 10 CONTINUACIÓN DE INSTRUCCIONES DE CONFIGURACIÓN CARGA DEL ROLLO DE CINTA CINTA CON ENGOMADO HACIA AUFERA Inserte el rollo de cinta. 1. Ajuste las placas guía del rollo para que se adapte Diagrama 12 (Vea Diagrama 12) al ancho de la cinta. (Vea Diagrama 9) Diagrama 9 Placas Guía del Rollo 2.
- Page 11 FUNCIONAMIENTO Con la máquina encendida, la cinta cargada y agua PROGRAMACIÓN DE LARGOS DE CINTA en el depósito: INTERMEDIOS Para longitudes de cinta preestablecidas: Presione Use este procedimiento para despachar largos la tecla del número que corresponda a la longitud de cinta intermedios [ejemplo: largos de deseada.
-
Page 12: Mantenimiento Y Cuidado
MANTENIMIENTO Y CUIDADO ¡PRECAUCIÓN! Solo el personal capacitado 4. Limpie solo el exterior del calentador (cerca del cepillo) con un paño humedecido con producto deberá hacer funcionar o realizar tareas de mantenimiento en esta máquina. descalcificador. ¡ADVERTENCIA! Peligro de Quemaduras – 5. - Page 13 REFERENCIA 100° 8O° °C CLAVE DESCRIPCIÓN Cable Eléctrico Cubierta Lateral Encendido Panel de Control Tecla Verde de 'Largo Aleatorio' - Despacha cinta Teclas para 11 Longitudes de Cinta Preestablecidas Tecla +2 (pulgadas) – Preestablece el largo en 5 cm (2") 'Short Length' (Longitud Corta) –...
-
Page 14: Données Techniques
π H-1036 1-800-295-5510 uline.ca DÉVIDOIR ÉLECTRONIQUE DE RUBAN ADHÉSIF KRAFT DONNÉES TECHNIQUES Dimensions de l'appareil 45 x 29,2 x 24,8 cm (17 ¾ x 11 ½ x 9 ¾ po) Poids de l'appareil 12 kg (26 ½ lb) Tension et fréquence consultez l'étiquette sur l'appareil... -
Page 15: Instructions D'installation
INSTRUCTIONS D'INSTALLATION INSTALLATION DU RÉSERVOIR D'EAU INSTALLATION DES SUPPORTS DE BOUTEILLE D'EAU Avant d'utiliser le dévidoir : Lavez la brosse humidifiante avec de l'eau et du savon. Rincez soigneusement. Installez les supports de bouteille sur le côté gauche de l'appareil, en insérant d'abord la dent supérieure Insérez la brosse dans le réservoir d'eau. - Page 16 INSTRUCTIONS D'INSTALLATION SUITE INSTALLATION DE L'ÉLÉMENT CHAUFFANT REMARQUE : Si la bouteille n'est pas vide, couvrez l'orifice de remplissage pour éviter les SUPÉRIEUR déversements. Pour les rubans de papier plus légers (calibre 60/70), 2. Remplissez la bouteille avec de l'eau propre. retirez le poids de l'élément chauffant supérieur.
- Page 17 INSTRUCTIONS D'INSTALLATION SUITE INSTALLATION DU ROULEAU DE RUBAN ADHÉSIF AVEC CÔTÉ GOMMÉ À L'EXTÉRIEUR RUBAN ADHÉSIF Insérez le rouleau Réglez les plaques de guidage du rouleau pour Figure 12 de ruban adhésif. qu’elles correspondent à la largeur du ruban adhésif. (Voir Figure 12) (Voir Figure 9) Plaques de guidage...
- Page 18 FONCTIONNEMENT PROGRAMMATION DE LONGUEURS DE RUBAN Lorsque l'appareil est allumé, avec le ruban installé et de l'eau dans le réservoir : INTERMÉDIAIRES Pour obtenir des longueurs de ruban prédéfinies : Utilisez cette procédure pour distribuer des longueurs Appuyez sur la touche numérotée qui correspond à de ruban intermédiaires [par exemple, longueurs de la longueur désirée.
- Page 19 ENTRETIEN ET NETTOYAGE MISE EN GARDE! Seules des personnes formées 4. Nettoyez l'extérieur de l'élément chauffant (à proximité de la brosse) à l'aide d'un chiffon peuvent utiliser ou réparer cet appareil. trempé dans un produit de décalcification. AVERTISSEMENT! Risque de brûlure – Éteignez ARRÊT l'appareil, débranchez le dévidoir et laissez 5.
- Page 20 RÉFÉRENCE 100° 8O° °C TOUCHE DESCRIPTION Cordon d'alimentation Couvercle latéral Alimentation Panneau de commande Touche de « longueur aléatoire » verte – distribue le ruban Touches pour 11 longueurs de ruban prédéfinies Touche +2 (pouces) – longueur prédéfinie de 5 cm (2 po) « Short Length »...
Need help?
Do you have a question about the H-1036 and is the answer not in the manual?
Questions and answers