
Subscribe to Our Youtube Channel
Related Manuals for Raymarine REALVISION 3D


Summary of Contents for Raymarine REALVISION 3D
- Page 1 REALVISION ™ RV-4xx Stainless Steel Through-Hull Transducer Installation Instructions English (en-US) Date: 02-2021 Document number: 87375 (Rev 2) © 2021 Raymarine UK Limited...
- Page 3 Please check the website to ensure you have the latest documentation. Publication copyright Copyright ©2021 Raymarine UK Ltd. All rights reserved. No parts of this material may be copied, translated, or transmitted (in any medium) without the prior written permission of Raymarine UK Ltd.
-
Page 5: Table Of Contents
Contents Chapter 1 Important information..................7 Declaration of Conformity......................7 Water ingress ..........................8 Disclaimer ........................... 8 Warranty registration ......................... 8 Product disposal ........................8 IMO and SOLAS ......................... 8 Technical accuracy ........................8 Chapter 2 Document and product information............. 9 2.1 Product documentation...................... 10 LightHouse™... - Page 6 Transducer cleaning ......................44 Cleaning preventing bridging ....................44 6.3 Re-applying anti-fouling paint..................45 Chapter 7 Technical support..................47 7.1 Raymarine product support and servicing ..............48 Viewing product information (LightHouse™ 3)...............49 7.2 Learning resources ......................50 Chapter 8 Technical specification..................51 8.1 Technical specification ...................... 52 Physical specification......................
-
Page 7: Chapter 1 Important Information
• Raymarine recommends certified installation by a Raymarine approved installer. A certified installation qualifies for enhanced product warranty benefits. Contact your Raymarine dealer for further details, and refer to the separate warranty document packed with your product. Warning: High voltage This product contains high voltage. -
Page 8: Water Ingress
Raymarine. Raymarine is not responsible for damages or injuries caused by your use or inability to use the product, by the interaction of the product with products manufactured by others, or by errors in information utilized by the product supplied by third parties. -
Page 9: Chapter 2 Document And Product Information
Chapter 2: Document and product information Chapter contents • 2.1 Product documentation on page 10 • 2.2 Applicable products on page 10 • 2.3 Product overview on page 11 • 2.4 Required additional components on page 12 • 2.5 Parts supplied — RV-4xx series transducers on page 13 Document and product information... -
Page 10: Product Documentation
For operation instructions for your product please refer to the LightHouse™ 3 MFD Operation instructions. The Basic (81369) and Advanced (81370) LightHouse™ 3 Operation Instructions can be downloaded from the Raymarine website: www.raymarine.com/manuals. Please check the website to ensure you have the latest documentation. Document illustrations Your product and if applicable, its user interface may differ slightly from that shown in the illustrations in this document, depending on product variant and date of manufacture. -
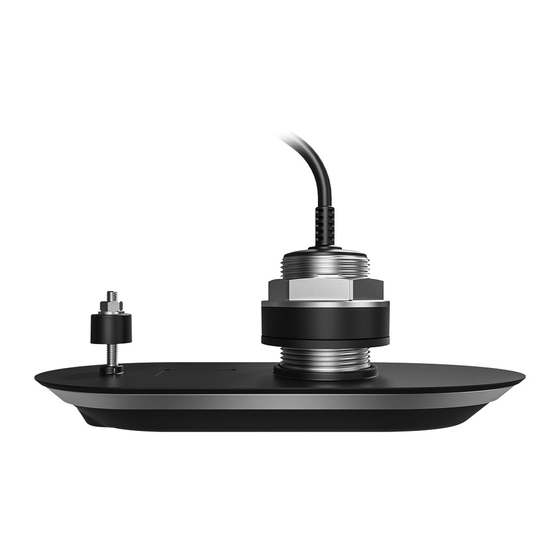
Page 11: Product Overview
The transducers differ internally, and contain different numbers and types of transmit and receive elements. Your installation should comprise either a single RV-400 transducer, or a split-pair of RV-412(P/S) or RV-420(P/S) transducers. The hull geometry of your vessel determines the most appropriate transducers to use. You should fit transducers whose elements are angled to match within ±6°... -
Page 12: Required Additional Components
• Cables included: – RV-400: 8 m (26.2 ft) attached cable. – RV-4xx(P/S): 2 m (6.5 ft) attached cable. – An 8 m (26.2 ft) extension cable (A80477) and a ‘Y’ cable (A80478) is provided when ordering transducers as a split-pair. •... -
Page 13: Parts Supplied - Rv-4Xx Series Transducers
2.5 Parts supplied — RV-4xx series transducers The following parts are supplied with each RV-4xx series transducers. Documentation pack 2. Locking collar kit (for transducer cable connector), consisting of: • 2 x Split rings (includes spare) • 1 x O-ring •... -
Page 14: Additional Parts Supplied
Additional parts supplied The following additional cables are supplied when ordering a split pair set of transducers. “Y-cable” adapter for connecting a split pair of transducers to a RealVision™ 3D-capable sonar device. Cable length: 0.3 m (0.98 ft.) 2. Extension cable 8 m (26.2 ft.). In a split pair transducer configuration, extends the single end of the “Y-cable”... -
Page 15: Chapter 3 Installation
Chapter 3: Installation Chapter contents • 3.1 Tools required on page 16 • 3.2 Pre-installation test on page 16 • 3.3 Selecting a location on page 17 • 3.4 Transducer mounting on page 22 Installation... -
Page 16: Tools Required
3.1 Tools required The following tools are required to install any of the transducers listed under “Applicable products”. Power drill 2. 70 mm (2 inch) hole cutter 3. Masking / adhesive tape 4. Water based anti-fouling paint 5. 16 mm ( inch) drill bit (for drilling anti-rotation bolt hole) 6. -
Page 17: Multiple Transducers
Channel). 6. Check that accurate depth and temperature readings are displayed. 7. If you experience difficulties obtaining readings then contact Raymarine Technical Support. Warning: Transducer operation Only test and operate the transducer in the water. Do NOT operate out of water as overheating may occur. - Page 18 Outboard or I/O (Planing hull) — mount forward and to the side of the propeller(s). 2. Inboard (Planing hull) — mount forward of the propeller(s) and shaft(s). 3. Stepped hull (Planing hull) — mount on the first step as far aft as possible. 4.
- Page 19 • Transducers must be installed in the correct orientation, with the anti-rotation bolt closest to the stern of the vessel. Additionally, a direction arrow pointing to the bow is embossed on the anti-rotation bolt cap. • When installing split-pair transducers: –...
-
Page 20: Emc Installation Guidelines
• To avoid interference with the internal magnetometer, mount transducers at least 1 m (39 inches) from other electrical devices. EMC installation guidelines Raymarine equipment and accessories conform to the appropriate Electromagnetic Compatibility (EMC) regulations, to minimize electromagnetic interference between equipment and minimize the effect such interference could have on the performance of your system Correct installation is required to ensure that EMC performance is not compromised. - Page 21 • A = 60.00 mm (2.36 in) • B = 42.00 mm (1.65 in) • C = 35.00 mm (1.40 in) • D = 76.00 mm (2.99 in) • E = 87.00 mm (3.43 in) • F = 8.00 mm (0.31 in) •...
-
Page 22: Transducer Mounting
3.4 Transducer mounting The mounting procedure below should be read thoroughly before attempting to mount the transducer. Important: • The RV-4xx series transducers are recommended for vessel’s with metal hulls., when installing, ensure that the transducer is isolated from the metal hull using ALL of the supplied isolator parts •... -
Page 23: Fitting The Anti-Rotation Bolt
10. Holding the transducer in place, carefully drill the pilot hole for the anti-rotation bolt (using the anti-rotation hole in the transducer as a guide). Drilling anti-rotation bolt hole 11. Remove the transducer from the hull. 12. Drill a 16 mm ( inch) hole for the anti-rotation bolt. -
Page 24: Fitting The Transducer
4. Apply a small amount of marine grade sealant to the inside of the anti-rotation bolt cap. 5. Fit the anti-rotation bolt cap by pressing it firmly into the hole in the transducer. The embossed “BOW” arrow must be pointing towards the temperature sensor in the base of the transducer. - Page 25 iii. all around and inside the transducer stem and anti-rotation holes on the exterior of the hull. 10. Guide the transducer cable through the stem hole in the hull. 11. Guide the transducer stem and anti-rotation bolt up through the holes in the vessel’s hull and support from beneath.
-
Page 26: Anti-Fouling
22.If necessary, apply additional marine-grade sealant to the anti-rotation bolt, above the small internal isolator sleeve. 23. Place the small washer over the anti-rotation bolt. 24. If necessary, apply additional marine-grade sealant to the anti-rotation bolt above the small washer. 25.Screw the anti-rotation nut onto the bolt and fully tighten, using a suitable sized wrench (spanner). - Page 27 The anti-fouling paint should be applied in a thin and even coat covering all externally exposed transducer surfaces. You should clean your transducer regularly and re-apply anti-fouling paint every 6 months, or sooner depending on how rapidly organic growth builds up. For guidance on transducer cleaning refer to p.44 —...
-
Page 29: Chapter 4 Connections
Chapter 4: Connections Chapter contents • 4.1 General cabling guidance on page 30 • 4.2 Cable routing on page 30 • 4.3 Attaching the connector locking collar on page 31 • 4.4 Making connections on page 34 Connections... -
Page 30: General Cabling Guidance
• Unless otherwise stated only use cables supplied by Raymarine. • Where it is necessary to use non-Raymarine cables, ensure that they are of correct quality and gauge for their intended purpose. (e.g.: longer power cable runs may require larger wire gauges to minimize voltage drop along the run). -
Page 31: Attaching The Connector Locking Collar
• RealVision™ transducer extension cable 5 m (16.4 ft) (part number A80476) • RealVision™ transducer extension cable 8 m (26.2 ft) (part number A80477) It is recommended that a maximum of two cable extensions are used, with the total cable length (including the transducer’s fitted cable) not exceeding 24 m (78.7 ft). - Page 32 The split-ring slides easily for approximately 1 cm onto the connector, before butting up against the connector moulding. 3. Carefully insert the pointed end of the supplied tool into the split-ring’s gap (labelled ‘C’ in the illustration). The tool widens the gap in the split ring, enabling the split ring to be pushed further back onto the connector in the following step.
- Page 33 You can now remove the tool. The split-ring stays in position on the connector, but rotates freely. 5. Slide the O-ring (arrowed) over the end of the connector, and ensure that it is seated squarely against the connector moulding, adjacent to the split-ring. 6.
-
Page 34: Making Connections
The locking collar slides easily towards the plug-end of the connector, before butting up against the split-ring moulding. 7. Grasp the body of the connector with one hand, then with the other hand, pull the locking collar firmly towards the plug-end of the connector. As you pull the locking collar, it clicks into place over the split-ring. - Page 35 i. Connect the cable from each transducer to the Y-cable tails (A80478); check the colored labels on the cables to ensure that the transducers are connected to the correct Y-cable tail. ii. Connect an extension cable to the remaining free plug on the Y-cable. See RealVision™...
-
Page 37: Chapter 5 System Checks And Troubleshooting
Chapter 5: System checks and troubleshooting Chapter contents • 5.1 RealVision™ 3D AHRS calibration on page 38 • 5.2 Troubleshooting on page 38 System checks and troubleshooting... -
Page 38: Realvision™ 3D Ahrs Calibration
If after referring to this section you are still having problems with your product, please refer to the Technical support section of this manual for useful links and Raymarine Product Support contact details. -
Page 39: Operation Instructions
Operation instructions For detailed operation instructions for your product, refer to the documentation that accompanies your display. All product documentation is available to download from the Raymarine website: www.raymarine.com/manuals. Sonar troubleshooting Scrolling image is not being displayed Possible causes Possible solutions Sonar disabled Enable Ping from the Fishfinder app’s sounder tab: Menu >... - Page 40 Possible causes Possible solutions Damaged or fouled Check transducer condition, ensuring it is not damaged and is free transducer from debris/fouling. If necessary, clean or replace your transducer. After cleaning or replacement coat the transducer using a water-based anti-fouling paint. Damaged cables Check the unit’s connector for broken or bent pins.
-
Page 41: Resetting The Sonar Module
Check the voltage from the power supply, if this is too low it can affect the transmitting power of the unit. Resetting the sonar module You can use the reset function on a compatible Raymarine multifunction display to restore the sonar module to its factory default settings. In the fishfinder application: 1. -
Page 43: Chapter 6 Maintenance
Chapter 6: Maintenance Chapter contents • 6.1 Routine checks on page 44 • 6.2 Unit cleaning instructions on page 44 • 6.3 Re-applying anti-fouling paint on page 45 Maintenance... -
Page 44: Routine Checks
6.1 Routine checks The following periodic checks should be made: • Examine cables for signs of damage, such as chafing, cuts or nicks. • Check that the cable connectors are firmly attached and that their locking mechanisms are properly engaged. Note: Cable checks should be carried out with the power supply switched off. -
Page 45: Re-Applying Anti-Fouling Paint
Fairing block. 2. Metal part of transducer 3. Metal hull 6.3 Re-applying anti-fouling paint If you have applied anti-fouling paint to your transducer, it is important to re-apply it at least every 6 months, to maintain effectiveness. Follow the instructions below to re-apply anti-fouling paint. Important: •... -
Page 47: Chapter 7 Technical Support
Chapter 7: Technical support Chapter contents • 7.1 Raymarine product support and servicing on page 48 • 7.2 Learning resources on page 50 Technical support... -
Page 48: Raymarine Product Support And Servicing
You can obtain this product information using diagnostic pages of the connected MFD. Servicing and warranty Raymarine offers dedicated service departments for warranty, service, and repairs. Don’t forget to visit the Raymarine website to register your product for extended warranty benefits: http://www.raymarine.co.uk/display/?id=788. United Kingdom (UK), EMEA, and Asia Pacific: •... -
Page 49: Viewing Product Information (Lighthouse™ 3)
• Tel: +47 692 64 600 Denmark (Raymarine subsidiary): • E-Mail: support.dk@raymarine.com • Tel: +45 437 164 64 Russia (Authorized Raymarine distributor): • E-Mail: info@mikstmarine.ru • Tel: +7 495 788 0508 Viewing product information (LightHouse™ 3) Use the Settings menu to view hardware and software information about your MFD, and connected products. -
Page 50: Learning Resources
Product info from the Diagnostics pop over menu. 7.2 Learning resources Raymarine has produced a range of learning resources to help you get the most out of your products. Video tutorials Raymarine official channel on YouTube: •... -
Page 51: Chapter 8 Technical Specification
Chapter 8: Technical specification Chapter contents • 8.1 Technical specification on page 52 Technical specification... -
Page 52: Technical Specification
8.1 Technical specification Physical specification • Dimensions: – Length: 347.51 mm (13.68 in) — including fairing block – Height: 180 mm (7.09 in.) — including cable bend radius – Width: 114.00 mm (4.49 in) — including fairing block • Cable length: –... -
Page 53: Chapter 9 Spares And Accessories
Chapter 9: Spares and accessories Chapter contents • 9.1 Spares on page 54 • 9.2 Accessories on page 54 Spares and accessories... -
Page 54: Spares
9.1 Spares • R70615 — RealVision™ 3D 25–pin locking collar kit • R70743 — RealVision™ 3D RV-4xx Isolation kit 9.2 Accessories • A80702 — RealVision™ 3D Thru-hull Transducer High Speed Nose Cone • A80515 — RealVision™ 3D Transducer right-angled adapter cable 400 mm (15.7 in.) •... - Page 57 Drilling holes............22 Technical specification ........51–52 Environmental ............52 Technical Specification Conformance ............52 Physical..............52 Electromagnetic Compatibility........ 20 RealVision 3D Sonar ..........52 EMC, Electromagnetic Compatibility Technical support..........48, 50 Temperature range ..........52 Tools required ............16 Training courses ............. 50 Hull nut ..............25 Transducer cable length...........13...
- Page 60 Raymarine Marine House, Cartwright Drive, Fareham, Hampshire. PO15 5RJ. United Kingdom. Tel: +44 (0)1329 246 700 www.raymarine.com a brand by...
Need help?
Do you have a question about the REALVISION 3D and is the answer not in the manual?
Questions and answers