Table of Contents
Advertisement
Quick Links
Advertisement
Table of Contents

Related Manuals for Jensen JCR-360


Summary of Contents for Jensen JCR-360
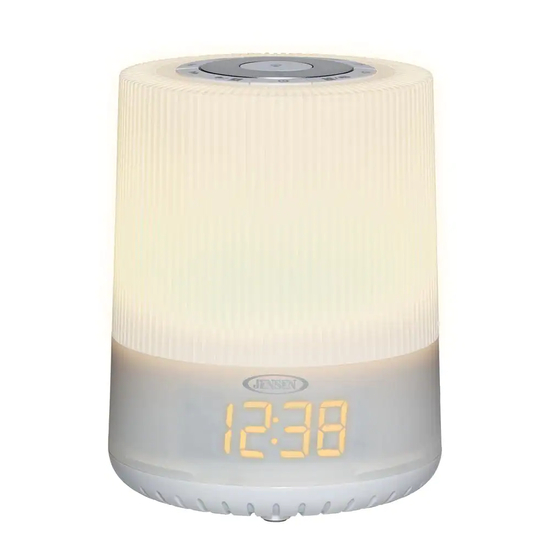
- Page 1 Mood Lamp Digital Dual Alarm Clock Radio MODEL: JCR-360 USER MANUAL PLEASE READ THIS USER MANUAL COMPLETELY BEFORE OPERATING THIS UNIT AND RETAIN THIS BOOKLET FOR FUTURE REFERENCE. Please contact Spectra Customer Service at 1-800-777-5331 if you have any questions about operating this product...
-
Page 2: Important Safety Instructions
WARNING WARNING : To reduce the risk of fire or electric shock, do not expose this appliance to rain or moisture. CAUTION: Use of controls or adjustments or performance of procedures other than those specified may result in hazardous radiation exposure. CAUTION RISK OF ELECTRIC SHOCK DO NOT OPEN... - Page 3 14. This appliance shall not be exposed to dripping or splashing water and that no object filled with liquids such as vases shall be placed on the apparatus. 15.Do not overload wall outlet. Use only power source as indicated. Use replacement part as specified by the manufacturer. 17.
-
Page 4: Compliance With Fcc Regulations
COMPLIANCE WITH FCC REGULATIONS This device complies with Part 15 of the FCC Rules. Operation is subject to the following two conditions: (1) this device may not cause harmful interference, and (2) this device must accept any interference received, including interference that may cause undesired operation. -
Page 5: Dear Jensen® Customer
The serial number of this product is found on its bottom cover. You should note the serial number of this unit in the space provided as a permanent record of your purchase to aid in identification in the event of theft of loss. Model Number: JCR-360 Serial Number :... -
Page 6: Location Of Controls
LOCATION OF CONTROLS... - Page 7 CLOCK SET BUTTON / RADIO PRESET BUTTON / TIME SET / Y-M-D / MEMORY+ (UP) BUTTON MEM.M+ MOOD LIGHT ON/OFF/PAUSE BUTTON / MOOD LIGHT / REPEAT/STOP BUTTON LAMP BRIGHTNESS INCREASE BUTTON LAMP ON/OFF/ LAMP ON/OFF BUTTON / ALARM SNOOZE BUTTON SNOOZE LAMP BRIGHTNESS DECREASE BUTTON ALARM 2 BUTTON / VOLUME UP BUTTON...
- Page 8 DISPLAY POWER SOURCE (AC ADAPTOR ONLY) The JCR-360 is powered by an external 120V AC adaptor with an output of AC ~ 5V 2000mA. The unit is also equipped with a battery back-up system for the clock that is powered by 1 x CR2032 lithium battery (not included).
-
Page 9: Standby Mode
Battery Precautions • Replacement of batteries must be done by an adult. • The supply terminals are not to be short-circuited. • Non-rechargeable batteries are not to be recharged. • Exhausted batteries are to be removed. • Only batteries of the equivalent type are to be used. •... -
Page 10: Getting Started
GETTING STARTED TURNING THE UNIT POWER ON/OFF When the unit is OFF (STANDBY MODE), tap the POWER / SOURCE BUTTON (#7) on top of the unit to turn it ON. The last selected input mode icon will show on LED display. Tap the POWER / SOURCE BUTTON (#7) on top of the unit again to turn the unit OFF and put it in STANDBY MODE. - Page 11 DUAL ALARM OPERATION THE JCR-360 FEATURES 2 SEPARATE ALARMS THAT CAN BE SET INDEPENTANT OF EACH OTHER AND ALLOW 2 DIFFERENT WAKE OPTIONS. While setting the Alarms, the unit may automatically revert back to the time after 10 seconds if you take too long going through the programming steps. If this happens, please review the set-up instructions prior to actually programming the Alarms.
- Page 12 IMPORTANT: If you selected the BEEPING ALARM in step 9, skip to step 11. 10A. IF YOU SELECTED FM RADIO: a) Repeatedly tap the DOWN BUTTON (#9) or UP BUTTON (#10) to select the volume level (01 – 15) for the FM radio. b) Tap the ALARM 1 BUTTON (#8) to confirm the FM radio volume level.
- Page 13 SETTING ALARM 2 Alarm 2 is set the same way you set Alarm 1, but using the ALARM 2 BUTTON (#6). 1. Repeat Steps 1 – 13 for setting Alarm 2 using the ALARM 2 BUTTON (#6). 2. The AL2 INDICATOR (#17) will turn ON while setting alarm 2 and will remain on once ALARM 2 is set.
- Page 14 MANUAL TUNING: Repeatedly tap the DOWN BUTTON (#9) or UP BUTTON (#10) to manually change the FM station. Use the manual tuning method to tune in weaker stations that are bypassed during AUTOMATIC TUNING. AUTOMATIC TUNING: Press and hold either the DOWN BUTTON (#9) or UP BUTTON (#10) until the radio station showing begins to scan.
- Page 15 CHIRPING BIRDS OCEAN FOREST STREAM WIND CHIMES SUMMER NIGHT THUNDERSTORM Repeatedly tap the DOWN BUTTON (#9) or UP BUTTON (#10) to select the nature sound you want to listen to. The selected sound will show for a few seconds and then change back to the clock. Tap the POWER / SOURCE BUTTON (#7) to turn the unit OFF when you are done listening.
-
Page 16: Care And Maintenance
Press and hold the MOOD LIGHT / BUTTON (#2) again and the light will automatically start changing colors again. Tap the MOOD LIGHT / BUTTON (#2) to turn the MOOD LIGHT OFF. NOTE: The MOOD LIGHT brightness cannot be changed. USB CHARGING (CHARGING CORD NOT INCLUDED THE UNIT FEATURES A REAR MOUNTED USB CHARGING PORT (#19) (DC 5V... -
Page 17: Troubleshooting Guide
Note: If this unit is operated without a back-up battery inserted, you will need to reprogram the clock, the alarms and the FM radio station presets if the power is interrupted or if there’s a power outage. TROUBLESHOOTING GUIDE If you experience difficulties in the use of this music system, please check the following or call 1-800-777-5331 for Customer Service. - Page 18 1 YEAR LIMITED WARRANTY AND SERVICE VALID IN THE U.S.A. ONLY SPECTRA MERCHANDISING INTERNATIONAL, INC. warrants this unit to be free from defective materials or factory workmanship for a period of 1 year from the from the date of original customer purchase and provided the product is utilized within the U.S.A. This warranty is not assignable or transferable.
Need help?
Do you have a question about the JCR-360 and is the answer not in the manual?
Questions and answers