
Related Manuals for Jensen JCR-300


Summary of Contents for Jensen JCR-300
- Page 1 MODEL JCR-300 AM/FM TALKING DUAL ALARM CLOCK RADIO ® WITH TALK ’N SET USER MANUAL PLEASE READ THIS USER MANUAL COMPLETELY BEFORE OPERATING THIS UNIT AND RETAIN THIS BOOKLET FOR FUTURE REFERENCE.
-
Page 2: Important Safety Instructions
WARNINGS WARNING: To reduce the risk of fire or electric shock, do not expose this appliance to rain or moisture. CAUTION: Use of controls or adjustments or performance of procedures other than those specified may result in hazardous radiation exposure. CAUTION - TO REDUCE THE RISK OF ELECTRIC SHOCK, DO NOT REMOVE COVER (OR BACK). -
Page 3: Compliance With Fcc Regulations
11) Only use attachments/accessories specified by the manufacturer. 12) Use only with a cart, stand, tripod, bracket, or table specified by the manufacturer, or sold with the apparatus. When a cart is used, use caution when moving the cart/apparatus combination to avoid injury from tip-over. - Page 4 The serial number of this product is found on its bottom. You should note the serial number of this unit in the space provided as a permanent record of your purchase to aid in identification in the event of theft of loss. Model Number: JCR-300 Serial Number: ____________________...
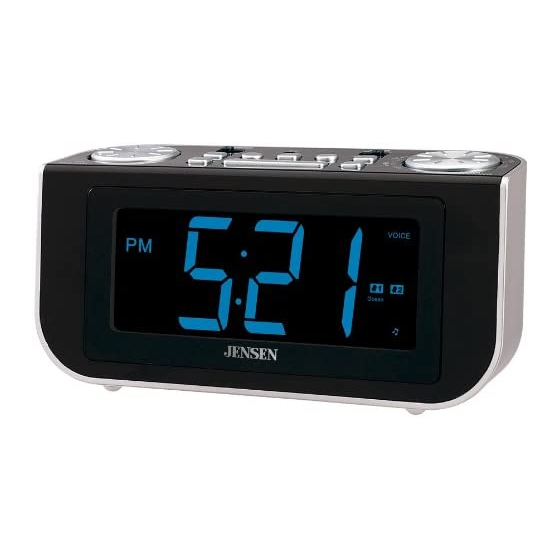
- Page 5 LOCATION OF CONTROLS Controls and Functions of Unit 1. Volume Control 12. On/Off Button 2. ALARM 1 (AL1) On/Off Button 13. LCD Panel 3. Trigger On/Off Switch 14. Rating Label 4. < (Down) Button 15. Reset Button 5. Set Button 16.
- Page 6 IMPORTANT NOTES Avoid installing the unit in locations described below: • Places exposed to direct sunlight or close to heat radiating appliances such as electric heaters. • Humid, moist or dusty places. • Places subject to constant vibration. • Noisy places. POWER REQUIREMENTS This unit operates on 120V~ 60Hz and requires 2 x CR2032 Lithium batteries (included) for system and time backup during power outage.
- Page 7 WHAT IS TALK’N SET? Talk ’N Set is an innovative clock operating system using the latest voice recognition technology. It’s the HANDS-FREE way to set your alarm clock. No more fumbling with instructions or pressing multiple buttons to set the time and alarm. Once the system is activated by saying the trigger word “Hello Clock Radio”, you now simply say one of the preset voice commands and follow the voice prompts to set-up the clock using your voice! Setting the Time, Alarm, Sleep Time, Sleep Sound and Alarm Sounds are just a few of the...
- Page 8 Time To check the current time. * Factory preset time is 12:00AM. Set Time To set the current time in AM or PM. Alarm To check the alarm time and status of AL1 & AL2. If the alarm is currently off, you have the option to turn it on or vice versa.
- Page 9 When the alarm source is successfully understood, the unit will reply, “Please say the time you would like the alarm to sound, including AM or PM” while the current alarm time is displayed. Say the time you wish Alarm One to sound in a clear, normal voice without any pause between words. Example: to set Alarm One to 10:19AM, say “Ten Nineteen AM”.
- Page 10 Start by saying the trigger word “Hello Clock Radio” or press the SNOOZE BAR (#11). The unit will reply “Yes” and will wait for your next command. Say “Alarm” and the unit will announce the Alarm One time, play a brief sample of the alarm sound and also ask if you want to turn the alarm off if on.
- Page 11 If you do not wish the alarm to sound again, you can disable it by pressing either the AL1 ON/OFF BUTTON (#2) or AL2 ON/OFF BUTTON (#8). The corresponding alarm indicators on the display (#25 & #26) will go off. To enable the alarms again, press either the AL1 ON/OFF BUTTON (#2) or AL2 ON/OFF BUTTON (#8).
-
Page 12: Listening To Radio
When sleep sound is playing, its volume can be adjusted from low to high (level 1-4) by pressing the > (UP) (#6) or < (DOWN) (#4) BUTTONS. The selected sleep sound volume will be displayed. To change the sleep sound during sleep, press the SNOOZE BAR (#11) and use “Play Sleep Sound” voice command to change it as usual. -
Page 13: Specifications
Note: In very rare case (such as an electrostatic discharge on a dry cold winter day), if the unit still fails to reset after pressing the RESET Button, you should unplug it from the AC power and then remove the backup batteries from the battery compartment at the bottom of the unit for at least 10 minutes. - Page 14 90 DAY LIMITED WARRANTY AND SERVICE VALID IN THE U.S.A ONLY SPECTRA MERCHANDISING INTERNATIONAL, INC. warrants this unit to be free from defective materials or factory workmanship for a period of 90 days from the date of original customer purchase and provided the product is utilized within the U.S.A.
Need help?
Do you have a question about the JCR-300 and is the answer not in the manual?
Questions and answers