
Subscribe to Our Youtube Channel
Related Manuals for Jensen JCR-225


Summary of Contents for Jensen JCR-225
- Page 1 Dual Alarm Projection Clock Radio USER MANUAL JCR-225 PLEASE READ THIS USER MANUAL COMPLETELY BEFORE OPERATING THIS UNIT AND RETAIN THIS BOOKLET FOR FUTURE REFERENCE.
-
Page 2: Important Safety Instructions
WARNING PREVENT FIRE SHOCK HAZARD, USE THIS PLUG WITH AN EXTENSION CORD, RECEPTACLE OR OTHER OUTLET UNLESS THE BLADES CAN BE FULLY INSERTED TO PREVENT BLADE EXPOSURE. TO PREVENT FIRE OR SHOCK HAZARD, DO NOT EXPOSE THIS APPLIANCE TO RAIN OR MOISTURE. WARNING To reduce the risk of fire or electric shock, do not expose this apparatus to rain or moisture. - Page 3 13. Unplug this apparatus during lightning storms or when unused for a long periods of time. 14. Refer all servicing to qualified service personnel. Servicing is required when the apparatus has been damaged in any way, such as power-supply cord or plug is damaged, liquid has been spilled or objects have fallen into the apparatus, the apparatus has been exposed to rain or moisture, does not operate normally, or has been dropped.
-
Page 4: Compliance With Fcc Regulations
COMPLIANCE WITH FCC REGULATIONS This device complies with Part 15 of the FCC Rules. Operation is subject to the following two conditions: This device may not cause harmful interference, and This device must accept any interference received, including interference that may cause undesired operation. -
Page 5: Dear Jensen® Customer
The serial number of this product is found on its bottom cover. You should note the serial number of this unit in the space provided as a permanent record of your purchase to aid in identification in the event of theft of loss. Model Number : JCR-225 Serial Number :... -
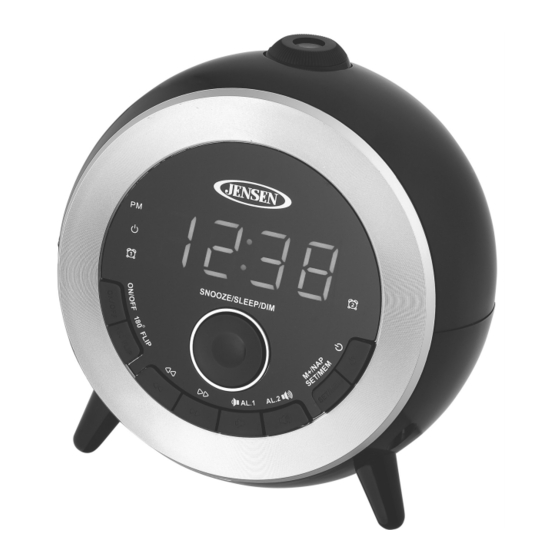
Page 6: Location Of Controls
LOCATION OF CONTROLS SNOOZE/SLEEP/DIM BUTTON ON/OFF BUTTON - PROJECTION ON/OFF 180° FLIP BUTTON – INVERT THE IMAGE OF THE PROJECTED TIME BUTTON - TUNE - / YEAR/MONTH/DAY DISPLAY AUTO CHANGE ON/OFF BUTTON - TUNE + / DISPLAY AUTO OFF / AL1 BUTTON - VOLUME DOWN / ALARM 1 ON/OFF / AL2 BUTTON - VOLUME UP / ALARM 2 ON/OFF SET/MEM BUTTON - MEMORY/MEMORY+/ CLK.ADJ./NAP BUTTON - ON/OFF... -
Page 7: Power Source
LED Display POWER SOURCE AC POWER CONNECTION This product operates on 120V ~60Hz AC power supply. Plug the AC power cord into a household outlet AC source. INSTALLING THE BACK-UP BATTERY This unit is equipped with a battery back-up system, it requires a 3V CR2032 lithium battery (not included) to maintain the time settings and radio presets during an AC power outage. -
Page 8: Alarm Operation
DST (DAYLIGHT SAVING TIME) SETTING Select DST (daylight saving time) mode For areas that observe daylight saving time (DST), the JCR-225 offers you a DST option for adjusting the time change. 1. In standby mode press and hold the SNOOZE/SLEEP/DIM BUTTON (#1) for 3 seconds. -
Page 9: Snooze Function
6. If you select Radio as the alarm sound mode, the volume will blink. Press the BUTTON (#5) or BUTTON (#4) to set the volume level. 7. To turn off Radio or Buzzer alarm after it sounds by pressing the / AL1 BUTTON (#6) or BUTTON (#9) 8. -
Page 10: Radio Operation
1. Press the PROJECTION ON/OFF BUTTON (#2) to turn “On” or “Off” the projector. 2. Project the time onto a light/flat surface such as the ceiling or wall behind the JCR-225. 3. Swivel the projector to position the projected time, and adjust the focus if needed. -
Page 11: Sleep Operation
To insure maximum FM tuner reception, unwrap and fully extend the EXTERNAL FM WIRE ANTENNA for best FM radio reception. To set / recall the radio presets 1. Press the ON/OFF button (#9) to turn on the JCR-225. 2. Press the BUTTON or BUTTON buttons (#5 or #4) to select the desired radio station. -
Page 12: Nap Timer Operation
NAP TIMER OPERATION During radio off mode, press the (#8) to enter NAP mode. Within 5 seconds, SET/MEM BUTTON press the (#8) repeatedly to select the duration 90 -80 – 70 – 60 – 50 – 40 SET/MEM BUTTON – 30 – 20 – 10 – OFF.. The alarm buzzer will sound for 30 min and then shut off automatically. -
Page 13: Care And Maintenance
CARE AND MAINTENANCE If you experience difficulties in the use of this music system, please check the following or call 1-800-777-5331 for Customer Service. SYMPTOM POSSIBLE CAUSE POSSIBLE SOLUTION GENERAL Power does not come on. AC line cord not plugged in. Insert plug firmly into AC outlet. - Page 14 90 DAY LIMITED WARRANTY AND SERVICE VALID IN THE U.S.A. ONLY SPECTRA MERCHANDISING INTERNATIONAL, INC. warrants this unit to be free from defective materials or factory workmanship for a period of 90 days from the date of original customer purchase and provided the product is utilized within the U.S.A. This warranty is not assignable or transferable.
Need help?
Do you have a question about the JCR-225 and is the answer not in the manual?
Questions and answers
My Jensen 225 does not scroll through date, time and year. It stays on time what do I do.
To fix the issue of your Jensen JCR-225 not scrolling through the date, time, and year, ensure that the "DISPLAY AUTO CHANGE ON/OFF" setting is correctly configured. Press BUTTON (#4) to toggle this feature. If the feature is off, the display will not scroll automatically.
This answer is automatically generated