Advertisement
Quick Links
Operating Manual
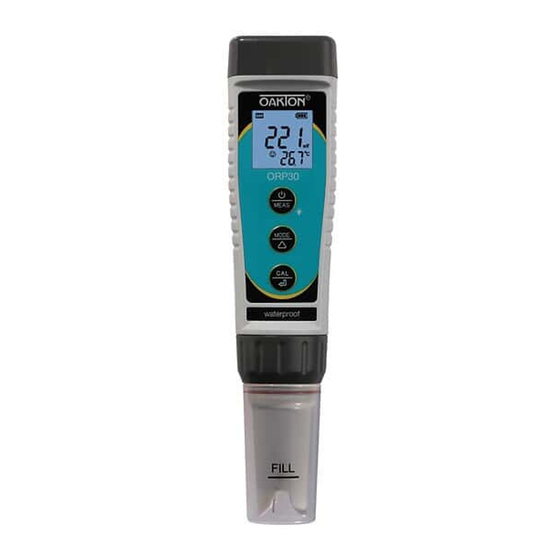
ORPTestr
30 Pocket Tester
®
Thank you for purchasing the Oakton
Please carefully read this operating manual before using the
product to obtain an accurate and reliable test result and avoid
unnecessary damage to the tester or probe.
Features
• Large easy-to-read LCD with 3-color backlight
• Replaceable double-junction sensor saves you money
• Stability and battery status icons
• Auto power-off function conserves battery life
• IP67 waterproof rating
Keypad Functions
Short press = <2 seconds
1. Short press to turn on the tester and long press to turn
off the tester.
2. When turned off, long press to enter parameter setting
MEAS
mode.
3. In measurement mode, short press to turn on backlight.
1. In calibration mode, short press to change calibration
value (unidirectional).
2. In mode setting, short press to change parameter
(unidirectional).
1. Long press to enter calibration mode.
CAL
2. In calibration mode, short press to confirm calibration.
3. When measured value is locked (HOLD icon), short
<
press to unlock.
Preparation Before Use
1. Pour certain amount of storage solution (KCl) into the probe cap,
soak the probe for 3 to 5 minutes to activate the sensor (if frequently
used, there is no need to soak).
2. The soaking solution is 3M KCl solution; preferably Oakton
Electrode Storage Solution (SKU 00653-04). Users can also
make it themselves by dissolving 25 g KCl in 100 ml of distilled
water.
ORP Calibration
1. Clean electrode in distilled water and dry it.
2. Pour a small amount of 222 mV ORP
standard solution (SKU 80055-90, 500-mL
bottle) into the calibration bottle.
3. Short press
/MEAS key to turn the meter
on. Long press CAL/
key to enter calibration
mode. If you need to exit calibration mode,
short press
/MEAS key.
4. Dip electrode in the ORP standard solution
(Zobell's solution), stir gently, and allow it to
stand still in the calibration solution until a
stable reading is reached. When measurement stability icon ( )
appears and remains on the screen (see Fig. 1), press MODE/△ key to
adjust the calibration value according to the table below (also on the
buffer bottle's label).
®
ORPTestr
®
30 Pocket Tester.
Long press = >2 seconds
ORP Standard Buffer Solution Calibration Reference Table
Temperature (ºC)
10
15
20
25
For example, if the temperature is around 25ºC, then adjust the
calibration value to 222 mV. If the temperature is around 20ºC, then
adjust the calibration value to 227 mV. Short press CAL/
complete the calibration.
ORP Measurement
Press
/MEAS key to power on, clean the probe in distilled water,
and gently dry it. Place the probe in the tested solution and stir
gently and let it stand still. Read the measurement after the stability
icon ( ) appears and remains on.
Notes
Usually there's no need to calibrate for ORP testing. When not used
for a long time, users can test the unit in 222 mV ORP standard
buffer. If the error is large, recalibrate according to the steps above.
Cleaning and Activating the ORP Probes
After long-time use, the surface of the platinum sensor can be
contaminated and cause inaccuracy and slow response time. If that
happens, the followed methods can be adopted to clean and
activate:
A. For contamination caused by inorganic substances, dip the
probe into 0.1 mol/L dilute hydrochloric acid for 30 minutes.
Clean it with distilled water, soak in KCL storage solution (SKU
00653-04) for 6 hours, and then it will be ready for use.
B. For contamination caused by organic substances and oiliness,
clean the platinum surface with dishwashing liquid and wash
with distilled water. Soak for 6 hours in storage solution (SKU
00653-04) and then it will be ready for use.
C. If the platinum surface is so severely contaminated that an
oxide film forms, use toothpaste to clean the platinum surface,
and then wash it with distilled water. The probe will be ready for
use again after 6 hours of soaking in the storage solution (SKU
00653-04).
Setting the Parameters
When tester is off, long press
settingmode. Short press MODE/△ key to switch from P1 to
P2...P6. Short press CAL/
press MODE/△key to choose desired parameter. Short press
CAL/
key to confirm selection. Long press
parameter setting mode.
Symbol
Menu setting
Set low
P1
measurement alarm
Set high
P2
measurement alarm
Select Automatic
P3
Lock (HOLD)
Select backlight
P4
Select temperature
P5
unit
Restore to
P6
factory default
A. High and Low Measurement Heads-Up Examples (P1 and P2)
mV (stability icon ( ) displays on LCD) the red backlight appears
on display.
mV
Temperature (ºC)
242
30
235
35
227
38
222
40
/MEAS key to enter parameter
key and parameter will flash, then short
/MEAS key to exit
Selection
Factory default
–1000 to +1000 mV
–1000 to +1000 mV
Off – On
Off – 1 – On
1 (1-min auto-off)
°C – °F
No – Yes
Preset low value =
mV
215
209
205
201
key to
–1000
1000
Off
°C
No
Advertisement

Related Manuals for Oakton ORPTestr 30


Summary of Contents for Oakton ORPTestr 30
- Page 1 When tester is off, long press /MEAS key to enter parameter settingmode. Short press MODE/△ key to switch from P1 to 2. The soaking solution is 3M KCl solution; preferably Oakton P2…P6. Short press CAL/ key and parameter will flash, then short Electrode Storage Solution (SKU 00653-04).
- Page 2 Warranty period is the time limit to provide free service for the products purchased by customers, not the service life of the tester Ordering Information or probe. Oakton Instruments reserves the right to update the information in Model Product description Catalog number this manual without giving notice in advance.
Need help?
Do you have a question about the ORPTestr 30 and is the answer not in the manual?
Questions and answers