Intermec CV41C User Manual
Hide thumbs
Also See for CV41C:
- User manual (150 pages) ,
- Manual (12 pages) ,
- Quick reference manual (2 pages)
Table of Contents
Advertisement
Quick Links
Advertisement
Table of Contents

Subscribe to Our Youtube Channel
Related Manuals for Intermec CV41C


Summary of Contents for Intermec CV41C
- Page 1 User’s Manual CV41C With Microsoft® Windows® Embedded CE Operating System...
- Page 3 Using the Vehicle Mount Computer This chapter introduces the CV41C Vehicle Mount Computer with Windows® CE operating system. Use this chapter to learn about the basic features and available accessories.
- Page 4 The CV41C is highly configured and runs on the Microsoft Windows CE operating system. Additionally, the CV41C supports the use of terminal emulation applications, browser-based applications, or custom applications.
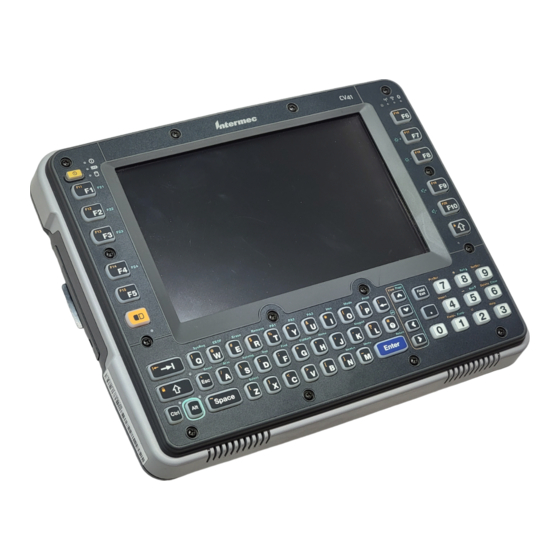
- Page 5 Chapter 1 — Using the Vehicle Mount Computer CV41C Front View Callout Description Power button Speakers Ambient light sensor Microphone CV41C Vehicle Mount Computer User Guide...
- Page 6 Chapter 1 — Using the Vehicle Mount Computer CV41C Back View with Quick Mount Smart Dock Callout Description Antenna connectors SIM card access panel COM 1 COM 2 USB connector CAN/audio connector Quick release handle Provision for padlock Provision for laptop security cable...
-
Page 7: About The Leds
Chapter 1 — Using the Vehicle Mount Computer About the LEDs The LEDs on the CV41C tell the state of the computer. Use this section to learn about the connection and system LEDs. Connection LEDs Connection LED Status Descriptions Callout... - Page 8 Callout LED State Description System Solid green The CV41C is on, or the CV41C is on but the backlight or display may be off. Blinking green The CV41C is in suspend mode, or external power every 4.5 seconds is not present.
- Page 9 Callout LED State Description There is no read or write activity. CV41C Accessories The CV41C does not ship with any accessories. All accessories are sold and ordered separately. For help, contact your local Intermec sales representative. CV41C Accessories Accessory Description...
-
Page 10: About The Internal Ups Battery
CV41C Mounting Kit Reference Guide. Connecting the CV41C to Power For the CV41C to operate, you must attach it to the smart dock and provide power to the CV41C through a DC/DC power supply or an AC/DC power supply. -
Page 11: About The Backup Battery
To install an SD card on the CV41C: 1 Remove the CV41C from the smart dock. 2 Press the Power button to place the CV41C in Suspend mode. 3 Using a small Phillips screwdriver, remove the two screws that secure the SD card access panel. -
Page 12: About The Phone
5 Reattach the SD Card Access Panel and torque the screws to 4-5 in/lbs. 6 Attach the CV41C back into the smart dock. 7 Press the Power button to resume the CV41C from Suspend mode. About the Phone The CV41C supports UMTS cellular technology. The phone features include a speaker and a microphone. - Page 13 To install the SIM card and activate the UMTS radio: 1 Remove the CV41C from the smart dock. 2 Press the Power button to place the CV41C in Suspend mode. 3 Using a small Phillips screwdriver, remove the SIM Card Access Panel.
-
Page 14: Adjusting The Volume
7 Press the Power button to resume the CV41C from Suspend mode. Adjusting the Volume You can change the CV41C volume, for sounds you hear when you tap the screen or scan bar codes with a scanner, to adjust to your needs and the environment. - Page 15 Chapter 1 — Using the Vehicle Mount Computer If you are going to use the CV41C in extreme cold conditions for an extended period of time, you should turn on the power at room temperature for at least 15 minutes prior to using it. This process of “warming up”...
-
Page 16: Navigating The Touch Screen
Chapter 1 — Using the Vehicle Mount Computer Navigating the Touch Screen Use a stylus or your fingers to navigate the touch screen on the CV41C. Touch Screen Navigation Action Description Touch the screen once with the stylus or finger to select options, open or close applications, or launch menus. -
Page 17: Installing An External Antenna
For information on purchasing an antenna, contact your local Intermec sales representative. To connect an external antenna: 1 Secure the antenna to one of the antenna plugs on the CV41C. CV41C Vehicle Mount Computer User Guide... -
Page 18: About The Keypad
About the Keypad The CV41C comes with one standard keypad overlay. The computer has a keypad backlight for low light conditions. By default, the keypad is enabled. You can disable the keypad backlight to conserve power. - Page 19 When the display is on, the keypad backlight is also on. Use this section to learn how to set the keypad backlight timer. To set the keypad backlight timer: 1 Tap Start > Control Panel. The Control Panel screen appears. CV41C Vehicle Mount Computer User Guide...
-
Page 20: Rebooting The Computer
Press the Up Arrow on the keypad and then press the key to type • an uppercase character. Rebooting the Computer If you are experiencing problems with the CV41C, you can perform a warm boot or restart. Warm Booting the CV41C When you perform a warm boot, the CV41C reboots without erasing any registry data, configuration settings, data in RAM storage, and cab files that were installed. -
Page 21: Physical And Environmental Specifications
Chapter 1 — Using the Vehicle Mount Computer Restarting the CV41C When you perform a restart, the CV41C reboots without erasing any registry data and configuration settings. The data in RAM storage is lost, networking sessions are lost, cab files are reloaded, and any data in applications that were running may be lost if they were not saved reloaded. -
Page 22: Operating System
8” color WVGA display with a resolution of 800 x 480 pixels, with optional heated display. Standard Communications • 802.11a/b/g • Bluetooth • • Serial Wireless LAN Data rates Supports all 802.11a/b/g data rates. Security WPA, WPA2, 802.1x (EAP-TLS, TTLS, LEAP, PEAP, EAP-FAST), WEP CV41C Vehicle Mount Computer User Guide... - Page 23 Radio Frequency (RF) Exposure Information The radiated output power of the CV41C is below the Industry Canada (IC) radio frequency exposure limits. The CV41C should be used in such a manner such that the potential for human contact during normal operation is minimized.
- Page 24 Informations concernant l'exposition aux fréquences radio (RF) La puissance de sortie émise par de le CV41C est inférieure à la limite d'exposition aux fréquences radio d'Industry Canada (IC). Utilisez le CV41C de façon à minimiser les contacts humains lors du fonctionnement normal.
Need help?
Do you have a question about the CV41C and is the answer not in the manual?
Questions and answers