
Related Manuals for Emerson FBxRemote I/O


Summary of Contents for Emerson FBxRemote I/O
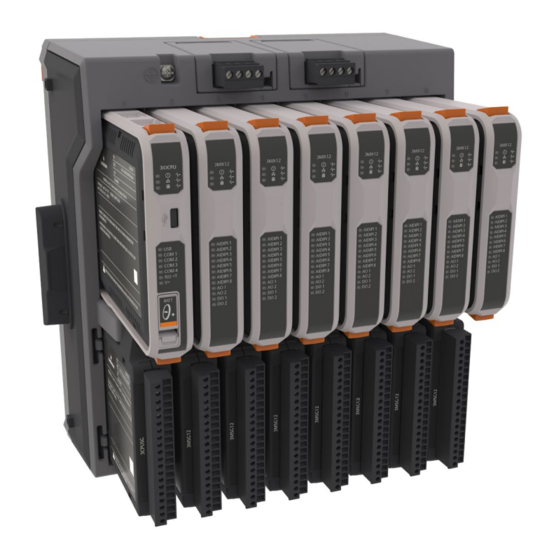
- Page 1 Emerson FBxRemote I/O Quick Start Guide D301902X012 April 2021 Emerson FBxRemote I/O™ Quick Start Guide Remote Automation Solutions...
- Page 2 Our full-time professional instructors can conduct classroom training at several of our corporate offices, at your site, or even at your regional Emerson office. You can also receive the same quality training via our live, interactive Emerson Virtual Classroom and save on travel costs. For our complete schedule and further information, contact the Remote Automation Solutions Training Department at 800-338-8158 or email us at education@emerson.com.
-
Page 3: Table Of Contents
Connecting to the FBxRemote I/O ......................18 Configuring the IP Address and DNP3 Address of the Remote I/O ............. 20 Example - Configuring I/O in the FBxRemote I/O ..................22 Example – Transferring Data from the FBxRemote I/O to the Host RTU ............. 25... - Page 4 Emerson FBxRemote I/O Quick Start Guide D301902X012 April 2021...
-
Page 5: Safety First
Emerson FBxRemote I/O Quick Start Guide D301902X012 March 2021 Safety First! Notes If the equipment is used in a manner not specified by the manufacturer, the protection provided by the equipment may be impaired. Wiring to or from this device, which either enters or leaves the user-provided enclosure, ... -
Page 6: Required Tools
Emerson FBxRemote I/O Quick Start Guide D301902X012 March 2021 Required Tools Certain tools and equipment are required for installing and servicing the RTU: Table 1: Required Tools Tool For chassis ground lug, panel installation, removal of rear #2 Phillips screwdriver panel. -
Page 7: Grounding The Fbxremote I/O
D301902X012 March 2021 Grounding the FBxRemote I/O™ The FBxRemote I/O rack includes a chassis ground lug to the left of the power supply modules. Location of Chassis Ground Lug Once you have installed the unit, run a ground wire (14 AWG protective conductor) between the ground lug and a known good earth ground. -
Page 8: Removing Battery Saver Tabs
Emerson FBxRemote I/O Quick Start Guide D301902X012 March 2021 Removing Battery Saver Tabs When you are ready to install the rack and place it into operation, you must remove the battery saver tabs for the SRAM coin cell batteries. Each power module, as well as the CPU, has a similar tab. -
Page 9: Wiring Communications
Emerson FBxRemote I/O Quick Start Guide D301902X012 March 2021 Wiring Communications The communication ports allow you to connect to a PC or laptop running FBxConnect software or to other devices. Regardless of the interface standard [RS-232, RS-485 (4-wire), or RS-485 (2- wire)], you must use FBxConnect to configure the port for proper usage. - Page 10 Emerson FBxRemote I/O Quick Start Guide D301902X012 March 2021 COM1 Configured as RS-485 (4-wire) RS-485 (4-wire) port on device Connect cable shields to suitable Instrument Earth connection point COM1 Configured as RS-485 (2-wire) RS-485 (2-wire) port on device Connect cable shields to suitable Instrument Earth connection point...
- Page 11 Emerson FBxRemote I/O Quick Start Guide D301902X012 March 2021 COM2 Configured as RS-232 RS-485 port on device Connect cable shields to suitable Instrument Earth connection point COM2 Configured as RS-485 (4-wire) RS-485 (4-wire) port on device Connect cable shields to suitable Instrument Earth connection point...
- Page 12 Emerson FBxRemote I/O Quick Start Guide D301902X012 March 2021 COM2 Configured as RS-485 (2-wire) RS-485 (2-wire) port on device Connect cable shields to suitable Instrument Earth connection point COM3 Configured as RS-485 (2-wire) Enable AC termination using switch RS-485 bus, twisted pair required...
- Page 13 Emerson FBxRemote I/O Quick Start Guide D301902X012 March 2021 COM4 Configured as RS-485 (2-wire) Enable AC termination using switch RS-485 bus, twisted pair required Connect cable shields to suitable Instrument Earth connection point...
- Page 14 Emerson FBxRemote I/O Quick Start Guide D301902X012 March 2021 Ethernet and Micro USB Ports Located on the top of the CPU module, the two Ethernet ports are standard 8-pin 10/100Base-T RJ - 45 8P8C sockets. The Micro A-B USB connector is located on the front of the module. The Micro A-B USB connector is compatible with either Micro A USB or Micro B USB plugs, but is not compatible with Micro C plugs.
-
Page 15: Wiring I/O
Emerson FBxRemote I/O Quick Start Guide D301902X012 March 2021 Wiring I/O You can individually configure AI/DI/PI1 through AI/DI/PI8 as analog inputs (AI), digital inputs (DI), or pulse inputs (PI). Analog Input (AI) AI Wiring Using 1–5 Vdc or 4–20 mA... - Page 16 Emerson FBxRemote I/O Quick Start Guide D301902X012 March 2021 AI Wiring Using Loop Power External Current Source Analog Output (AO) AO Wiring...
- Page 17 Emerson FBxRemote I/O Quick Start Guide D301902X012 March 2021 Digital Input (DI) DI Wiring (internal pull-up enabled) Digital Output (DO) DO Wiring: Low Side Internal Switch Power Supply 30VDC Max 50 mA load max field device Low side switch - internal Suppression diodes- only one required.
- Page 18 Emerson FBxRemote I/O Quick Start Guide D301902X012 March 2021 Digital Output (DO) Wiring –High Side Internal Switch with 24V Loop Supply 50 mA load max field device High Side Switch - INTERNAL Digital Output (DO) Wiring –Dry Contact Closure 500 mA load max field device...
- Page 19 Emerson FBxRemote I/O Quick Start Guide D301902X012 March 2021 Digital Output (DO) Wiring – Contact Closure using 24V Loop Supply 500 mA load max field device Pulse Input (PI) Pulse Input (PI) Wiring External Device (Because no power supply, requires internal pull-up to be enabled.)
-
Page 20: Wiring Power
Emerson FBxRemote I/O Quick Start Guide D301902X012 March 2021 Wiring Power DANGER EXPLOSION HAZARD: Ensure the area in which you perform this option is non-hazardous. Performing this operation in a hazardous location could result in an explosion. The device supports both 12V and 24V power supplies. It accepts DC voltage from 10.5 to 30V; the amount of power required varies depending upon the options used. - Page 21 Emerson FBxRemote I/O Quick Start Guide D301902X012 March 2021 TechView and other components of BSI_Config software cannot be installed on a computer running OpenBSI Network Edition versions older than 5.9 Service Pack 2. You must have administrative privileges to install Field Tools.
-
Page 22: Establishing A Connection And Configuring Remote I/O
RTU host only communicates to the I/O rack using Ethernet. You must configure an IP address and a DNP address for the FBxRemote I/O rack. Once this is done, you can configure the I/O points and FBxNet™ connections either locally, or remotely through the host RTU. - Page 23 Emerson FBxRemote I/O Quick Start Guide D301902X012 March 2021 Choose FBx as the Device Platform. Choose the Connection Type For serial: choose the PC Comm port (or the port for the USB/serial adapter). COM 1 defaults to DNP3, 115200 BAUD, 8 data bits no parity 1 stop bit, RS‐232.
-
Page 24: Configuring The Ip Address And Dnp3 Address Of The Remote I/O
Configuring the IP Address and DNP3 Address of the Remote I/O 1. When FBxConnect opens, click Configure, then click Communications. Click on the ports drop-down and select the Ethernet Port which the FBxRemote I/O rack will use to communicate with its host RTU. - Page 25 Emerson FBxRemote I/O Quick Start Guide D301902X012 March 2021 On the General tab for the Ethernet Port enter the IP address you want to use in the IPv4 IP Address field, then click Save. Click the DNP tab then specify the DNP address for the rack in the Flow Computer Address...
-
Page 26: Example - Configuring I/O In The Fbxremote I/O
Example - Configuring I/O in the FBxRemote I/O I/O in the FBxRemote I/O rack is configured the same way as you configure I/O in the FB3000 host device. You can connect locally to the rack, as described in Connecting to the FBxRemote I/Oand run FBxConnect to configure the I/O. - Page 27 4. You will notice that the FBxConnect ribbon changes to reflect only those options available for the FBxRemote I/O rack. 5. You will notice that the FBxConnect ribbon changes to reflect only those options available for the FBxRemote I/O rack. For this example, click the Configure tab and choose IO Setup > AI.
- Page 28 6. You will notice that the FBxConnect ribbon changes to reflect only those options available for the FBxRemote I/O rack. For this example, click the Configure tab and choose IO Setup > AI. You can now configure the AI as you would any AI in the host RTU.
-
Page 29: Example - Transferring Data From The Fbxremote I/O To The Host Rtu
Also, you must create an FBxNet user in each device that uses FBxNet. In this case, that means you must create an FBxNet user in the FB3000 host RTU, and then create an identical FBxNet user in the FBxRemote I/O rack. You create an FBxNet user within FbxConnect as follows: Click Services > User Management... - Page 30 Emerson FBxRemote I/O Quick Start Guide D301902X012 March 2021 3. For the user details: Select FBxNet as the Protocol Type. Specify a Username and Password combination. All FBxNet users you define on your network must share this same username/password combination.
- Page 31 Device IP Address. For this example, this address is the IP port on the host FB3000 RTU that communicates with the FBxRemote I/O rack. Click Save when finished. 4. Now you’ll notice the site name gets added, and the name of the RTU you specified as the designated device shows below it.
- Page 32 Emerson FBxRemote I/O Quick Start Guide D301902X012 March 2021 5. The publisher is your FBRIO rack so edit the Name field to make it the name of the FBxRemote I/O rack and enter the IP Address for the FBxRemote I/O rack.
- Page 33 7. Click Tag Browser (or Open Tag Browser in the menu bar). Select the Device name (in this case it’s your FBxRemote I/O rack), then choose the AI you want and its associated parameter (in this case Live Value) finally click Copy Tag.
- Page 34 Emerson FBxRemote I/O Quick Start Guide D301902X012 March 2021 8. In the Publisher Parameters Configuration pane, click in the Publisher Tag field, and right click to paste in the tag you copied from the Tag Browser. 9. Now go back to the Tag Browser and select the Device name (in this case it’s your FB3000 host RTU), then choose the destination parameter (in this case Primary Process Variable Input to PID Loop 1) then finally click Copy Tag.
- Page 35 Emerson FBxRemote I/O Quick Start Guide D301902X012 March 2021 10. Now paste the copied tag into the Subscriber Tag field. 11. This completes the definition of the parameter. You can repeat this entire process for other parameters you want to transfer. When finished, click Save To File to save the CSV file.
- Page 36 Emerson Automation Solutions Remote Automation Solutions Emerson FZE P.O. Box 17033 © 2021 Remote Automation Solutions, a business unit of Emerson Automation Solutions. All Jebel Ali Free Zone – South 2 rights reserved. Dubai U.A.E. This publication is for informational purposes only. While every effort has been made to ensure...
Need help?
Do you have a question about the FBxRemote I/O and is the answer not in the manual?
Questions and answers