Advertisement
Quick Links
OPERATOR'S MANUAL
KSPLS15-HITCH Kit
Lesco
102497
Truckster
Spyker
S80-12010
For use with
the Spyker or Lesco
Electric Spreaders
Spyker Spreaders
Contact us at 800.972.6130
www.spyker.com
IMPORTANT
!
!
This manual contains information for the safety of persons and property.
Read it carefully before assembly and operation of the equipment!
English Manual
Page 1
1019548-A
Advertisement

Related Manuals for SPYKER KSPLS15


Summary of Contents for SPYKER KSPLS15
- Page 1 KSPLS15-HITCH Kit Lesco 102497 Truckster Spyker S80-12010 For use with the Spyker or Lesco Electric Spreaders Spyker Spreaders Contact us at 800.972.6130 www.spyker.com IMPORTANT This manual contains information for the safety of persons and property. Read it carefully before assembly and operation of the equipment!
-
Page 2: Table Of Contents
Table of Contents + Safety TABLE OF CONTENTS SAFETY Understanding the Machine Safety Labels Safety ....2-4 The machine safety labels shown in this section are placed in Parts important areas on your machine to draw attention to potential safety hazards. -
Page 3: Safety
Safety OPERATING SAFELY General Personal Protective Equipment • Read this manual and the manual of the vehicle you are • Always wear ear and eye protection when operating the attaching the hitch and spreader onto. Be thoroughly familiar spreader. with the controls and the proper use of the equipment. Know •... - Page 4 (C) Cargo Box Load Weight NOTE: (Do not exceed maximum cargo box capacity) • It is not recommended that the KSPLS15-HITCH is (D) Optional Vehicle Accessories Weight used on a make or model UTV that is not listed. (Cab, snow blade, etc) •...
-
Page 5: Hardware Identifier
ILLUSTRATIONS ON THIS PAGE ARE TO SCALE FOR FASTER Hardware Identifier IDENTIFICATION OF HARDWARE DURING ASSEMBLY. DO NOT RETURN PRODUCT IF YOU ARE MISSING PARTS. PLEASE CALL: 1 (800) 972-6130 Bolt; Carriage, 3/8"-16 x 2-1/4” (x1) ..... 11M1236P Bolt;... -
Page 6: Part List
Washer; Flat, 3/8" 45M1313P Cotter; Hairpin, 1/8" #211 D-146P These Additional Parts are only needed for attaching to a LESCO Spreader > They're unnecessary for a Spyker Assembly. No. Part # Description No. Part # Description 1019518-10 Left Adapter; Lesco, Painted... -
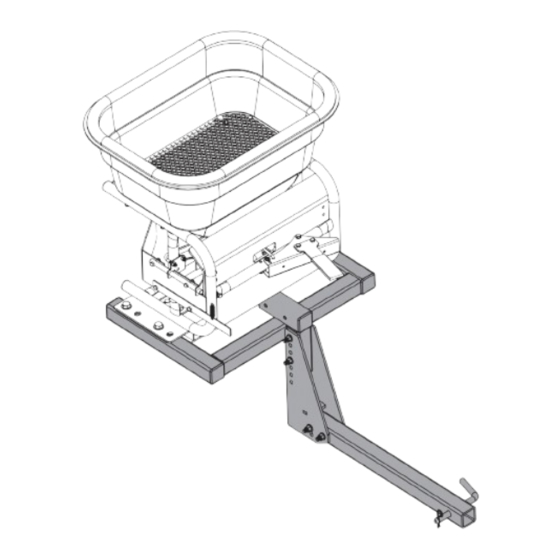
Page 7: Part Explosion
Part Explosion These Additional Parts are only needed for attaching to a LESCO Spreader > They're unnecessary for a Spyker Assembly. English Manual Page 7 1019548-A... -
Page 8: Assembly
Assembly 4. Slide the hitch tube (1) into the adjustment plate 1. Identifying Hardware (2) at the base, as illustrated here. For reassurance, lay the nuts, bolts and washers Add a 3/8" washer (13) to two 3/8 hex bolts (11). down on page 5 to verify you’re using the correct parts during assembly. - Page 9 Assembly 6. Adding Spreader Mount The assembly process for the next few steps will vary depending on the brand of spreader you're using: SPYKER LESCO Align the spreader mount (3) with the adjustment Align the spreader mount (3) with the adjustment plate (2) as illustrated below.
- Page 10 SPYKER LESCO Align the Adaptor Brackets (15) and (16) to the Spreader Mount (3) as These brackets are not illustrated here: necessary for a Spyker Hitch Assembly. Skip to Step 8 on page 11. Fig. 6 Add a 1/2" Flat Washer (12) to each of four 1/2" x 3 hex head bolts (10).
- Page 11 IF THIS The Spreader dimension "B" is 15" off the ground. Mount (3) MEASUREMENT NOTE: In the Spyker configuration, the Spreader will need to be IS MORE THAN moved down. 15 INCHES Mount (3) can be inverted 180 degrees to allow for...
- Page 12 Assembly 9. Mounting the Spreader SPYKER LESCO Align the spreader to the hitch mount (3). Align the spreader to the adaptor plate (16). Add a 1/2" flat washer (12) to each of Add a 1/4" flat washer (19) to two 1/4" x 1" hex four 1/2"...
- Page 13 Assembly 10. For Spyker S80-12010 Spreader, load the hopper with 120 lb ballast. For Lesco 102479 Truckster Spreader, load hopper with 80 lb ballast. NOTE: If the Adjusting the Spreader Angle FAN on the spreader is angled down toward the ground, see 11.
-
Page 14: Warranty
WARRANTY 1 YEAR LIMITED WARRANTY This is warranted to the original purchaser only. Spyker will replace parts with defects in materials and workmanship, for a period of one year from the date of purchase. For Spyker Spreaders–a Brinly-Hardy Company, products employing metal gear systems,...
Need help?
Do you have a question about the KSPLS15 and is the answer not in the manual?
Questions and answers