
Subscribe to Our Youtube Channel
Related Manuals for GABOR Mainmast DMS-200


Summary of Contents for GABOR Mainmast DMS-200
- Page 1 DMS-200 / MAINMAST SINGLE DISPLAY DESKTOP MONITOR STAND for 17 to 32 in. Screens User Manual...
- Page 2 Thank you for choosing Gabor. Gabor’s sturdy Mainmast Single Display Desktop Monitor Stand is a space and clutter saver for desks and workstations at home and in the office. This freestanding desk accessory can hold a 17- to 32-inch monitor weighing up to 15.4 pounds, and it allows you to adjust the height, swivel, and tilt for the perfect viewing angle.
-
Page 3: Safety Warnings
Safety Warnings • Please read and follow the instructions, and keep this manual in a • Make sure everything is secure before proceeding to the next step. safe place. • Do not exceed the maximum load capacity. • To avoid damage to this product, be careful not to overtighten or improperly thread any of the threaded fittings. -
Page 4: Product Specifications
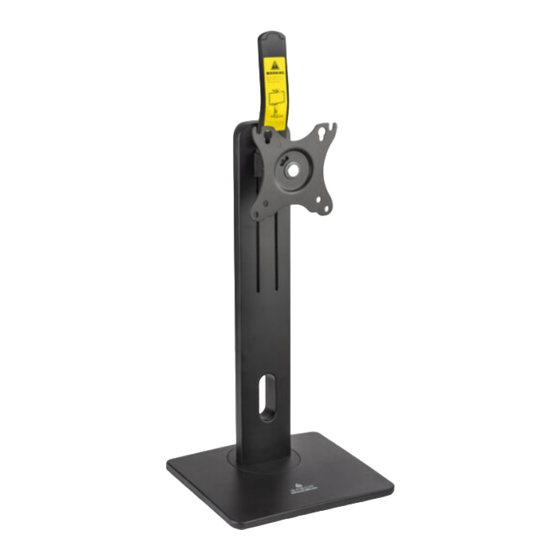
Product Specifications Monitor display size Column height adjustment ±1 8 0 ° 17 to 32 in. (43.2 to 81.3 cm) 10.4 to 16.3 in. (26.5 to 41.5 cm) Maximum monitor weight Weight (without monitor) 15.4 lb. (7 kg) 6.7 lb. (3 kg) VESA standards Package Weight 75 ×... - Page 5 Overview Lever VESA back plate Tilt tension screws Bracket support Lever front Mounting Height lock bracket Column Monitor arm hook Cable channel Base...
-
Page 6: Parts Included
Parts Included M4 × 12 mm screws M5 × 12 mm screws D5 washer Base Mounting bracket Lever back Lever front Column Bracket support Hex bolt M4 × 6 mm screw M4 × 8 mm screw M6 × 20 mm screw 5 mm hex key 6 mm hex key... -
Page 7: Assembling The Base
Assembling the Base Attaching the Lever Fit the column (A) Attach the lever back into the base (B). (D) to the height lock with the four M4×6 Screw the hex bolts screws (H). Use the (G) into the holes in screwdriver end of the the bottom of the 5 mm hex key (K) to... - Page 8 Inserting the VESA Mount onto the Column Hang the mounting bracket on the hooks that extend from the front of the column. Attach the bracket support (F) under the mounting bracket, and secure it with the M6×20 screw (J). Use the Phillips end of the 5 mm hex key (K) to tighten until secure.
-
Page 9: Mounting The Monitor
Mounting the Monitor Before you attach the VESA plate, hand thread one of the M-A or M-B screws to determine which one fits your monitor. Make sure the screw is also not too long or too short. If the screw is too long, it may damage the display. If it’s too short, it may not hold it. 100 ×... -
Page 10: Cable Organization
Cable Organization Adjusting the Monitor Height Important! When adjusting After the monitor is installed, keep your cables neat monitor height, support the and organized by running them through the cable bottom of the monitor with channel in the column. one hand. The other hand will support the monitor from above and operate the lever. - Page 11 Monitor Tilt, Rotation, and Swivel Tilt Rotation Swivel To adjust the viewing angle, To change the orientation of a For optimum monitor position, the tilt the monitor up and monitor from landscape to column swivels 40° to the left and right. down by 15°.
- Page 12 To obtain warranty coverage, contact the Gabor Customer Service Department to obtain a return merchandise authorization (“RMA”) number, and return the defective product to Gabor along with the RMA number and proof of purchase. Shipment of the defective product is at the purchaser’s own risk and expense.
Need help?
Do you have a question about the Mainmast DMS-200 and is the answer not in the manual?
Questions and answers