Advertisement
Quick Links
Advertisement

Related Manuals for GABOR ACCUGEAR UPMP-1000


Summary of Contents for GABOR ACCUGEAR UPMP-1000
- Page 1 UPMP-1000 / ACCUGEAR UNIVERSAL PROJECTOR MOUNT User Manual...
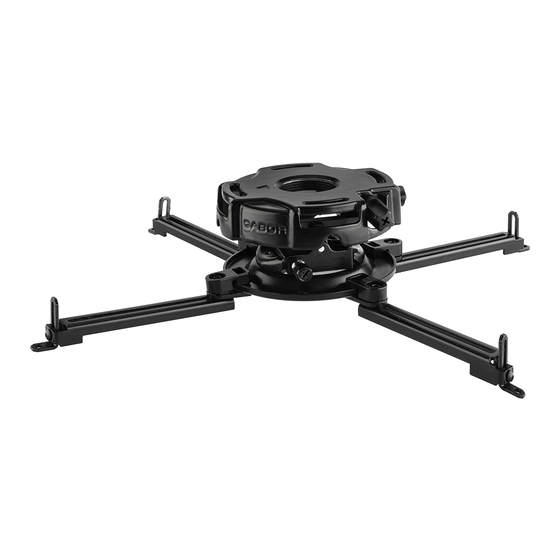
- Page 2 Thank you for choosing Gabor. The Gabor UPMP-1000 AccuGear Universal Projector Mount provides an easy and professional solution for mounting your projector to a ceiling. The AccuGear’s dual-gear mechanism offers exact image alignment which allows you to quickly dial in ideal tilt and roll viewing angles. Preassembled parts and the quick-release mount make the installation process fast and simple, and the adjustable arms can be configured to fit most projectors.
-
Page 3: Safety Warnings
(gypsum board), verify the studs are a minimum 2 × 4 in. size. Do not install this mount over drywall greater than 5/8 inches thick. If installing this Gabor ceiling mount to a concrete ceiling, it must be at least 8 inches thick with a minimum compressive strength of 2000 psi. - Page 4 Overview Mounting plate Projector mount Tools Needed for Assembly Wood Concrete Stud finder Pencil Phillips screwdriver Hammer Concrete anchor Anchor screw Drill 5/16-inch (8 mm) concrete drill bit M5 x 6mm 1/4”...
-
Page 5: Projector Placement
Projector Placement Before installing the Gabor AccuGear, you will need to determine the projector’s placement and identify surrounding ceiling or wall supports for attachment. 1. Measure the width at the top of your projector’s screen, and locate the center. Make a mark above the center point. - Page 6 Wood Studs Wood studs run vertically inside the wall or across the ceiling, behind the drywall or plaster. The plate must be mounted to a wood stud, or the plate could fall out and damage the projector or cause personal harm. Make sure the studs are at least 1.5 inches (38 mm) wide.
- Page 7 Concrete Warning! Make sure the concrete anchors are installed into solid concrete that is at least 8 inches (20 cm) thick. If concrete exhibits cracks or other defects, this may result in failure of the concrete anchors and cause serious personal injury or equipment damage.
- Page 8 Attaching the Projector 1. Determine which screws (J, K, L, M, or N) to use with your projector. K, L, 2. Loosen the projector mount’s arms with the hex key (I).
- Page 9 If your projector model has only three holes for mounting, then remove the fourth arm with the hex key (I). Warning! Do not use the projector mount with only two arms. 3. Slide the arms around the projector mount and along the arm’s shaft to position them over your projector’s mounting holes.
- Page 10 6. Slide the projector mount into the mounting plate’s flange, and secure it with the spring screw. Push the screw in, and rotate until secure. Secure the projector in the mounting plate with the included security screw (E). Note: If you have a high ceiling, use a compatible 1.5 NPT extension column (not included).
- Page 11 Adjusting the Projector’s Alignment You can easily change the projector’s viewing angles with the AccuGear’s dual-gear mechanism. With the simple pull and twist of a lever you can precisely adjust up to ±20° tilt and ±10° roll. In addition, you can swivel the projector 360°...
- Page 12 Swivel With the Mounting Plate +/- 15° Side View With the Mounting Arms 360° On Extension Column (Sold Separately) 360° Side View...
-
Page 13: Cable Management
Cable Management For a clean look, you can run A/V and low-voltage power cables through the mounting plate. You may need to drill an extra hole in the wood or concrete support structure to fit the cables and connect them to the projector. - Page 14 Use the AccuGear with other 1.5 NPT-compatible structural mounts or mounting plates as well as extension columns. Extend or suspend your projector from high ceilings with hardware such as the Gabor SCP-770 Suspended Ceiling Mounting Plate (sold separately), which includes a 1.5 NPT extension column needed for attachment.
-
Page 15: Product Specifications
Product Specifications Maximum load capacity 50 lb. (22.7 kg) Color Black Tilt ±20° Roll ±10° Rotation 360° / ±15° Dimensions (H × W × D) 4.5 × 18 × 18 in. (11.4 × 45.7 × 45.7 cm) Weight 3.1 lb. (1.4 kg) - Page 16 Five-Year Limited Warranty This Gabor product is warranted to the original purchaser to be free from defects in materials and workmanship under normal consumer use for a period of five (5) years from the original purchase date or thirty (30) days after replacement, whichever occurs later.
Need help?
Do you have a question about the ACCUGEAR UPMP-1000 and is the answer not in the manual?
Questions and answers