BIXOLON SRP-S200 Installation Manual & Safety Manual
Lineless printer
Hide thumbs
Also See for SRP-S200:
- User manual (33 pages) ,
- Network connection manual (15 pages) ,
- Network connection manual (56 pages)
Table of Contents
Advertisement
Available languages
Available languages
Quick Links
Printer Installation Guide & Safety Guide
KN04-00214A (Ver.1.0)
◈ Information
This installation guide contains quick information required for the product installation.
Please refer to the Software and Documents provided on the Download section of the
BIXOLON Website(http://www.bixolon.com) for more information on how to setup.
1. Manual: User's Manual, Code Table, Control Commands, Software manuals
2. Driver: Windows, OPOS, CUPS(Linux, Mac), VCOM(USB, Ethernet)
3. SDK: UPOS SDK(iOS)
4. Utility: Unified POS Utility, Net Configuration Tool, Android Utility, iOS Utility
We at BIXOLON maintain ongoing efforts to enhance and upgrade the functions and quality
of all our products. In following, product specifications and/or user manual content may be
changed without prior notice.
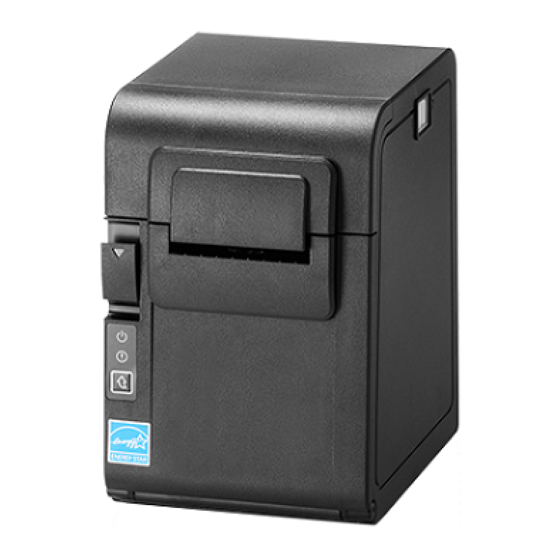
◈ Components
SRP-S200
◈ Cable Connection
1. Turn off the printer and peripheral devices.
2. Connect the power cord to the adapter and connect the adapter to the power supply
connector of the printer.
3. Check the type of the interfaces at the back of the printer (USB, Serial, Ethernet) and
connect the interface cable.
Ethernet Cable
Power cord
Serial Cable
USB Cable
◈ Installing Paper Roll
◈ Using Control Panel
• Power LED (Indicatior Lamp)
The Power light is on whenever the printer is on.
• Error (Indicator Lamp)
Red light will be on in various error conditions such as out of paper, cover
open, etc
• Feed (Button)
Press this button to feed the paper out.
Hold down this button to feed out the paper continuously.
Power cord
Installation Guide
USB
Serial Ethernet
1. Pull the Cover-Open button to open the cover.
2. Insert new roll paper in the correct direction.
3. Pull the paper out slightly and close the cover.
※ Note
When closing the cover, press down on the center of
the cover to ensure that the paper is in contact with
the roller. Printing quality may not be optimum if
recommended paper is not used.
(Refer to the User's Manual.)
LINERLESS PRINTER SRP-S200
◈ Mounting Partition(40mm)
Refer to the user manual for detailed instruction.
◈ Self-Test
1. Check whether paper is mounted correctly.
2. Turn on the power while holding down the Feed button and the self-test procedure will
begin.
3. Printer will print out the current status of printer including the version of ROM.
4. After printing out the current status of printer, the printer will print following lines and
waits for the next step(paper lamp will keep blinking).
5. Press the Feed button to resume printing or hold down the button for at least one second
to change the VMSM settings.
5-1 If "Continuous SELF-TEST" is selected
5-1-1 Press the Feed button for less than one second to print the preset page.
5-1-2 The self test ends automatically as it prints the following line and cuts the paper.
5-1-3 The printer goes into normal print mode upon completion of the self test.
Partition
5-2 If "VMSM Selection" is selected
5-2-1 The following lines will be printed when the VMSM opens.
USB Cable
5-2-2 Press the Feed button to run the above function.
5-2-2-1 Step 1(Select Options): press the button a number of times as shown by each
menu.
5-2-2-2 Step 2(Enter Options): hold down the button for at least one second to apply each
item selected.
※ Note
If you select any items not listed above, the list of "VMSM Selection" will be printed again.
Setting the mode will be canceled if no item is selected in Step 1.
5-3 Hold down the Feed button for at least 1 second to save the changes.
The following line will be printed before cutting the paper.
※ Attention
If "0: Exit and reboot printer" is not executed, the new settings will not be saved.
Power
6. The new settings will be automatically applied when printer resets.
※ Note
You can check whether printer works correctly or not through the self-test.
Printing quality, ROM version, and memory switch settings can be checked through the self-
test function.
◈ Using of Taken Sensor Function
When it comes to Taken Sensor, it will detect the paper not to feed next paper before user
detach it. Refer to the user manual for detailed instruction.
◈ Reconfiguration of Printer
SRP-S200 does not support Dip Switch. To change the settings of the printer, use the virtual
memory switch utility or virtual memory switch control function for self-diagnosis.
◈ Recommended Papers
Sticky(Restick),
- Iconex Sticky Media(USA):
Classic: 9023-1823, 9023-1397(58mm), 9023-1233, 9023-1818(40mm)
Classic High Tack: 9023-1500(58mm), 9023-1258(40mm)
Ultralite: 9023-1410(58mm), 9023-1865(40mm)
- MAX International Converters, Inc. MAXStick Products Ltd(USA)
※ Attention
Use of papers other than those recommended above may damage TPH or degrade the
printing quality and our company. Is not responsible for the damage caused by non-
recommended papers.
SELECT MODES BY PRESSING FEED BUTTON.
Continuous SELF-TEST : Less than 1 second
VMSM Selection : 1 second or more
*** COMPLETED ***
** VMSM Selection **
0 : Exit and reboot printer
1 : Print current settings
2 : Set Print Density
3 : Set Print Speed
4 : Set Cutting mode
5 : Reserved
6 : Reserved
7 : Set Black Mark Cut Position
8 : Maintenance Counter
9 or more : None
*** COMPLETED ***
Advertisement
Table of Contents

Related Manuals for BIXOLON SRP-S200


Summary of Contents for BIXOLON SRP-S200
- Page 1 Printer Installation Guide & Safety Guide LINERLESS PRINTER SRP-S200 KN04-00214A (Ver.1.0) ◈ Information ◈ Mounting Partition(40mm) This installation guide contains quick information required for the product installation. Refer to the user manual for detailed instruction. Please refer to the Software and Documents provided on the Download section of the BIXOLON Website(http://www.bixolon.com) for more information on how to setup. ◈ Self-Test 1. Manual: User’s Manual, Code Table, Control Commands, Software manuals 1. Check whether paper is mounted correctly. 2. Driver: Windows, OPOS, CUPS(Linux, Mac), VCOM(USB, Ethernet) 2. Turn on the power while holding down the Feed button and the self-test procedure will 3. SDK: UPOS SDK(iOS) begin. 3. Printer will print out the current status of printer including the version of ROM. 4. Utility: Unified POS Utility, Net Configuration Tool, Android Utility, iOS Utility 4. After printing out the current status of printer, the printer will print following lines and We at BIXOLON maintain ongoing efforts to enhance and upgrade the functions and quality waits for the next step(paper lamp will keep blinking). of all our products. In following, product specifications and/or user manual content may be SELECT MODES BY PRESSING FEED BUTTON. changed without prior notice. Continuous SELF-TEST : Less than 1 second VMSM Selection : 1 second or more ◈ Components 5. Press the Feed button to resume printing or hold down the button for at least one second to change the VMSM settings. 5-1 If “Continuous SELF-TEST” is selected ...
- Page 2 details of where and how they can take this item for environmentally safe recycling. Do not plug several products in one You must use only the supplied Business users should contact their supplier and check the terms and conditions of multi-outlet. adapter. the purchase contract. This product should not be mixed with other commercial • This can provoke over-heating and a fire. • It is dangerous to use other wastes for disposal. • If the plug is wet or dirty, dry or wipe it before usage. • If the plug does not fit perfectly with the outlet, adapters. do not plug in. • Be sure to use only standardized multi-outlets. ONLY SUPPLIED ADAPTER ☎ BIXOLON Co., Ltd. ● Website http://www.bixolon.com PROHIBITED PROHIBITED ● Korea Headquarters (Add) 7~8F, (Sampyeong-dong), 20, Pangyoyeok-ro241beon-gil, Bundang-gu, Seongnam-si, Gyeonggi-do, 13494, Korea (ROK) (Tel.) +82-31-218-5500 ● U.S. Office ...
- Page 3 프린터 설치 안내서 & 안전 가이드 라이너리스 프린터 SRP-S200 ◈ 안내 ◈ 조작부 사용 본 설치 안내서는 제품 설치에 필요한 간단한 정보만 기록하고 있습니다. • 전원 (표시등) 자세한 설치 안내는 빅솔론 홈페이지(http://www.bixolon.com)의 다운로드 페이지에서 제공되는 전원 표시 등은 프린터에 전원이 켜져 있을 경우 켜집니다. Software 및 Document 를 참고하십시오. • 오류(표시등) 1. 매뉴얼: 사용자 매뉴얼, 코드표, 제어명령, 소프트웨어 매뉴얼 용지 없음, 커버 열림 등 오류가 발생하였을 때 적색 표시등이 켜집니다. 2. 드라이버(Driver): Windows, OPOS, JavaPOS, CUPS(Linux, Mac), 가상 시리얼포트 (USB 및 Ethernet 용) • 이송 (버튼) 3. 소프트웨어 개발도구(SDK): UPOS SDK(iOS, Android) 용지를 배출하고자 할 때 이송버튼을 누릅니다. 4. 유틸리티(Utility): 통합 POS 유틸리티(Unified POS Utility), 네트워크 설정 도구(Net Configuration Tool), 이송버튼을 계속 누르고 있으면 용지가 연속적으로 배출됩니다. 안드로이드 유틸리티(Android Utility), iOS 유틸리티(iOS Utility) ◈ 파티션 장착(40mm) 저희 (주)빅솔론은 제품의 기능과 품질 향상을 위하여 지속적인 개선을 하고 있습니다. 이로 인하여 제품의 세부 사용 방법에 대한 설명은 유저 매뉴얼을 참조하십시오. 사양과 매뉴얼의 내용은 사전 통보 없이 변경될 수 있습니다. ◈ Self Test ...
- Page 4 ◈ Taken Sensor 기능 사용 ◈ 안전상의 경고 Taken Sensor 기능은 인쇄물을 회수해 가지 않으면 다음 장 인쇄가 되지 않게 하는 기능입니다. 세부 사용 제품을 올바르게 사용하여 위험이나 물적 손해를 미리 방지하기 위한 내용이므로 방법에 대한 설명은 유저 매뉴얼을 참조하십시오. 반드시 지켜 사용해 주세요. ◈ 프린터 설정 변경 경고 SRP-S200 모델은 Dip Switch 를 지원하지 않습니다. 표시사항 위반시 심각한 상해나 사망이 발생할 가능성이 있습니다. 프린터의 설정을 변경하기 위해서는 가상메모리 스위치 유틸리티를 사용하거나, 자가진단 시 가상메모리 스위치 관리 기능을 사용하시기 바랍니다. 한 콘센트에 여러 제품의 전원플러그를 동시에 어댑터는 공급된 제품만을 사용하세요. 꽂지 마세요. • 다른 어댑터를 사용하면 위험합니다. • ◈ 권장 용지 • 발열 및 발화되어 위험합니다.
Need help?
Do you have a question about the SRP-S200 and is the answer not in the manual?
Questions and answers