Table of Contents
Advertisement
Quick Links
Europe / Middle-East / Africa
Microlife AG
Espenstrasse 139
9443 Widnau / Switzerland
Tel. +41 / 71 727 70 30
Fax +41 / 71 727 70 39
Email admin@microlife.ch
www.microlife.com
Asia
Microlife Corporation.
9F, 431, RuiGang Road, NeiHu
Taipei, 114, Taiwan, R.O.C.
Tel. 886 2 8797-1288
Fax.886 2 8797-1283
Email service@microlife.com.tw
www.microlife.com
North / Central / South America
Microlife USA, Inc.
424 Skinner Blvd., Suite C
Dunedin, FL 34698 / USA
Tel. +1 727 451 0484
Fax +1 727 451 0492
Email custserv@microlifeusa.com
www.microlife.com
Advertisement
Table of Contents

Related Manuals for Microlife BP 3BT0-A


Summary of Contents for Microlife BP 3BT0-A
- Page 1 Tel. 886 2 8797-1288 Fax.886 2 8797-1283 Email service@microlife.com.tw www.microlife.com North / Central / South America Microlife USA, Inc. 424 Skinner Blvd., Suite C Dunedin, FL 34698 / USA Tel. +1 727 451 0484 Fax +1 727 451 0492 Email custserv@microlifeusa.com...
- Page 2 BP 3BT0-A Automatic Blood Pressure Monitor Instruction Manual (1-11) Автоматический прибор для измерения артериального давления и частоты пульса Руководство по пользованию (12-23) Automatyczny aparat do mierzenia ciśnienia Instrukcja używania (24-35) Automata vérnyomásmérő Használati utasítás (36-47)
- Page 3 Automatic Blood Pressure Monitor Instruction Manual...
-
Page 4: Table Of Contents
Carrying out a measurement 5.1. Before the measurement 5.2. Common sources of error 5.3. Fitting the cuff 5.4. Measuring procedure 5.5. Memory – displaying the last measurement 5.6. Discontinuing a measurement Error messages/malfunctions Care and maintenance, recalibration Guarantee Technical specifications 10. www.microlife.com... -
Page 5: Introduction
The device offers a very high and clinical tested measurement accuracy and has been designed to provide a maximum of user-friendliness. Thanks to the large LCD display of BP 3BT0-A, both operational status and cuff pressure are visible for the entire duration of the measurement. - Page 6 With blood-pressure values that are too low, i.e. systolic values under 100 mmHg and/or diastolic values under 60 mmHg, likewise, please consult your doctor. Even with normal blood-pressure values, a regular self-check with your blood-pressure monitor is recommended. In this way you can detect possible changes in your values early and react appropriately. If you are undergoing medical treatment to control your blood pressure, please keep a record of the level of your blood pressure by carrying out regular self-measurements at specific times of the day.
-
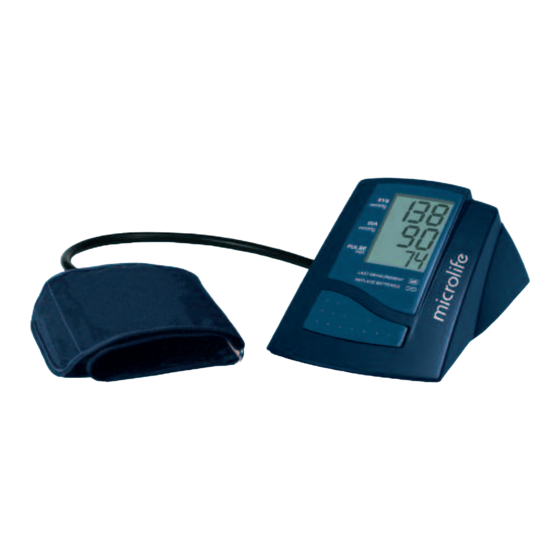
Page 7: The Various Components Of The Blood-Pressure Monitor
• Avoid fatty foods. B) Previous illnesses Follow consistently any medical instructions for treating previous illness such as: • Diabetes (Diabetes mellitus) • Fat metabolism disorder • Gout C) Habits • Give up smoking completely • Drink only moderate amounts of alcohol •... -
Page 8: Putting The Blood-Pressure Monitor Into Operation
Putting the blood-pressure monitor into operation 4.1. Inserting the batteries After you have unpacked your device, first insert the batteries. The battery compartment is located on the back side of the device (see illustration). a) Remove cover as illustrated b) Insert the batteries (4 x size AA 1,5 V), thereby observing the indicated polarity. -
Page 9: Carrying Out A Measurement
Carrying out a measurement 5.1. Before the measurement • Avoid eating, smoking as well as all forms of exertion directly before the measurement. All these factors influence the measurement result. Try and find time to relax by sitting in an armchair in a quite atmosphere for about 5 minutes before the measurement. -
Page 10: Measuring Procedure
Make sure that the tube is not kinked. Comment: If it is not possible to fit the cuff to the left arm, it can also be placed on the right one. However all measurements should be made using the same arm 5.4. -
Page 11: Error Messages/Malfunctions
automatically. Error messages/malfunctions If an error occurs during a measurement, the measurement is discontinued and a corresponding error code is displayed. (Example Error no. 1) Error No. Possible cause(s) ERR 1 The systolic pressure was determined but afterwards the cuff pressure fell below 20 mmHg. This situation can occur, for example, if the tube becomes unplugged after the systolic blood pressure has been measured. -
Page 12: Care And Maintenance, Recalibration
Malfunction Remedy The blood pressure values measured differ • Record the daily development of the values and consult from those measured by the doctor. your doctor about them. Other possible malfunctions and their eliminations - If problems occur when using the device, the following points should be checked and if necessary, the corresponding measures are to be taken: Further information ☞... -
Page 13: Guarantee
Guarantee The blood-pressure monitor is guaranteed for 3 years from date of purchase. This guarantee includes the instrument and the cuff. The guarantee does not apply to damage caused by improper handling, accidents, not following the operating instructions or alterations made to the instrument by third parties. The guarantee is only valid upon presentation of the guarantee card filled out by the dealer. -
Page 14: Technical Specifications
Refference to standarts: EU directive 93/42/EEC, NIBP - requirements: EN 1060-1 /-3 /-4 & ANSI / AAMI SP10 Technical alterations reserved! 10. www.microlife.com Detailed user information about our thermometers and blood pressure monitors as well as services can be found at www.microlife.com. - Page 15 Автоматический прибор для измерения артериального давления и частоты пульса Руководство по пользованию...
- Page 16 — — Ó Ó ‰ ‰ Â Â Ê Ê ‡ ‡ Ì Ì Ë Ë Â Â 1 1 . . ¬ ¬ ‚ ‚ Â Â ‰ ‰ Â Â Ì Ì Ë Ë Â Â . . 1.1.
- Page 17 1 1 . . ¬ ¬ ‚ ‚   ‰ ‰ Â Â Ì Ì Ë Ë Â Â . . 1 1 . . 1 1 . . Œ Œ Ò Ò Ó Ó · · Â Â Ì Ì Ì Ì Ó Ó Ò Ò Ú Ú Ë Ë ÃÓ‰Âθ...
- Page 18 ≤‡Ê ÂÒÎË ËÁÏÂÂÌÌ˚ Á̇˜ÂÌˡ ‰‡‚ÎÂÌˡ ̇ıÓ‰ˇÚÒˇ ‚ ÌÓÏÂ, ÂÍÓÏẨÛÂÏ Ò ÔÓÏÓ˘¸˛ ‚‡¯Â„Ó ÔË·Ó‡ „ÛΡÌÓ ÍÓÌÚÓÎËÓ‚‡Ú¸ Ò‚Ó ÍÓ‚ˇÌÓ ‰‡‚ÎÂÌËÂ, ˜ÚÓ·˚ Ò‚Ó‚ÂÏÂÌÌÓ ‡ÒÔÓÁ̇ڸ ‚ÓÁÏÓÊÌ˚ ÓÚÍÎÓÌÂÌˡ ‰‡‚ÎÂÌˡ Ë Ô‰ÔËÌˇÚ¸ ÌÂÓ·ıÓ‰ËÏ˚ ‰ÂÈÒڂˡ. ≈ÒÎË ‚˚ ÔÓıÓ‰ËÚ ÍÛÒ Î˜ÂÌˡ ÔÓ Â„ÛÎËÓ‚‡Ì˲ ÍÓ‚ˇÌÓ„Ó ‰‡‚ÎÂÌˡ, „ÛΡÌÓ ‚˚ÔÓÎÌˇÈÚ ËÁÏÂÂÌˡ ÍÓ‚ˇÌÓ„Ó...
- Page 19 3 3 . . — — Ó Ó Ò Ò Ú Ú ‡ ‡ ‚ ‚ Ì Ì ˚ ˚   ˜ ˜ ‡ ‡ Ò Ò Ú Ú Ë Ë Ô Ô Ë Ë · · Ó Ó ‡ ‡ ‰ ‰ Î Î ˇ ˇ Ë Ë Á Á Ï Ï Â Â Â Â Ì Ì Ë Ë ˇ ˇ Í Í Ó Ó ‚ ‚ ˇ ˇ Ì Ì Ó Ó „ „ Ó Ó ‰ ‰ ‡ ‡ ‚ ‚ Î Î Â Â Ì Ì Ë Ë ˇ ˇ . . ÕËÊ ËÁÓ·‡ÊÂÌ ÔË·Ó ‰Îˇ ËÁÏÂÂÌˡ ÍÓ‚ˇÌÓ„Ó ‰‡‚ÎÂÌˡ BP 3BT0-A, ÒÓÒÚÓˇ˘ËÈ ËÁ ÒÎÂ‰Û˛˘Ëı ˜‡ÒÚÂÈ: ‡...
- Page 20 4 4 . . ¬ ¬ ‚ ‚ Ó Ó ‰ ‰ Ô Ô Ë Ë · · Ó Ó ‡ ‡ ‚ ‚ ˝ ˝ Í Í Ò Ò Ô Ô Î Î Û Û ‡ ‡ Ú Ú ‡ ‡ ˆ ˆ Ë Ë ˛ ˛ . . 4 4 .
- Page 21 5 5 . . ¬ ¬ ˚ ˚ Ô Ô Ó Ó Î Î Ì Ì Â Â Ì Ì Ë Ë Â Â Ë Ë Á Á Ï Ï Â Â Â Â Ì Ì Ë Ë ˇ ˇ . . 5 5 .
- Page 22 ¬ ¬ ‡ ‡ Ê Ê Ì Ì Ó Ó ! ! »ÁÏÂÂÌˡ ÏÓÊÌÓ ÔÓ‚Ó‰ËÚ¸ Ì ÚÓθÍÓ Ì‡ ΂ÓÈ, ÌÓ Ë Ì‡ Ô‡‚ÓÈ ÛÍÂ. ¬ β·ÓÏ ÒÎÛ˜‡Â ‚Ò ËÁÏÂÂÌˡ ÌÂÓ·ıÓ‰ËÏÓ ÔÓ‚Ó‰ËÚ¸ ̇ Ó‰ÌÓÈ ÛÍÂ. 5 5 . . 4 4 . . ” ” Ò Ò Ú Ú ‡ ‡ Ì Ì Ó Ó ‚ ‚ Í Í ‡ ‡ Ô Ô Â Â ‰ ‰   ΠΠ‡ ‡ ‰ ‰ ‡ ‡ ‚ ‚ Î Î Â Â Ì Ì Ë Ë ˇ ˇ . . øÓÒÎÂ...
- Page 23 6 6 . . — — Ó Ó Ó Ó · · ˘ ˘ Â Â Ì Ì Ë Ë ˇ ˇ Ó Ó Ì Ì Â Â Ë Ë Ò Ò Ô Ô ‡ ‡ ‚ ‚ Ì Ì Ó Ó Ò Ò Ú Ú ˇ ˇ ı ı Ë Ë Ë Ë ı ı Ô Ô Ë Ë ˜ ˜ Ë Ë Ì Ì ˚ ˚ . . ≈ÒÎË...
- Page 24 Ñ Ñ ‡ ‡ Î Î ¸ ¸ Ì Ì Â Â È È ¯ ¯ ‡ ‡ fl fl Ë Ë Ì Ì Ù Ù Ó Ó Ï Ï ‡ ‡ ˆ ˆ Ë Ë fl fl ☞...
- Page 25 1 1 0 0 . . w w w w w w . . m m i i c c r r o o l l i i f f e e . . r r u u èÓ‰Ó·ÌÛ˛ ÔÓÎÂÁÌÛ˛ ËÌÙÓχˆË˛ Ó Ò‚ËÒÌ˚ı ‚ÓÁÏÓÊÌÓÒÚflı ̇¯Ëı ÚÂÏÓÏÂÚÓ‚ Ë ÚÓÌÓÏÂÚÓ‚, Ç˚ ̇ȉÂÚ ̇ ̇¯ÂÈ ÒÚ‡Ìˈ www.microlife.ru. Внимание! Регистрационное...
- Page 27 Automatyczny aparat do mierzenia ciśnienia Instrukcja używania...
- Page 28 5. Przeprowadzenie pomiaru 5.1. Przed pomiarem 5.2. Najcz´stsze êród∏a b∏´dów 5.3. Zak∏adanie mankietu 5.4. Proces pomiaru 5.5. Pami´ç ostatniego pomiaru 5.6. Przerwanie pomiaru przed czasem 6. Informacje o b∏´dach/awariach 7. Piel´gnacja i konserwacja, rekalibracja 8. Gwarancja 9. Dane techniczne 10. www.microlife.com...
- Page 29 1. Wprowadzenie 1.1. Cechy aparatu CiÊnieniomierz jest automatycznym cyfrowym aparatem do pomiaru ciÊnienia krwi, zak∏adanym na rami´, umo˝liwiajàcym szybki i wiarygodny pomiar ciÊnienia skurczowego i rozkurczowego krwi, jak równie˝ cz´stotliwoÊci t´tna, przy u˝yciu oscylometrycznej metody pomiaru. Aparat gwarantuje bardzo wysokà, klinicznie potwierdzonà precyzj´ pomiaru i zosta∏ zaprojektowany w taki sposób, by by∏...
- Page 30 Równie˝ zbyt niskie ciÊnienie, tj. skurczowe poni˝ej 100 mmHg i/lub rozkurczowe poni˝ej 60 mmHg, wymaga konsultacji lekarza. Nawet przy normalnym poziomie ciÊnienia zalecane sà regularne samokontrole przy u˝yciu ciÊnieniomierza. W ten sposób mo˝na wczeÊniej zaobserwowaç potencjalne zmiany i w∏aÊciwie zareagowaç. W trakcie leczenia majàcego na celu utrzymanie ciÊnienia na w∏aÊciwym poziomie nale˝y prowadziç...
- Page 31 B) Przebyte choroby Post´powanie zgodne z zaleceniami lekarza dotyczàcymi przebytych chorób, takich jak: • cukrzyca, • zaburzenia metabolizmu t∏uszczów, • dna moczanowa. C) Na∏ogi • Rzucenie palenia. • U˝ywanie tylko umiarkowanych iloÊci alkoholu. • Ograniczenie spo˝ycia kofeiny (kawy). D) Kondycja fizyczna •...
- Page 32 4. Obs∏uga ciÊnieniomierza 4.1. Wk∏adanie baterii Po odpakowaniu aparatu nale˝y najpierw w∏o˝yç baterie. Miejsce na baterie znajduje si´ na spodzie aparatu (patrz rysunek). Zdjàç pokrywk´, jak pokazano na rysunku. W∏o˝yç baterie (4 x AA 1,5 V) zgodnie z oznaczeniami biegunów wewnàtrz pomieszczenia bateryjnego. JeÊli na wyÊwietlaczu pojawi si´...
- Page 33 5. Przeprowadzenie pomiaru 5.1. Przed pomiarem • Unikaç jedzenia, palenia, jak równie˝ wszelkich form wysi∏ku fizycznego bezpoÊrednio przed pomiarem. Wszystkie te czynniki majà wp∏yw na wynik pomiaru. Znaleêç czas, by si´ odpr´˝yç, np. siedzàc spokojnie w fotelu, przez oko∏o 5 minut przed pomiarem. •...
- Page 34 Mankiet nale˝y zapiàç w ten sposób, aby nie le˝a∏ zbyt ciasno. Prosz´ po∏o˝yç r´k´ na stole wewn´trznà stronà d∏oni zwróconà do góry. Mankiet powinien si´ znajdowaç na wysokoÊci serca. Prosz´ uwa˝aç, aby nie zaginaç w´˝a. Uwaga: Je˝eli nie jest mo˝liwe za∏o˝enie opaski (mankietu) na lewe rami´, mo˝na jà...
- Page 35 6. Informacje o b∏´dach/awariach JeÊli w trakcie przeprowadzania pomiaru nastàpi b∏àd, pomiar zostanie przerwany, a odpowiedni kod pojawi si´ na wyÊwietlaczu. B∏àd Mo˝liwa przyczyna ERR 1 Po wyczuciu ciÊnienia skurczowego spad∏o ciÊnienie w mankiecie poni˝ej 20 mmHg. Mo˝e do tego dojÊç, je˝eli po zmierzeniu ciÊnienia skurczowego wà˝ zosta∏ wyciàgni´ty. Inne mo˝liwe przyczyny: urzàdzenie nie wyczu∏o pulsowania.
- Page 36 ☞ Dalsze informacje Poziom ciÊnienia krwi podlega wahaniom nawet u zdrowych osób. Dlatego nale˝y pami´taç, ˝e porównywane pomiary wymagajà zawsze takich samych warunków (spokoju)! W razie problemów z ciÊnieniomierzem nale˝y skontaktowaç si´ z dystrybutorem lub farmaceutà. Nie nale˝y samemu naprawiaç aparatu! Ka˝de samowolne otwarcie aparatu uniewa˝nia wszelkie roszczenia gwarancyjne! 7.
- Page 37 Odsy∏acz do norm: Dyrektywy UE 93/42/EEC, Wymogi NIBP: EN 1060-1 /-3 /-4, ANSI / AAMI SP10 Prawo do zmian technicznych zastrze˝one! 10. www.microlife.com Szczegó∏owe informacje na temat elektronicznych termometrów, ciÊnieniomierzy krwi oraz serwisu mo˝ecie Paƒstwo znale˝ç na naszej stronie internetowej www.microlife.com.
- Page 39 Automata vérnyomásmérő Használati utasítás...
- Page 40 A mérés elvégzése 5.1. A mérés elôtt 5.2. A leggyakoribb hibaforrások 5.3. A mandzsetta felhelyezése 5.4. A mérési folyamat 5.5. Memória funkció – a legutolsó eredmény kijelzése 5.6. A mérés leállítása Hibaüzenetek/Mûködési hibák Karbantartás, újrahitelesítés Garancia Mûszaki jellemzôk 10. www.microlife.com...
- Page 41 Bevezetés 1.1. A készülék jellemzôi A vérnyomásmérô készülék teljesen automata, digitális kijelzésû vérnyomásmérô eszköz, amellyel a felsô karon végezhetô el a mérés. Az oszcillometrikus mérési módszer nagyon gyors és megbízható eredményt ad mind a szisztolés és a diasztolés vérnyomás ellenôrzésekor, mind a pulzus megfigyelésében. A készüléket a felhasználó...
- Page 42 Abban az esetben, ha a vérnyomásértéke túl alacsony, pl. a szisztolés értéke 100 Hgmm alatt van, és/vagy a diasztolés érték 60 Hgmm alatt, ugyancsak forduljon orvosához. Abban az esetben is javasolt a rendszeres önellenôrzés, ha a megfigyelt értékek a normális tartományban vannak.
- Page 43 B) Elôzô betegségek Következetesen tartsa be az orvosi utasításokat az elôzô betegségek kezelésére vonatkozóan, mint például: • Cukorbetegség • (zsír) anyagcserezavarok • köszvény C) Szokások • Teljesen hagyjon fel a dohányzással! • Csak mérsékelt mennyiségû alkoholt fogyasszon! • Csökkentse koffeinfogyasztását (kávé)! D) Fizikai alkat •...
- Page 44 A vérnyomásmérô üzembe helyezése 4.1. Az elemek behelyezése A készülék kicsomagolása után elsô lépésben helyezze be az elemeket. Az elemek helye a készülék hátulján található (lásd a rajzot). Az ábrán látható módon távolítsa el a fedelet. A jelölt polaritásra figyelve helyezze be az elemeket (4 db AA típusú...
- Page 45 A mérés 5.1. A mérés elôtt • Közvetlenül mérés elôtt kerülje az étkezést, a dohányzást, illetve az erôkifejtés valamennyi formáját. Az említett tényezôk erôsen befolyásolhatják a mérési eredményt. Ha lehetséges, a mérés elôtt pihenjen kb. 5 percet egy kényelmes karosszékben, nyugodt körülmények között. •...
- Page 46 Erôsítse a mandzsettát a Velcro zárral kényelmesen a felkarjára. Figyeljen rá, hogy ne legyen túl szoros. Helyezze a karját (tenyérrel felfelé) az asztalra, hogy a karja a szívével kerüljön egy magasságba. Figyeljen rá, hogy a gumicsô ne törjön meg. Megjegyzés: Ha nem lehet rátenni a mandzsettát a bal karjára akkor a jobb karjára is ráhelyezheti.
- Page 47 Hibaüzenetek/Mûködési hibák Ha mérés folyamán hiba történik a mérés megáll, és a megfelelô hibakód megjelenik a kijelzôn (pl. error no. 1.) Hiba száma (A képernyôn megjelenô üzenet) Lehetséges okok ERR 1 A szisztolés nyomást meghatározta, de azután a mandzsetta nyomása 20 Hgmm alá csökkent.
- Page 48 merülne fel, nézze át a következô pontokat, és szükség esetén kövesse a leírtakat. ☞ További információk A vérnyomás értéke még az egészséges embereknél is állandóan változik. Éppen ezért nagyon fontos, hogy az összehasonlító méréseket mindig azonos – nyugodt – körülmények között végezze. Ha bármilyen mûszaki probléma lenne a vérnyomásmérô...
- Page 49 M méret, 22-32 cm-es karkerületre vagy L méret, 32-42 cm-es karkerületre Szabványi hivatkozások: 93/42/EGK EU-irányelv; NIBP-követelmények: EN 1060-1 /-3 /-4, ANSI / AAMI SP10 A technikai változtatás jogát fenntartjuk. 10. www.microlife.com Részletes információt termékeinkröl, (lázméröinkröl ill vérnyomásméröinkröl) szervizelési lehetöségekröl a www.microlife.com honlapunkon találhat.
Need help?
Do you have a question about the BP 3BT0-A and is the answer not in the manual?
Questions and answers