Table of Contents
Advertisement
Available languages
Available languages
Advertisement
Chapters
Table of Contents

Related Manuals for Microlife bp3gx1-5x


Summary of Contents for Microlife bp3gx1-5x
-
Page 2: Table Of Contents
4.2. Setting the date and time 4.3. Using the AC power adapter 4.4. Cuff tube connection 4.5. Select the user 4.6. Select the measuring mode: standard or Microlife Averaging Mode 4.7. Microlife Averaging Mode 5. Measurement procedure 5.1. Before measurement 5.2. -
Page 3: Introduction
1. Introduction 1.1. Features of your Automatic Blood Pressure Monitor Your blood pressure monitor is a fully automatic digital blood pressure measuring device for use by adults on the upper arm at home or in your doctor’s/nurse’s office. It enables very fast and reliable measurement of the systolic and diastolic blood pressure as well as the pulse by way of the oscillometric method. -
Page 4: Which Values Are Normal
pressure is lowest (diastolic blood pressure value). Blood pressure values must lie within certain normal ranges in order to prevent particular diseases. 2.2. Which values are normal? Blood pressure is too high if your diastolic pressure is above 100 mmHg and/or your systolic blood pressure is over 160 mmHg, while at rest. -
Page 5: What Can Be Done If Regular High/Low Values Are Obtained
Further information • If your values are mostly normal under resting conditions but exception- ally high under conditions of physical or psychological stress, it is possible that you are suffering from so-called "labile hypertension." Consult your doctor. • Correctly measured diastolic blood pressure values above 120 mmHg require immediate medical treatment. - Page 6 3) Habits • Give up smoking completely. • Drink only moderate amounts of alcohol. • Restrict your caffeine consumption (e.g., coffee). 4) Physical constitution • After a preliminary medical examination, do regular exercise. • Choose sports which require stamina and avoid those which require strength.
-
Page 7: Components Of Your Blood Pressure Monitor
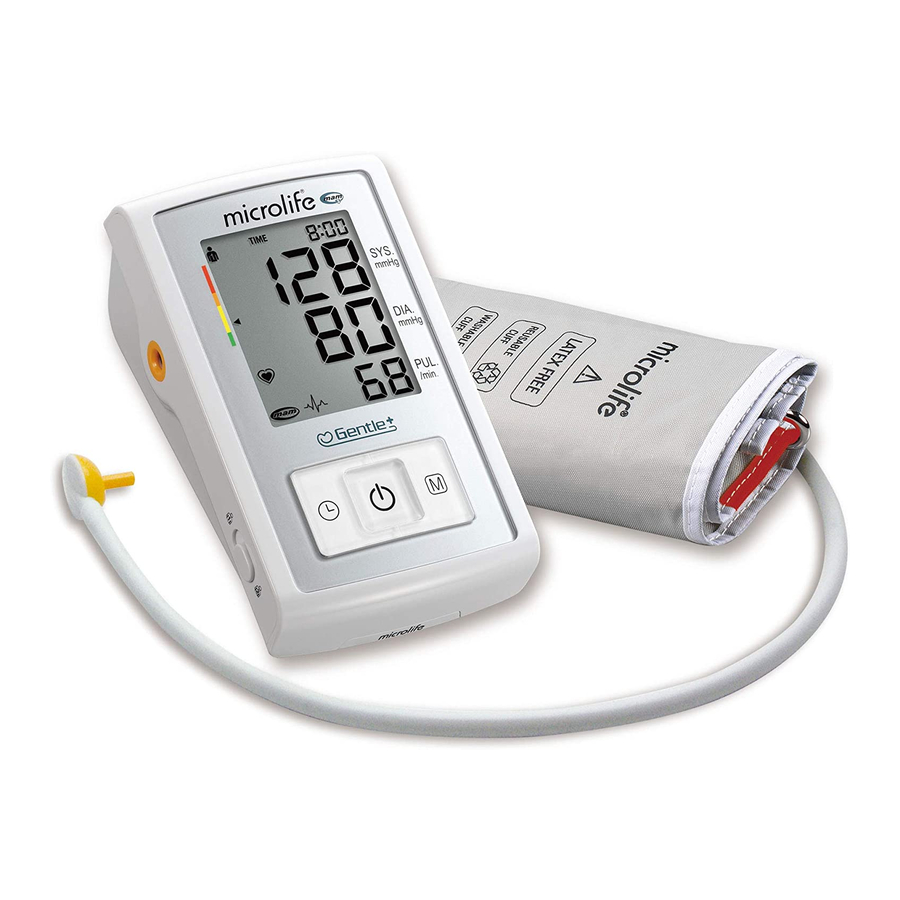
3. Components of your blood pressure monitor a) Measuring unit Memory Recall Button Cuff Socket (yellow) POWER Button Hypertension Risk Indicator Time/Date User Switch Button AC Adapter Port USB Port Mode Switch Select 1 or 3 Measurements b) Wide Range Cuff: For arm circumference 22 cm - 42 cm (8.7”... -
Page 8: Using Your Blood Pressure Monitor For The First Time
4. Using your blood pressure monitor for the first time 4.1. Inserting the batteries After you have unpacked your device, insert the batteries. The battery compartment is located on the bottom of the device. a) Remove the battery cover. b) Insert the batteries (4 x size AA 1.5 V), observing the indicated polarity. -
Page 9: Using The Ac Power Adapter
4. Once you have set the last minute and pressed the TIME button, the date and time are set and the time is displayed. 5. If you want to change the date and time, press and hold the TIME button down for approximately 3 seconds until the year number starts to flash. -
Page 10: Select The User
4.7. Microlife Averaging Mode (MAM) • In Microlife Averaging Mode (MAM), three measurements are automati- cally taken in succession and the result is then automatically analyzed and displayed. Because your blood pressure constantly fluctuates, a result determined in this way is more reliable than one produced by a single measurement. -
Page 11: Measurement Procedure
5. Measurement procedure Please note: You should always be seated before and during measurement. 5.1. Before measurement: • Avoid eating and smoking as well as all forms of exertion directly before measurement. These factors influence the measurement result. Find time to relax by sitting in an armchair in a quiet atmosphere for about ten minutes before your measurement. -
Page 12: Fitting The Cuff
5.3. Fitting the cuff a) Pass the end of the cuff through the flat metal ring so that a loop is formed. The hook and loop material must be facing outward. (Ignore this step if the cuff has already been prepared.) b) Slide the cuff onto your upper left arm. -
Page 13: Measuring Procedure
Comment If it is not possible to fit the cuff to your left arm, it can also be placed on your right arm. However, all measurements should be made using the same arm. Comparable blood pressure measurements always Cuff on require the same conditions (relax for several right arm minutes before a reading). - Page 14 When the unit is set to the MAM (Microlife Averaging Mode) setting, 3 separate measurements will take place in succession, after which your result is calculated and displayed as a single, averaged measurement (individual results are not displayed). There is a 15 second resting time between each measurement.
-
Page 16: Hypertension Risk Indicator
5.7. Hypertension risk indicator The bars on the left-hand edge of the display show you the range within which the indicated blood pressure value lies. Depending on the position of the triangle indicator, the readout value is either within the normal (green), borderline (yellow) or danger (orange, dark orange) range. -
Page 17: Irregular Heartbeat Detector
5.8. Irregular heartbeat detector The appearance of this symbol indicates that certain pulse irregularities were detected during the measurement. In this case, the result may deviate from your normal basal blood pressure – repeat the measurement. In most cases, this is no cause for concern. -
Page 18: Battery Charge Indicator
5.9. Battery charge indicator Batteries almost discharged When the batteries are approximately 75% used, the battery symbol will flash a few times as soon as the instrument is switched on (if at least one of the batter- ies still has some charge). Although the instrument will continue to measure reliably, you should obtain replacement batteries. -
Page 19: Software Functions
6. Software functions This unit can be used in connection with your personal computer (PC) running the PC Link blood pressure analyzer software. Your PC will allow a capacity of monitoring 80 patients, each with 1000 data (note: overuse will lower system efficiency). The memory data can be transferred to the PC by connecting the monitor via the included USB cable. -
Page 20: Error Messages/Troubleshooting
7. Error messages/troubleshooting If an error occurs during a measurement, the measure- ment is discontinued and a corresponding error code is displayed (example: Error no. 2). Error No. Possible cause(s)/Solutions ERR 1 The tube may have loosened, or no pulse was detect- ed.* Ensure cuff connections are tight with proper cuff placement. - Page 21 Other possible errors and their solutions If problems occur when using the device, the following points should be checked and, if necessary, the corresponding measures are to be taken: Malfunction Remedy The display remains blank when the 1. Check batteries for the correct instrument is switched on although polarity.
-
Page 22: Care And Maintenance
8. Care and maintenance a) Do not expose the device to either extreme temperatures, humidity, dust or direct sunlight. b) The cuff contains a sensitive airtight bubble. Handle this cuff carefully and avoid all types of stress through twisting or buckling. -
Page 23: Warranty
9. Warranty Your Automatic Blood Pressure Monitor is guaranteed for 5 years against manufacturer defects for the original purchaser only, from date of purchase. The warranty does not apply to damage caused by improper handling, accidents, professional use, not following the operating instruc- tions or alterations made to the instrument by third parties. -
Page 24: Technical Specifications
11.Technical specifications: Weight: ......368 g (with batteries) Size: ......85 (W) x 143 (L) x 58 (H) mm Storage temperature: . -
Page 25: How To Contact Us
12.How to contact us Microlife USA, Inc. 1617 Gulf to Bay Blvd 2nd Floor Clearwater, FL 33755 Toll Free Help Line: 1-800-568-4147 Email: custserv@microlifeusa.com Fax: (727) 451-0492 www.microlifeusa.com Made in China... - Page 26 Monitor de Presión Arterial Automatico Manual de Instrucción Modelo #BPGX1-5X...
- Page 27 4.3. Utilización del adaptador de corriente alterna (CA) 4.4. Conexión del brazalete 4.5. Selecciónar al usuario 4.6. Selección a el modo de medición –estándar o modo promedio Microlife 4.7. Technología modo promedio Microlife 5. Procedimiento para la medición 5.1. Antes de la medida 5.2.
- Page 28 9. Garantía 10.Certificaciones 11.Especificaciones técnicas 12.Como contactarnos...
-
Page 29: Introducción
1. Introducción 1.1. Características de su Monitor de Presión Arterial Automatico Su monitor de presión sanguínea es un dispositivo digital, completamente automático para uso en adultos en la parte superior del brazo, tanto en el hogar como en el consultorio médico/enfermería. Hace posible un rápida y confiable lectura de la presión arterial sistólica y diastólica, como también del pulso, por medio del método de oscilación. -
Page 30: Cuales Son Los Valores Normales
cardiaca. Durante la "eyección de sangre" (sístole), el valor es más alto (valor de presión de la sangre sistólicas). Al final del periodo de "descanso del corazón" (diástole) la presión es la más baja (valor de la presión de la sangre diastólica). -
Page 31: Que Se Puede Hacer Si Se Obtienen Valores Altos O Bajos
+Información adicional • Si sus valores son mayormente normales bajo períodos de descanso pero excepcionalmente altos bajo condiciones de stress físico o mental, es posible que usted sufra de lo que se denomina "hipertensión lábil." Consulte con su médico. • La presión sanguínea diastólica correctamente medida que esta por encima de 120 mmHg requiere tratamiento médico inmediato. -
Page 32: Componentes De Su Monitor De Presión Arterial
3) Hábitos • Deje de fumar por completo. • Beba sólo cantidades moderadas de alcohol. • Reduzca el consumo de cafeína (ej., café). 4) Constitución física • Después de un examen médico preliminar, haga ejercicio con regularidad. • Elija deportes que requieran vigor y evite aquellos que requieran fuerza. •... -
Page 33: Utilización De Su Monitor De Presión Arterial Por Primera Vez
b) Brazaletes – amplia gama, fácil ajustar Para brazos de circunferencia 22-42 cm o 8.7”-16.5” (incluido) Si es necesario comprar un brazalete de reempla- zo, llámenos al número gratuito 1-800-568-4147. Nota: La circunferencia del brazo debe medirse con una cinta métrica en el medio de la parte superior del brazo relajado. -
Page 34: Ajuste De La Fecha Y Tiempo
4.2. Ajuste de la fecha y tiempo 1. Después de que las baterías nuevas están activa- das, el número del año parpadea en la pantalla. Usted puede avanzar el año presionando el botón de la memoria "M". Para confirmar y luego ajustar el mes, presione el botón de la HORA. -
Page 35: Utilización Del Adaptador De Corriente Alterna (Ca)
4.3. Utilización del adaptador de corriente alterna (CA) Usted también puede utilizar este monitor con el adaptador de corriente alterna incluido. Para evitar daños a la unidad, utilice únicamente el adaptador incluido. a) Asegúrese que tanto el cable como el adaptador no se encuen- tren dañados. -
Page 36: Selecciónar Al Usuario
Esto resulta en un promedio final. 4.7. Technologia modo promedio Microlife (MAM) • Cuando se utiliza la modalidad modo promedio Microlife (MAM), se tomarán tres medidas consecutivas, y el resultado será automáticamen- te analizado y desplegado. Debido a que la presión arterial fluctúa constantemente, un resultado obtenido de esta manera es más seguro... -
Page 37: Procedimiento Para La Medición
5. Procedimiento para la medición Nota: Usted siempre debe estar sentado antes y durante la medición. 5.1. Antes de la medida: • Evite comer y fumar como también toda forma de ejercicio inmediata- mente antes de la medición. Estos factores influencian el resultado de la medición. -
Page 38: Ajuste Del Brazalete
5.3. Ajuste del brazalete a) Pase el extremo de la breazalete a través del pasador de metal para formar un lazo. El material de gancho y bucle debe quedar orientada hacia afuera. (Ignore este paso si la brazalete ya ha sido preparada). 22 - 42 cm b) Deslice el brazalete en su brazo izquierdo. -
Page 39: Procedimiento De Medición
Nota Si no es posible colocarse el brazalete en el brazo izquierdo, también se puede colocar en el derecho. Sin embargo, todas las mediciones deben ser tomadas en el mismo brazo. Para poder comparar las Brazalete en el lecturas obtenidas se requiere que siempre se brazo derecho cumplan las mismas condiciones (relajarse por varios minutos antes de la medición). - Page 40 Cuando el monitor está en el MAM (modo promedio Microlife) configura- ción, se tomarán tres lecturas consecutivas luego de las cuales se calculará el resultado (los mediciones individuales no se muestran). Habrán 15 segundos de intervalo entre cada medición. Una cuen ta regresiva indicará...
-
Page 41: Interrupción De Una Medida
Memoria llena Cuando la memoria ha almacenado 99 resultados, un nuevo, valor medido se guarda sobreescribiendo el valor más antiguo. Como despejar los valores Si está seguro de que desea eliminar permanentemente todos lo valores almacenados, mantenga presionado el botón "M" ( el dispositivo debe de estar apagado) hasta que las letras "CL"... - Page 42 La barra de semáforo plantea de acuerdo a su medición. • Si su medida tiene solo una barra verde, su medida es "Normal", de acuerdo a las normas del NIH. • Si su medida tiene una barra amarillo, su medida es "Pre-Hipertensión." •...
-
Page 43: Detector De Latido Irregular
5.8 Detector de latido irregular La aparición de este símbolo indica que un pulso irregular se detectaron durante la medición. En este caso, el resultado puede desviarse de su presión arterial basal normal – repita la medición. En la mayoría de los casos, esto no es motivo de preocupación. -
Page 44: Indicador De La Carga De La Batería
5.9. Indicador de la carga de la batería Baterías casi completamente descargadas. Cuando las baterías están aproximadamente 75% descargados, se podrá observar el símbolo de las baterías centelleando en la pantalla al momento de encender la unidad. A pesar de que el instrumento continuará... -
Page 45: Programa De Análisis De La Presión Arterial
6. Programa de análisis de la presión arterial Esta unidad se puede utilizarse en conexión con su computadora personal que ejecuta el Programa Analizador de Presión Arterial. Su PC tiene la capaci- dad de vigilar 80 pacientes, cada una con la capacidad de 1000 lecturas. (Nota: El sobre uso disminuirá... -
Page 46: Mensajes De Error/Solución De Problemas
7. Mensajes de error/solución de problemas Si ocurre un error durante la medición, la misma será descon- tinuada y el código de error correspondiente se observará en la pantalla (ej., Error no. 2). Error No. Posible(s) causa(s)/solución(es) ERR 1 El tubo pudo haberse aflojado, no se detectó Pulso.* Asegúrese de que las conexiones de la bocamanga estén en posición correcta. - Page 47 Otros posibles errores y soluciones Si aparecen problemas al usar el aparato, deben comprobarse los siguien- tes puntos y, si es necesario, deben tomarse las medidas correspondientes: Mal funcionamiento Solución La pantalla permanece 1. Revise la polaridad de las baterías en blanco cuando se 2.
-
Page 48: Cuidado Y Mantenimiento
8. Cuidado y mantenimiento a) No exponga este dispositivo a temperaturas extremas, humedad, polvo o rayos del sol. b) Las bocamangas contienen burbujas de aire muy sensitivas. Manéjelas con cuidado para evitar todo tipo de stress al doblarlas o abrocharlas. c) Limpie el dispositivo con un paño limpio y seco. - Page 49 9. Garantía Su Monitor de Presión Arterial Automatico tiene garantía por cinco años para cubrir defectos de fabricación válidos para el comprador únicamente, a partir de la fecha de adquisición. La garantía no cubre daños causados por mal uso, accidentes, uso profesional, el no seguimien- to de las instrucciones de uso o alteraciones hechas al dispositivo por terceras personas.
- Page 50 11.Especificaciones técnicas Peso: ......368 g (con baterías) Tamaño: ......85 (W) x 143 (L) x 58 (H) mm Temperatura de almacenamiento: .
- Page 51 12.Como contactarnos Microlife USA, Inc. 1617 Gulf to Bay Blvd, 2nd Floor, Clearwater, FL 33755 Línea de servicio al cliente, llame sin cargo: 1-800-568-4147 Email: custserv@microlifeusa.com Fax: (727) 451-0492 www.microlifeusa.com Hecho en China...
- Page 53 BP3GX1-5X-0713-1...
Need help?
Do you have a question about the bp3gx1-5x and is the answer not in the manual?
Questions and answers
Can you charge the meter with usb?