Advertisement
Available languages
Available languages
Quick Links
H-5052, H-6990
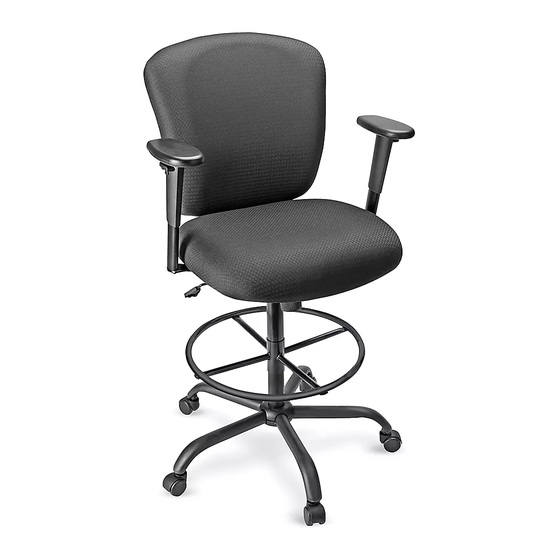
BIG AND TALL WORK STOOL
TOOL INCLUDED
Allen Wrench
Back Support x 1
Seat Cushion x 1
Gas Lift x 1
Armrest x 2
Figure 1
PAGE 1 OF 9
1-800-295-5510
uline.com
PARTS
5-Star Base x 1
Caster x 5
1
Mechanism x 1
Screw x 4
5/16 x 1¼"
ASSEMBLY
Gas Lift
Footring
Iron Pipe
Pour le français, consulter les pages 7-9.
Glide x 5
Hardware Kit
2
3
Screw x 4
Screw x 2
5/16 x 1"
3/8 x 1⁄"
1.
Insert casters or glides into legs of five-star base. Turn
base upright. Insert iron pipe into center of base. Set
footring on top of iron pipe and then insert gas lift
into center of footring. (See Figure 1)
Para Español, vea páginas 4-6.
Footring x 1
Iron Pipe x 1
4
5
Screw x 4
Screw x 2
5/16 x 1⁄"
3/8 x 1¼"
0921 IH-5052
Advertisement

Related Manuals for U-Line BIG AND TALL H-5052


Summary of Contents for U-Line BIG AND TALL H-5052
- Page 1 Para Español, vea páginas 4-6. Pour le français, consulter les pages 7-9. H-5052, H-6990 1-800-295-5510 uline.com BIG AND TALL WORK STOOL TOOL INCLUDED Allen Wrench PARTS Footring x 1 Back Support x 1 Seat Cushion x 1 5-Star Base x 1 Caster x 5 Glide x 5 Iron Pipe x 1...
- Page 2 ASSEMBLY CONTINUED 2. Align armrest with holes on bottom of seat cushion. Use Figure 2 two 5/16 x 1¼" screws (1) and two 5/16" x 1½" screws (4) to attach. Repeat on opposite side. (See Figure 2) NOTE: Use Allen wrench to tighten all screws. 3.
-
Page 3: Stool Adjustments
ASSEMBLY CONTINUED 5. Slowly lower stool assembly onto the gas lift. Press Figure 5 down on seat cushion to secure. (See Figure 5) STOOL ADJUSTMENTS Seat Height Adjustment – To raise seat height, lift lever up with little to no weight on the seat. To lower seat height, lift lever up while sitting. - Page 4 H-5052, H-6990 800-295-5510 uline.mx SILLA GRANDE Y ALTA PARA TRABAJO HERRAMIENTA INCLUIDA Llave Allen PARTES 1 Base Estrella 5 Niveladores 1 Reposapiés 1 Respaldo 1 Asiento 5 Ruedas 1 Tubo de Hierro Kit de Tornillería 1 Pistón de Gas 2 Descansabrazos 1 Mecanismo 4 Tornillos 4 Tornillos...
- Page 5 CONTINUACIÓN DEL ENSAMBLE 2. Alinee el descansabrazos con los orificios en la parte Diagrama 2 inferior del asiento. Use dos tornillos de 5/16 x 1½" (1) y dos tornillos de 5/16 x 1¾" (4) para fijarlo. Repita la operación con el lado opuesto. (Vea Diagrama 2) NOTA: Utilice la llave Allen para apretar todos los tornillos.
- Page 6 CONTINUACIÓN DEL ENSAMBLE 5. Baje lentamente el ensamble de la silla sobre el Diagrama 5 pistón de gas. Presione el asiento para asegurarlo. (Vea Diagrama 5) AJUSTES DE LA SILLA DE TRABAJO 1. Ajuste de la Altura del Asiento – Para subir la altura del asiento, levante la palanca sin o con poco peso en el asiento.
- Page 7 H-5052, H-6990 1-800-295-5510 uline.ca TABOURET DE TRAVAIL POUR TAILLES FORTES ET ÉLANCÉES OUTIL INCLUS Clé Allen PIÈCES Base à 5 branches x 1 Patin x 5 Repose-pied x 1 Dossier x 1 Siège x 1 Roulette x 5 Tuyau en fer x 1 Matériel de fixation Vérin Accoudoir x 2...
- Page 8 ASSEMBLAGE SUITE 2. Alignez l'accoudoir sur les trous situés sous le siège. Figure 2 Fixez à l’aide de deux vis de 5/16 x 1 ¼ po (1) et de deux vis de 5/16 x 1 ½ po (4). Répétez la procédure sur le côté...
- Page 9 ASSEMBLAGE SUITE 5. Abaissez lentement le tabouret sur le vérin Figure 5 pneumatique. Appuyez sur le siège pour le fixer. (Voir Figure 5) RÉGLAGES DU TABOURET Réglage de la hauteur du siège – Pour élever le siège, soulevez le levier avec peu ou sans poids sur le siège. Pour abaisser le siège, soulevez le levier en position assise.
Need help?
Do you have a question about the BIG AND TALL H-5052 and is the answer not in the manual?
Questions and answers