Advertisement
Table of Contents
- 1 Table of Contents
- 2 Device Description
- 3 About the Device
- 4 List of Tool Kit Items
- 5 Device Specif Ications
- 6 Instructions for Use
- 7 Unboxing Instructions
- 8 Local Printing
- 9 Cloud Printing Via App
- 10 Notes and Daily Maintenance
- 11 Lubrication Maintenance
- 12 Leveling the Platform
- 13 Using and Maintaining the Magnetic Adhesive Sticker
- 14 Cleaning Foreign Objects from the Chassis
- 15 Connecting to Cloud Print
- Download this manual
Advertisement
Table of Contents

Subscribe to Our Youtube Channel
Related Manuals for Creality Sermoon V1


Summary of Contents for Creality Sermoon V1
- Page 1 V1.0...
- Page 2 Thank you for choosing Creality. To make using our products easier, please read this User Manual before you start and follow the instructions provided carefully. Creality is always ready to provide you with high-quality services. If you encounter any issues or have any questions when using our products, please use the contact information at the end of this manual to contact us.
-
Page 3: Table Of Contents
Table of Contents 1. Device Description ....................................... 03-04 ........................................1.1 About the device ......................................... 1.2 List of tool kit items ......................................1.3 Device specif ications 04-04 2. Instructions for Use ..................................... 05-14 ......................................2.1 Unboxing instructions 05-05 ......................................... 2.2 Local printing 07-11 ...................................... -
Page 4: Device Description
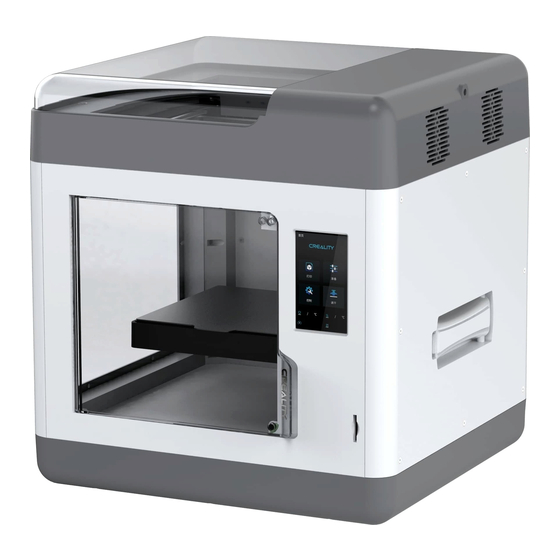
Device Description 1.1 About the device Cover Display screen Front door Rack SD card slot Power switch Filament entrance Power socket Ventilation fan Voltage adjustment port 1.2 List of tool kit items Filament x1 Power cable x1 Wrench and screwdriver x1 Cutting plier x1 Nozzle x1 Leveling card x1... -
Page 5: Device Specif Ications
1.3 Device specif ications Basic Parameters Model Sermoon V1 | Sermoon V1 Pro Modeling size 175x175x165 mm Modeling technology Number of nozzles Nozzle diameter 0.4 mm (Standard) Accuracy ± 0.1 mm Print materials 1.75 mm PLA / ABS / PETG... -
Page 6: Instructions For Use
2. Instructions for Use 2.1 Unboxing instructions • Please ensure the correct position for the power supply switch and mains before supply connection, in order to avoid damage to the device. • If the mains between 100V and 120V, please select the 115V for the power supply switch. Notes •... -
Page 7: Local Printing
Local printing Cloud printing Method 1 (Connect via Wi-Fi) Server Data Method 2 Insert SD card (Connect via Bluetooth) Install apps 3D / STL G-code files 1. Cloud slicer Model slicing 2. Cloud print 3. Cloud monitor (Pro version) - Page 8 2.2 Local printing 2.2.1 Install slicer This manual only introduces the installation of Creality slicer software. If users use other slicer software, we recommend to set the retraction parameter to 3mm to avoid the risk of plugging. Please login of f icial Creality website Select Preferences in sequence →...
- Page 9 >> Generate G code → Save to memory card Insert Memory Card It is important to note f ile name within the memory card must be in Latin Note: For details on using the software, please refer to the letters or numbers. Chinese characters or any other special symbol slicing software user manual on the SD card.
- Page 10 2.2.2 Setup wizard When using the printer for the first time, please reset the printer to zero. If this procedure fails, please turn of f the power and contact after-sales. Note: The above interface is for reference only. The actual UI may vary. >>...
- Page 11 PLA mode: As our company recommends the PLA mode, the system’s parameters have been set according to PLA f ilaments. It is recommended to use Creality f ilaments for printing. When the inside the box temperature exceeds 30°C, please open the top cover to avoid nozzle blockage.
- Page 12 2.2.4 Start printing In this order, go to Print f iles → Select f ile → Print. Note: The above interface is for reference only. The actual UI may vary. >> >> >> 225 225 225 225 225 225 225 225 70.68 70.68 70.68...
-
Page 13: Cloud Printing Via App
2.3 Cloud printing via app 2.3.1 Install app Scan the QR code to download the app >> >> Download Create account Log in... - Page 14 2.3.2 Connect to the network and cloud printing (Method 1: Connect via Wi-Fi) As shown below, please use your smartphone to select your device model and slicing: Note: When cloud printing via the app, be sure to uncheck the PLA mode and ABS mode on the device, otherwise the app cannot control the device temperature. >>...
- Page 15 2.3.3 Connect to the network and cloud printing (Method 2: Connect via Bluetooth) As shown below, please use your smartphone to select your device model and slicing: Note: When cloud printing via the app, be sure to uncheck the PLA mode and ABS mode on the device, otherwise the app cannot control the device temperature. >>...
- Page 16 2.3.4 Cloud monitor (Pro version only) Note: Open the camera interface on the app, and both cloud printing and local printing can be viewed remotely using the camera. The LED light will also automatically turn on in environments with poor light. Method 1: >>...
-
Page 17: Notes And Daily Maintenance
3. Notes and Daily Maintenance 3.1 Feed out and feed in f ilaments Note: The above interface is for reference only. The actual UI may vary. >> >> >> >> 225 225 225 225 225 225 70.68 70.68 70.68 Once the specif ic temperature has been reached and f ilaments are withdrawing, please immediately pull out the f ilaments. -
Page 18: Lubrication Maintenance
3.2 Lubrication maintenance Note: Please perform regular maintenance on the blue area using oil and lubrication (as shown in the f igure). Y-axis optical axis 1 X-axis optical axis 1 X-axis optical axis 2 Y-axis optical axis 2 Spool Z-axis optical axis 1 Z-axis optical axis 2 3.3 Leveling the platform Note: After using the printer for a long time, the distance between the platform and the nozzle may change, which could cause the adhesion of the f irst... - Page 19 You can use the leveling card provided to help with the leveling. The nozzle should be just able to scratch the leveling card. Keep adjusting them until you can feel a slight resistance from the nozzle when you pull the leveling card. Note: The nozzle is a damageable part.
-
Page 20: Using And Maintaining The Magnetic Adhesive Sticker
3.4 Using and maintaining the magnetic adhesive sticker Note: The printing platform is a damageable part. Please replace it regularly to ensure the adhesion of the f irst layer model. Take the printed model and platform out of the The f ilament residue on the platform can be If the adhesion of the f irst layer of the model is device together, and partially bend the platform scraped off... -
Page 21: Connecting To Cloud Print
3.6 Connecting to cloud print Note: If the network conf iguration is unsuccessful or you need to re-bind your smartphone, please follow the steps below. It is recommended to use the small wrench Once the Wi-Fi indicator light turns off, Once the Wi-Fi has been successfully reset, use your smartphone to scan the QR in the accessory package to enter the rack’s... - Page 22 U.S. FCC Part 15 Regulatory Information: This equipment complies with radiation exposure limits set forth for an uncontrolled environment. This transmitter must not be co-located or operating in conjunction with any other antenna or transmitter. This equipment should be installed and operated with minimum distance 20cm between the radiator& your body.
- Page 23 For pluggable equipment, the socket-outlet shall be easily accessible. Pour l'équipement pluggable, la prise de prise doit être facilement accessible. Do not use this apparatus near water. Ne pas utiliser cet appareil à proximité des sources d'eau. Clean only with dry cloth. Nettoyer seulement avec un chiffon doux sec.
- Page 24 Hereby, [Shenzhen Creality 3D Technology Co., Ltd.] declares that the radio equipment type [Sermoon V1 Pro, Sermoon V1] is in compliance with Directive 2014/53/EU. The full text of the EU declaration of conformity is available at the following internet address: https://www.creality.com/...
- Page 25 Each model is different. All images are for illustrative purposes only, and the actual product may vary. The f inal interpretation right belongs to Shenzhen Creality 3D Technology Co., Ltd. Of f icial Website: www.creality.com 210-170942 5021078...
Need help?
Do you have a question about the Sermoon V1 and is the answer not in the manual?
Questions and answers