Table of Contents

Related Manuals for Creality Ender-5 Plus


Summary of Contents for Creality Ender-5 Plus
- Page 1 Ender-5 Plus Printer To be the Chief Evangelist Guide Book To make Top-quality 3D printer ◆ This guide book is for standard Ender-5 Plus only. ◆ Please plug the power cord into a three-hole power jack. ◆ Detailed instructions are available in the TF card.
- Page 2 WARNING Do not use the printer any way other than described herein in order to avoid personal injury or property damage. Do not place the printer near any heat source or flammable or explosive objects. We suggest placing it in a well-ventilated, low-dust environment.
-
Page 3: Table Of Contents
Contents 1.Introduction........1 6 . L o a d i n g F i l a m e n t ......9 2.General List........2 7.Bed Leveling........10 3.Assembly Step........3... -
Page 4: Introduction
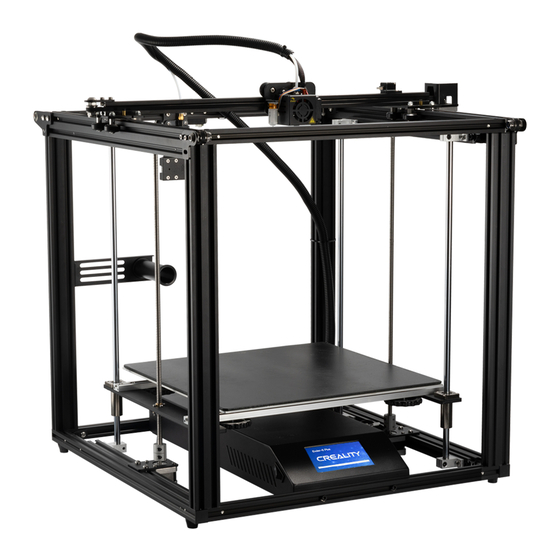
: Introduction BL Touch Power switch X-axis limit switch Antivibration feet broken filament detecting device Touch screen X-axis motor Filament Holder Hot Bed Leveling nut TF card& USB Y-axis motor Main control box Hot end Z-axis motor Y-axis limit switch... -
Page 5: General List
General List : Tool List A:Top Frame B:Extruder kit Image Name Wrench & Screw 1set driver C:Filament Holder 1set TF Card & Reader Spatula D:2040 Aluminum profile(4Pcs) Pliers 0.4mm Nozzle Cleaner E:Hot Bed Power Cable F:Z-axis Frame Filament(200)g 1set Spare Parts G:Bottom Frame... -
Page 6: Assembly Step
Frame Assembly Pt. 1 Ready: Note: Please note that the hole at the top of piece facing left and right, in relation to the front of the printer. 2040 Aluminum Bottom Frame profile(4Pcs) 8pcs M5X25 Keep the front of the Bottom Frame facing you. Step 1. -
Page 7: 0 . C I R C U I T W I R I N
Frame Assembly Pt. 2 Ready: Top Frame 8pcs M5X25 Note: Front Tighten the four screws on the top, then tight the side screws. 2. Facing your top-side Y-axis passive block, you can adjust it to Make sure the front of the bottom frame is facing you . Step 1. - Page 8 Frame Assembly Pt. 3 Ready: Behind Lift Z-axis Frame Right Z-axis Frame 8pcs M5X30 Make sure the front of the bottom frame is facing you . Step 1. Place double Z-axis frame inside of previously assembled frame. The double Z-axis frame is mounted on the left and right 2040 aluminum Step 2.
- Page 9 Frame Assembly Pt. 4 Hot Bed Filament Holder 8pcs 2pcs M4X10 M5X8 M5 T-nut Make sure the front of the base(b) is facing you. Place the hot bed on the support plate of the double Z-axis frame and align with the Step 1.
-
Page 10: Cable Connection
Cable Connection : Nozzle Cable Connection Bed Cable Connection 5Pin BL Touch Connection 3Pin Broken filament detecting device Connection Select the correct input voltage to match your local mains (230V or 115V). -
Page 11: Screen Information
: Screen Information screen information Main Menu Sub Menu Explanation Stop Pause / Continue Choose to Print Automatic Print speed Manual Nozzle temp SD card Selected file Adjust Hot-bed temp Cooling Z offset Leveling fan(off\on) Automatic PLA\ABS(185°\220°) Refuel Nozzle preheat Manual Hot-bed preheat Temp... -
Page 12: Loading Filament
: Loading Filament 1. Preheat 2. Feeding Method 1 Press and hold the extruder lever and insert the Method 2 1.75mm filament through the filament detector and through the extruder motor. Continue feeding until you see filament extrude from the nozzle. Tip: How to replace the Filament?... -
Page 13: Bed Leveling
: AUX leveling 1. Slightly tighten the four leveling nuts at the bottom of the platform before initial leveling. 2. Select "Settings" → “Level mode” → “AUX leveling” , click on the number ②. 3. Adjust the platform height by turning the knob underneath. Use apiece of A4 paper (standard printer paper) to assist with the adjustment, making sure that the nozzle lightly presses on the paper. - Page 14 : Auto leveling 1. In “Settings” → “Leveling mode” 2. 2mm feeler gauge between the nozzle and the hot bed → If the gap is too thin or too large, click "Z+" or "Z-" on the interface to adjust the gap to slightly more than 0.2 mm(the distance between the nozzle and the hot bed should be about 0.2mm).
-
Page 15: Software Installation
: Software Installation 1. Double click to install the software. 2、Double click to open the software. 3. Select language→ Next → Select your machine → Next → Finish. -
Page 16: Preparing To Print
: Preparing to Print 1.Slicing Insert TF card into computer with Reader. Open the software→ Load → Select the file → Wait for slicing to finish ,and save the Gcode file to TF card. 2.Printing Insert the TF card → Select Print from TF → Select the file. - Page 17 : Circuit Wiring...
- Page 18 SHENZHEN CREALITY 3D TECHNOLOGY CO.,LTD. 11F & Room 1201,Block 3,JinChengYuan,Tongsheng Community,Da lang,Longhua District,Shenzhen,China,518109 Official Website: www.creality3d.cn Tel: +86 755-85234565 E-mail: info@creality3d.cn cs@creality3d.cn...
Need help?
Do you have a question about the Ender-5 Plus and is the answer not in the manual?
Questions and answers