Table of Contents
Advertisement
Available languages
Available languages
Quick Links
Istruzioni per installazione, uso e manutenzione
Installation, use and maintenance instructions
安装、使用和维护手册
Bruciatore policombustibile gasolio/gas
I
Dual fuel gas oil/gas burner
GB
燃油 / 燃气双燃料燃烧器
CN
Funzionamento modulante
Modulating operation
电子比例调节运行
CODICE - CODE
代码
20074416
MODELLO - MODEL
型号
DB9 LSE C13 TC FS1 A0
TIPO - TYPE
类型
74416X
20074523 (2) - 03/2014
Advertisement
Chapters
Table of Contents

Related Manuals for Riello DB9 LSE C13 TC FS1 A0


Summary of Contents for Riello DB9 LSE C13 TC FS1 A0
- Page 1 Bruciatore policombustibile gasolio/gas Dual fuel gas oil/gas burner 燃油 / 燃气双燃料燃烧器 Funzionamento modulante Modulating operation 电子比例调节运行 CODICE - CODE MODELLO - MODEL TIPO - TYPE 代码 型号 类型 20074416 DB9 LSE C13 TC FS1 A0 74416X 20074523 (2) - 03/2014...
- Page 3 Avvertenze generali Informazioni sul manuale Questo manuale costituisce parte integrante del prodotto e non va da esso separato. Leggerlo attentamente in quanto fornisce importanti indicazioni riguardanti l'installazione, l'uso e la ma - nutenzione del bruciatore; conservarlo con cura per ogni ulteri - ore consultazione.
-
Page 4: Table Of Contents
Indice CAPITOLO Introduzione ....pagina 3 1.1 Descrizione codice di selezione ... . . 1.2 Specifica del tipo e codifica bruciatori . -
Page 5: Introduzione
Introduzione Descrizione codice di selezione Specifica del tipo e codifica bruciatori TIPO CODICE DB 9 LS TC A-0 DB9 LSE C13 TC FS1 20074416 Alimentazione aria comburente A-0 = dal basso A-90 = da destra A-180 = dall’alto A-270 = da sinistra Testa TC = testa standard TL = testa lunga... -
Page 6: Descrizione Del Bruciatore
Descrizione del bruciatore Dati tecnici Modello DB9 LSE C13 TC FS1 A0 Capacità Min./Max. gas naturale [kW] 5500 - 9500 Min./Max. gasolio [kW] 5500 - 9500 Regolazione potenza Modulante Rapporto di modulazione Gas naturale 1 : 6 su potenza massima... -
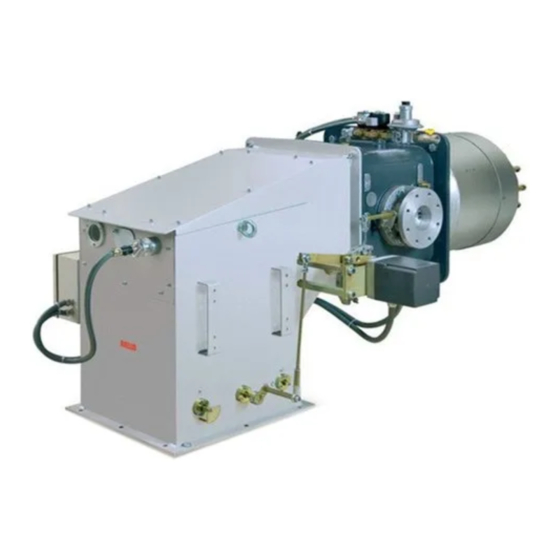
Page 7: Componenti Bruciatore
CAPITOLO Descrizione del bruciatore Componenti bruciatore 20075187 Fig. 2 Cassetta elettrica con morsettiera per collegamenti elettrici 16 Testa di combustione Cassa d’aria 17 Flangia di attacco alla caldaia Coperchio 18 Servomotore combustibile Pressostato gas di massima 19 Lancia bruciatore Regolatore portata gas 20 Valvola azionamento pneumatico lancia (min. - Page 8 CAPITOLO Descrizione del bruciatore DIMENSIONI FLANGE Collegamento canale aria Fissaggio alla caldaia Alimentazione gas 4 7 0 4 3 0 4 0 0 420 DB 9 1 8 0 1 8 0 1 6 0 2 2 0 2 2 0 470 DB 12 DN 80 D3972...
-
Page 9: Dimensioni Di Ingombro
CAPITOLO Descrizione del bruciatore Dimensioni di ingombro 20075188 Fig. 6... -
Page 10: Perdite Di Carico Lato Aria
CAPITOLO Descrizione del bruciatore Perdite di carico lato aria (rilevata a monte serranda con apertura completa) D3977 m bar 2000 4000 6000 8000 10000 12000 14000 Fig. 7 Potenza bruciatore Pb [kW] Paragrafo 5.1 Le curve di pressione si riferiscono alle condizioni di regolazione della testa di combustione. Vedere In caso di aria di alimentazione con temperatura maggiore di 20°C e/o altitudine maggiore di 100 m. -
Page 11: Perdite Di Carico Lato Gas
CAPITOLO Descrizione del bruciatore Perdite di carico lato gas Fig. 8 Perdite testa di combustione La pressione del gas in funzione D3978 della potenza massima svilup - pata dal bruciatore è data dalle curve di Fig. 8. Rappresenta la perdita di carico della testa di combustione. -
Page 12: Installazione
Installazione Tutte le operazioni di installazione, manutenzione e smontaggio devono assolutamente essere eseguite con rete elettrica staccata. PERICOLO L’installazione del bruciatore deve essere effettuata da personale abilitato, secondo quanto riportato nel presente manuale ed in conformità alle norme e disposizioni di legge vigenti. ATTENZIONE Rimozione viti di blocco dell’otturatore... -
Page 13: Alimentazione Al Bruciatore
Alimentazione al bruciatore Collegamento alimentazione gas al bruciatore Collegamento del bruciatore Il collegamento del bruciatore alla rampa gas viene effettuato tramite l’attacco a flangia (5)(Fig. 2). Le dimensioni della flangia sono riportate a pag. 6. Per collegare la flangia gas alla rampa utilizzare gli appositi adattatori, previsti come accessori. Collegamento del bruciatore pilota Il bruciatore è... -
Page 14: Schema Generale Di Alimentazione
CAPITOLO Alimentazione al bruciatore Schema generale di alimentazione... -
Page 15: Preparazione All'avviamento
Preparazione all’avviamento Regolazione della testa di combustione Il servomotore (10)(Fig. 2) provvede a variare la portata d’aria in funzione della richiesta di potenza regolando l’apertura delle ser - rande aria e, tramite un levismo (1), l’apertura della testa di combustione. Il numero dei fori di fulcro (5-6-7-8-10) del levismo (1) corrispondono alle tacche di apertura della testa quando il servomotore che aziona le serrande aria compie una rotazione di 90°... -
Page 16: Regolazione Pressostati
CAPITOLO Preparazione all’avviamento Regolazione pressostati Non essendo ancora determinabili i valori delle pressioni di riferimento, prima di iniziare le operazioni di taratura, occorre effettuare le seguenti operazioni (a bruciatore spento): • aprire le valvole manuali poste a monte della rampa gas; •... -
Page 17: Lancia Portaugello
CAPITOLO Preparazione all’avviamento Lancia portaugello Per la sostituzione degli anelli di tenuta (1) (2) (3) (4) si consiglia l’acquisto del kit O-ring codice 20019166. ARI A/ AI R D9926 Fig. 21 Ugelli (atomizzazione meccanica) UGELLI CONSIGLIATI • BERGONZO, tipo B5 •... -
Page 18: Avviamento E Regolazione Bruciatore
Avviamento regolazione bruciatore Sistema di regolazione aria/combustibile e modulazione di potenza Generalità Il sistema di regolazione aria/combustibile, e di modulazione della potenza, che equipaggia il bruciatore realizza, in un unico di - spositivo di controllo, una serie di funzioni integrate per la totale ottimizzazione energetica e operativa del bruciatore, sia in caso di funzionamento singolo che in combinazione con altre unità... -
Page 19: Taratura Dei Pressostati
CAPITOLO Avviamento regolazione bruciatore Taratura dei pressostati Pressostato aria Eseguire la regolazione del pressostato aria dopo aver effettuato tutte le altre regolazio - ni del bruciatore con il pressostato aria regolato a inizio scala (Fig. 24). Con il bruciatore funzionante alla potenza MAX aumentare la pressione di regolazione girando lentamen - te in senso orario l'apposita manopolina fino al blocco del bruciatore. -
Page 20: Manutenzione
Manutenzione Verifica della rilevazione di fiamma Cellula UV La corrente minima per un corretto funzionamento è Fig. 27 di 70 µA. Se il valore è inferiore può dipendere da: D1143 • cellula esaurita; • tensione bassa (inferiore a 187 V); •... -
Page 21: Problemi E Procedure Di Risoluzione
CAPITOLO Manutenzione Problemi e procedure di risoluzione Quando si verifica un malfunzionamento del bruciatore occorre prima di tutto: 1 controllare che i collegamenti elettrici siano stati eseguiti correttamente; 2 accertarsi che vi sia la disponibilità della portata di combustibili; 3 controllare che tutti i parametri di regolazione (per es. temperatura acqua caldaia o pressione vapore caldaia) siano tarati cor - rettamente. - Page 22 CAPITOLO Manutenzione FUNZIONAMENTO A GAS Inconveniente Causa probabile Rimedio consigliato In funzionamento il bruciatore si • Guasto al pressostato aria ....Sostituirlo ferma in blocco •...
- Page 23 General warnings Informations about the This handbook is a supplement to the burner and must always be kept handbook with it. It should be read carefully as it supplies important information for installation, use and maintenance; it should be kept in a safe place for future consultation.
- Page 24 Index CHAPTER Introduction....page 3 1.1 Selection code description ....3 1.2 Specification of the burner type and coding .
- Page 25 Introduction Selection code description Specification of the burner type and coding DB 9 LS TC A-0 TYPE CODE DB9 LSE C13 TC FS1 20074416 Combustive air supply A-0 = from below A-90 = from the right A-180 = from above A-270 = from the left Combustion head TC = standard head...
- Page 26 Burner description Technical data Model DB9 LSE C13 TC FS1 A0 Capacity Min./Max. natural gas [kW] 5500 - 9500 Min./Max. light oil [kW] 5500 - 9500 Output adjustment Modulating Modulation ratio against maxi - Natural gas 1 : 6 mum rated output...
- Page 27 CHAPTER Burner description Burner components 20075187 Fig. 2 Electrical control box base for electrical connections 16 Combustion head Air box 17 Boiler attachment flange Cover 18 Fuel servomotor Maximum gas pressure switch 19 Burner lance Oil pressure regulator 20 Lance pneumatic activation valve (5 bars min.) Gas train attachment flange 21 Safety oil valve Photocell...
- Page 28 CHAPTER Burner description FLANGE DIMENSIONS Air duct connection Fixing to the boiler Gas supply 4 7 0 4 3 0 4 0 0 420 DB 9 1 8 0 1 8 0 1 6 0 2 2 0 2 2 0 470 DB 12 DN 80 D3972...
- Page 29 CHAPTER Burner description Overall dimensions 20075188 Fig. 6...
- Page 30 CHAPTER Burner description Air side pressure drop (taken upstream from the completely open air damper) D3977 m bar 2000 4000 6000 8000 10000 12000 14000 Fig. 7 Burner output Pb [kW] The pressure curves refer to the different adjustment conditions for the combustion head. Refer to Paragraph InIn the case of air supply at a higher temperature than 20°C and/or an altitude higher than 100 m.
- Page 31 CHAPTER Burner description Gas side pressure drop Fig. 8 Head pressure drop Gas pressure on the basis of the D3978 maximum output developed by the burner is given by the curves in Fig. 8. It represents the pressure drop in the combustion head. Natural gas G 20 - Net calorific value = 10 kWh/Nm m bar...
- Page 32 Installation All the installation, maintenance and disassembly operations must be carried out with the electricity supply disconnected. DANGER The installation of the burner must be carried out by qualified personnel, as indicated in this manual and in compliance with the standards and regulations of the laws in force. WARNING Removal of the locking screws from the shutter...
- Page 33 Fuel supply Gas supply connections to the burner Burner connection The burner is connected to the gas train by the flange attachment on the gas butterfly valve (5)(Fig. 2). The size of the flange is given in page 6. Use the relative adapters to connect the gas flange to the train, supplied as accessories. Pilot burner connection The burner has a special gas train that is fixed over the manifold.
- Page 34 CHAPTER Fuel supply General supply layout...
- Page 35 Preparation for start up Combustion head adjustment The servomotor (10)(Fig. 2) varies air delivery based on required output by adjusting air damper opening and, by means of a link - age (1), combustion head opening too. The number of the fulcrum holes (5-6-7-8-10) in linkage (1) correspond to the opening notches on the head when the servomotor driving the air dampers turns max.
- Page 36 CHAPTER Preparation for start up Pressure switches adjustment As the reference pressure levels cannot yet be established, before beginning setting operations, the following must be carried out (with the burner turned off): • open the manual valves upstream from the gas train; •...
- Page 37 CHAPTER Preparation for start up Nozzle holder lance For the replacement of the sealing rings (1) (2) (3) (4) we recommend the purchase of the O-Ring Kit code 20019166. ARI A/ AI R D9926 Fig. 21 Nozzles (mechanical atomisation) RECOMMENDED NOZZLES •...
- Page 38 Burner start up and adjustment Air/fuel control and power modulation system General information The burner system for air/fuel adjustment and power modulation performs - in one single control device - a series of integrated functions to obtain optimal energy/operating efficiency from the burner, both for single operation and when combined with other units (e.g.
- Page 39 CHAPTER Burner start up and adjustment Pressure switches setting Air pressure switch Adjust the air pressure switch after having performed all other burner adjustments with the air pressure switch set to the start of the scale (Fig. 24). With the burner operating at max.
- Page 40 Maintenance Checking the flame detector UV cell Fig. 27 Minimum current for correct working is 70 µA. If the value is lower, it could be due to: D1143 • exhausted photocell; • low current (lower than 187 V); • bad regulation of the burner. In order to measure the current, use a microammeter of 100 A c.c., connected in series to the photocell, as in the scheme, with a capacitor of 100 F - 1V c.c.
- Page 41 CHAPTER Maintenance Problems and remedies If the burner does not work properly, first you must: 1 check that the electric connections have been correctly performed; 2 ensure that the fuel is delivered correctly; 3 check that all the adjustment parameters (e.g. boiler water temperature or boiler steam pressure) are correctly set GAS WORKING Fault Possible cause...
- Page 42 CHAPTER Maintenance GAS WORKING Fault Possible cause Recommended remedy During operation, the burner • Fault on air pressure switch ....Replace stops in lock out •...
- Page 43 一般提示 关于本手册 本手册与燃烧器随机附带,安装、使用和维护燃烧器前须认真 阅读,并妥善保管以备查阅。 手册使用者 本手册提供给具有燃油及燃气燃烧器工作经验的有关人员。 本手册包括下列相关信息: - 安装; - 使用; - 维护; - 安全注意事项。 本手册的使用人员必须具有操作这类燃烧器的资质及丰富的现 场工作经验。 相关文件 - 燃气阀组 - 控制面板接线图 - 负荷调节器 ( 比例调节 )
- Page 44 目录 第 简介 ..... . 页码 3 1.1 型号释义......3 1.2 燃烧器型号及编码...
-
Page 45: 型号释义
简介 型号释义 燃烧器型号及编码 类型 代码 DB 9 LS TC A-0 DB9 LSE C13 TC FS1 20074416 助燃空气进风位置 A-0 = 从底部 A-90 = 从右侧 A-180 = 从上部 A-270 = 从左侧 燃烧头 TC = 标准 TL = 加长 TXL = 特制 调节 E = 电子比调... -
Page 46: 燃烧器描述
燃烧器描述 技术数据 型号 DB9 LSE C13 TC FS1 A0 出力大小 最小 / 最大 天然气 [kW] 5500 - 9500 最小 / 最大 轻油 [kW] 5500 - 9500 出力调节 比例调节 对最大额定出力的调节比 天然气 1 : 6 轻油 1 : 4 燃料 选项 S 天然气... -
Page 47: 燃烧器部件
第 章 燃烧器描述 燃烧器部件 20075187 图 2 电气接线盒 16 燃烧头 空气室 17 锅炉连接法兰 盖板 18 燃料伺服马达 最大燃气压力开关 19 燃烧器油枪 油压调节器 20 油枪气动阀 ( 最小压力为 5 bars) 燃气阀组连接法兰 21 燃油安全阀 火焰检测器 22 燃料回路压力表 点火枪 23 回路上的最小油压开关 燃烧头调节控制杆 24 燃料输出压力表 10 空气伺服马达 25 最大输出油压开关... - Page 48 第 章 燃烧器描述 法兰尺寸 风管连接法兰 锅炉连接法兰 燃气管路连接法兰 4 7 0 4 3 0 4 0 0 420 DB 9 1 8 0 1 8 0 1 6 0 2 2 0 2 2 0 470 DB 12 DN 80 D3972 D3973 D3974 图...
-
Page 49: 外观尺寸
第 章 燃烧器描述 外观尺寸 20075188 图 6... -
Page 50: 空气侧压力损失
第 章 燃烧器描述 空气侧压力损失 ( 上游风门挡板全开时 ) D3977 m bar 2000 4000 6000 8000 10000 12000 14000 图 7 燃烧器出力 Pb [kW] 压力曲线分别对应燃烧头的不同调节状况。参见 。 若空气温度高于 20°C 且 / 或海拔高度高于 100 m. a.s.l. 时,实际的压力损失为上图中所示的燃烧头处的压力损失乘以由下表中查 出的系数 K 得出。 海拔 空气温度 °C m. a.s.l. 0..920 0.988 1.021... -
Page 51: 燃气侧压力损失
第 章 燃烧器描述 燃气侧压力损失 图 8 燃烧头压力损失 燃烧器满负荷时,其燃气压力为 D3978 图 8 中给出曲线。 该曲线代表了燃烧头的压力损 失。 天然气 G 20 - 净热值 = 10 kWh/Nm 该曲线在以下条件下得出: m bar • 燃气蝶阀下游的压力开关处 压力测试点的压力; • 炉膛压力为 0 mbar ; • 燃烧器满负荷运行。 蝶阀全开时的压力损失如图 9。 2000 4000 6000 8000 10000 12000 14000... -
Page 52: 起吊点
安装 所有安装、维护和拆卸操作都必须在断开电源后进行。 危险 安装燃烧器必须由有资质的人员进行操作,且符合安装地的强制标准。 警告 从风门挡板上拆去锁定螺丝 安装燃烧器到锅炉之前, 先取下螺丝和螺母 1) 和 2)( 图 10) 后, 用燃烧器随附的螺丝 3) M12 X 25 替代。 固定燃烧器到锅炉 D12015 图11显示如何将燃烧器固定到不带前冷却板的锅炉 上。 图 10 燃烧头突出锅炉前板的长度不应超过 200 mm。 任何情况下,燃烧筒长度都必须大于锅炉炉门加装 炉补 炉衬后的总厚度。 起吊点 移动燃烧器时,应使用图 12 中标出的起吊点。 D2129 最大 500 图 11 20075189 图... -
Page 53: 连接到燃烧器的燃气供应
燃料供应 连接到燃烧器的燃气供应 燃烧器连接 燃烧器通过燃气蝶阀上的法兰 (5)( 图 2) 与燃气阀组连接。 法兰尺寸见第 6 页。 使用随附的相关适配器来连接燃气法兰和阀组。 点火枪连接 燃烧器有一个固定在多歧管上的点火枪燃气阀组。此燃气阀组应连接到过滤器或调压器 ( 视不同配置而定 ) 下游的主阀组上。 下图为使用天然气为燃料的燃烧器示例。 燃气供应压力 50 ÷ 500 mbar 图 14... - Page 54 第 章 燃料供应 燃料总供给示意图...
-
Page 55: 燃烧头调节
启动前准备 燃烧头调节 根据所需出力,伺服马达 (10)( 图 2) 通过调节风门挡板开启角度改变风量,并且可以通过连杆 (1) 调节燃烧头的开启度。 连杆 (1) 上的支点孔 (5-6-7-8-10) 的编号与燃烧头上的开启刻度对应,当伺服马达驱动风门挡板至最大角度 90° 时,通过指示器 (5) 处的槽孔 (2) 可查看对应的刻度。 燃烧头处风速最大时可获得最多出风量,这需要将风门挡板开启至最大角度时才能获得,但燃烧头在最小开启角度,要根据所需出 力,将拉杆 (4) 置于下表推荐的的支点孔上。如果,通过伺服马达驱动旋转 90° 后,风量仍不足以保证所需最大出力,需移动拉杆 (4) 至下一个编号更高的孔位,来增大燃烧头的开启度和送风量。 移动拉杆(4)到不同的支点孔上, 改变燃烧头最大开启度(当伺服马达转至90°时), 但最小开启度(当伺服马达位置为0°时) 保持不变。 出力范围 kW 连杆支点孔 1) 自 至 1200 3750 3750 5500 5500... - Page 56 第 章 启动前准备 压力开关设定 由于相关压力还未建立,在开始设定操作前,必须进行下列操作 ( 燃烧器停机时 ): • 打开燃气阀组上游的手动阀; • 调节燃气阀组上的最小燃气压力开关 ( 图 18) 至量程的起始位置; • 调节蝶阀上的最大燃气压力开关 ( 图 19) 至量程的终止位置; • 调节燃烧器空气室的风压开关 ( 图 20) 至量程的起始位置。 最小燃气压力开关 最大燃气压力开关 风压开关 D2214 D2213 D2215 图 18 图 19 图 20...
-
Page 57: 喷嘴支架
第 章 启动前准备 喷嘴支架 更换密封圈 (1) (2) (3) (4) 时,建议购买 O 型环 (O-Ring) 组件,代码 20019166。 ARI A/ AI R D9926 图 21 喷嘴 ( 机械雾化 ) 推荐喷嘴 • BERGONZO, 型号 B5 • FLUIDICS, 型号 W2 全系列喷嘴 : Bergonzo B5 45° - 450 - 500 - 550 - 600 - 650 - 700 - 750 - 800 Fluidics W2 50°... -
Page 58: 燃烧器启动及调节
燃烧器启动及调节 空气 / 燃料控制及出力比调系统 概况 空气 / 燃料控制及出力比调的燃烧器管理系统集成在一个控制装置内,该装置集成了一系列功能以使燃烧器获得最优运行效率,适 用于一台燃烧器单独使用或与其它设备同时使用 ( 如双炉膛锅炉或几台并联锅炉运行 )。 基本的系统控制功能包括: 1. 调节空气量及燃料用量,直接使用伺服电机来定位相关阀门;这样可以消除杠杆及机械凸轮 ( 在传统比调燃烧器中使用 ) 系统 中可能发生的问题; 2. 出力比调系统可根据燃烧器所需出力,保持锅炉在所设定的压力或温度下运行; 3. 根据烟道中排出烟气 (O )的分析, 正确并持续调节风量;要实现这一功能需加装一个O 组件, 包括 PLL模块和QGO 传感器; 4. 燃烧烟气的测量 ( 此功能需加装 O 组件 ) ; 5. 正确连接几个锅炉序列 ( 串级调节 )。 此外还有计算机界面和交互功能,可根据不同的系统配置,实现远程控制或集成中央监控系统。... -
Page 59: 压力开关设定
第 章 燃烧器启动及调节 压力开关设定 风压开关 完成燃烧器调试的所有工作后, 再调节空气压力开关, 此前已将其置于起始位置(图24)。 使燃烧器处于最大出力运行,顺时针缓慢旋转压力调节旋钮,增加空气压力开关的设定 值至燃烧器锁定。然后逆时针旋转旋钮设置值的 20% ,重新启动燃烧器以确认燃烧器能 正常运行。 如果燃烧器再次锁定,将旋钮向逆时针方向再调节一些。 注意: 按规定,空气压力开关必须起到将烟气中 CO 的排放量限制在 1% (10.000 ppm) 以内的作用。为此需在烟道内安装烟气分析仪以进行检测,缓慢关小风机进风口 ( 如使 D2215 用纸板将风机入口部分挡住 ), 然后检查燃烧器是否在烟气中 CO 排放浓度超过 1% 前锁 定。 图 24 最大燃气压力开关 完成燃烧器调试的所有工作后,调节最大燃气压力开关,此前已将其置于最大位置 ( 图 25)。 使燃烧器处于最大出力运行,逆时针缓慢旋转压力调节旋钮,降低燃气压力开关的 设定值至燃烧器锁定。... -
Page 60: 检查火焰探测器
维护 检查火焰探测器 电眼 图 27 最小正常工作电流为 70 µA。 如果电流低于该值,可能由于以下原因: D1143 • 光电管失效 ; • 低电压 ( 低于 187 V) ; • 燃烧器调试不正确。 为了测量电流,应在光电管的检测回路中串联一量程为 100 A c.c. 的微安计,如图所示,同时并联安装一只 100 F - 1V c.c. 的电 容器。 定期检查 建议进行如下检查: 月检项目 1 检查火焰检查装置,保证其未被损坏及保持清洁。 2 检查点火装置,如需必要可进行清洁。 3 检查燃料及空气的压力是否正确。... -
Page 61: 问题及解决方案
第 章 维护 问题及解决方案 如果燃烧器不能正常工作,首先需要: 检查电气连接是否正确; 确保燃料供应正常; 3 检查所有调整参数 ( 如锅炉内水温或锅炉气压 ) 设置是否正确。 燃气运行 故障 可能的原因 建议解决方案 燃烧器不启动 • 无电源 ........闭合所有开关 - 检查电气连接 •... - Page 62 第 章 维护 燃气运行 故障 可能的原因 建议解决方案 燃烧器在运行中锁定并停机 • 风压开关故障 ......更换 •...
- Page 63 Appendice - Appendix - 附录 Schema quadro elettrico Control board diagram Note sulla sicurezza per i collegamenti elettrici Notes on safety for the electrical wiring I collegamenti elettrici devono essere esegu - The electrical wiring must be carried out with iti in assenza di alimentazione elettrica.
- Page 64 Appendice - Appendix - 附录 控制面板图示 电气连接安全注意事项 电气连接时必须切断电源。 电气连接必须由具有资质的技术人员进行操 作,且符合安装地的强制标准。参看电气连接 图。 危险 因改变本手册电气连接图或电气连接与图不 符而造成的后果,利雅路公司将不承担任何责 任。 检查确认燃烧器电源是否符合机器铭牌和本 手册描述。 符合安装地强制标准的正确有效的接地系统 能够保证设备的电气安全。必须检查基本安全 要求。如有疑问,需请有资质的人员检查电气 系统。不得使用燃气管做为电气设备的接地系 统。 不要用潮湿的身体和 / 或光脚时接触设备。 不得拉拽电缆。 在进行任何维护、清洁和检查之前,需进行如下操作: 切断主开关系统,断开燃烧器主电源; 危险 切断燃料截止阀。 危险 避免外壳出现冷凝水,冰及水。 危险...
- Page 66 Appendice - Appendix - 附录 Legenda schema elettrico Wiring layout key Pressostato aria Air pressure switch Pressostato gas di massima Max. gas pressure switch Pressostato olio di minima Min. oil pressure switch Pressostato olio di massima Max. oil pressure switch Servomotori Servomotors Valvola pilota gas...
- Page 67 Appendice - Appendix - 附录 电气接线图例 风压开关 最大燃气压力开关 最小油压开关 最大油压开关 伺服马达 点火枪电磁阀 点火枪电磁阀 燃油安全阀 喷嘴阀 点火变压器 主火焰检测管 油枪位置开关 XQRI 火焰传感器连接 XP... 接线 伺服马达连接 燃烧器接线端子板 接线盒部件 燃烧器部件...
- Page 68 RIELLO S.p.A. I-37045 Legnago (VR) Tel.: +39.0442.630111 http:// www.riello.it http:// www.riello.com Con riserva di modifiche - Subject to modifications - 保留修改的权利...
Need help?
Do you have a question about the DB9 LSE C13 TC FS1 A0 and is the answer not in the manual?
Questions and answers