Table of Contents
Advertisement
Quick Links
Advertisement
Table of Contents

Related Manuals for Fortis 700C BAFANG


Summary of Contents for Fortis 700C BAFANG
- Page 1 700C BAFANG MID-DRIVE ELECTRIC BIKE FS7MDSTBBMA...
-
Page 3: Safety And Warnings
SAFETY & WARNINGS Electric Assisted Bike Regulations The EN 15194 EU standard or EPAC (Electric Power Assisted Cycle) conforms to the following characteristics for electric power assisted bikes: • Motor assistance only starts when the cyclist pedals. • The assistance cuts out as soon as the cyclist stops pedalling. •... - Page 4 14. Store the battery in a dry place after having completely recharged it. Avoid extreme temperatures (both low and high) as they can damage the battery. Optimal operating range: -10°C to 35°C. Cleaning and Maintenance • Use a damp cloth with neutral detergent to clean the bike frame. Do not use any detergents or cleaning liquids liable to deteriorate the frame or components.
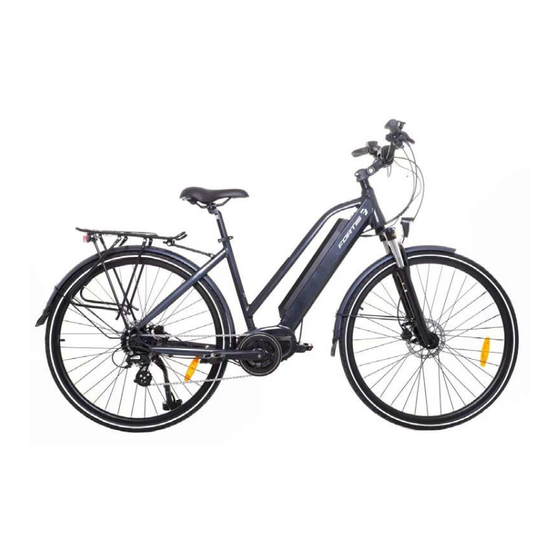
- Page 5 OVERVIEW Basic overview Brake lever Control pad Handlebars Handle grips Seat Handlebar stem Bike frame Seat post Rack Headlight Battery Fork Rear sprocket Front brakes Rear derailleur Pedals Front wheel Crankset Rear wheel Chain...
- Page 6 ASSEMBLY Stem Assembly Stem fitted in the head tube with an expanding bolt (Figure 1). Insert the stem into the head tube, respecting the minimum insertion limit as indicated on the stem and tighten the expanding bolt to 18Nm. Before tightening the stem, make sure that it is in-line with the front wheel. Figure 1 WARNING To prevent steering system damage and possible loss of...
- Page 7 Wheel Mounting Insert the maximum length of the skewer into the wheel hub, tighten locknut and tighten the whole system with the quick release lever (Figure 3). Make sure that the wheel is correctly fitted. Figure 3 Brake Adjustment After installing the front wheel, re-connect the front brake by squeezing the arms together and sliding the cable guide back into the carrier.
-
Page 8: Before First Use
BEFORE FIRST USE Recommendations and Component Control before Use Before using your bicycle for the first time, you must check that all adjustments have been correctly made. • Check that the front and rear brakes work, check brake pads for wear. •... - Page 9 Bearings Check that all bearings are properly adjusted and lubricate if needed. Make sure that they are not too loose or that they have seized up. Check steering bearings, wheel bearings, pedal bearings and bottom bracket bearings. Crank set and Pedals Make sure that the pedals are correctly tightened and that the teeth of the crank set do not show any unusual wear.
-
Page 10: Operation
OPERATION 1. Battery 1.1. Use the Battery Properly • The battery can always be charged at any time no matter how much power is left. However, in the following cases, you should have the battery fully charged. Make sure to use the specified charger to charge the battery. •... - Page 11 2. Display 2.1 Appearance and Dimensions The shell is made of PC (poly carbonate). The liquid crystal interface is made of hard hardness acrylic. 94mm ø 31.80mm/25.4mm/22.2mm 82mm 44mm 22.20mm 41mm...
- Page 12 2.2 Function Overview and Key Definitions Function Overview • The display adopts a two-way serial communication protocol. The external five-key keypad enables users to operate the display conveniently. • Speed display: displaying the real-time SPEED, the max speed MAXS and the average speed AVG.
- Page 13 Items to be Shown on the Display: Maintenance warning Menu Speed display Battery level Distance mode Speed mode Headlight Fault prompt Riding distance display Walk assistance Assist mode Speed mode: Average speed (AVG km/h), maximum speed (MAXS km/h) Speed display: Display of the speed, km/h or mile/h 10-segment battery indication;...
- Page 14 Button overview Headlight Increase (+) Power Decrease (–) Mode (i) 3. Normal Operation 3.1. Turning on • Turn on the power. Press and hold the Power button for 2 seconds to power on the display. • To turn the display off, press and hold the Power button for another 2 seconds •...
- Page 15 3.3. Distance Mode and Speed Mode Switch Press the Mode (i) button to switch distance/speed display information, giving a display of single-trip distance (TRIP km), accumulated distance (TOTAL km), maximum riding speed (MAXS km/h), average riding speed (AVG km/h), Range and OC sequentially. Mode Switch Interface Note: Range and OC settings are displayed in the menu but are non-functioning for this...
- Page 16 3.4. Headlight/ Backlight Switch • After pressing and holding the Headlight button for 2 seconds, both the backlight of the display and the headlight (needing the support of the controller) will be turned on. • Hold and press the Headlight button again for 2 seconds to power off the headlight and the display backlight.
- Page 17 3.6. Battery Level Indication When the battery voltage is normal, the battery is indicated by a certain number of segments with the border lighted according to the actual quantity of electricity. It the battery is under-voltage, all of the 10 segments will black out with the border blinking, indicating that the battery needs to be charged immediately.
- Page 18 In the parameter setting state, when the parameter to be set begins to flash, press the Increase (+) or Decrease (–) buttons to adjust the parameter value. Press the Mode (i) button to switch among the to-be-set parameters. Press the Mode (i) button twice (the interval between the two pressing actions should be shorter than 0.3 seconds) to exit the parameter setting state.
- Page 19 Light Sensitivity: When the speed field displays bL0, press the Increase (+) or Decrease (–) buttons to display a figure between 0 to 5. 0 represents the shutdown of light-sensing function. As the figure increases, light sensitivity gradually increases. After this setting, press the Mode (i) button for shorter than 0.3 seconds to enter the setting interface of backlight brightness.
- Page 20 Automatic Off Time: When the speed field displays OFF, press the Increase (+) or Decrease (–) buttons to display a figure between 1 to 9. This figure indicates the minute that it takes to automatically shut down the display. After this setting, press the Mode (i) button for shorter than 0.3 seconds to enter the setting interface of maintenance warning.
- Page 21 Wheel Diameter View: When the speed position displays Wd, the distance field displays the wheel diameter setting. This is set to 27 inches and cannot be adjusted. After viewing, press the Mode (i) button for less than 0.3 seconds to enter the setting interface of speed limit view.
-
Page 22: Specifications
SPECIFICATIONS Power Supply 36V/48V Rated Current 10mA Maximum Operating Current 30mA Power-off Leakage Current <1uA Operating Current Supplied to the Controller 50mA Operation Temperature -18 ~ 60˚C Storage Temperature -30 ~ 70˚C Waterproof Grade IP65 Storage Humidity 30%-70%... -
Page 23: Troubleshooting
TROUBLESHOOTING Error Code Definitions The MAX-C966 display can give warnings on bicycle faults. When a fault is detected, the icon will be displayed on the LCD screen and there will be the following error code symbol in the speed display field: Definitions of error codes are listed in the table below: Error Code Error Description... - Page 24 Need more information? We hope that this user guide has given you the assistance needed for a simple set-up. For the most up-to-date guide for your product, as well as any additional assistance you may require, head online to help.kogan.com.
Need help?
Do you have a question about the 700C BAFANG and is the answer not in the manual?
Questions and answers